50 Life Hacks That Will Make Your Life Easier

Life hacks improve our efficiency and help us get things done. Life hacks also help us tackle the everyday problems that we face. Today, we have compiled some amazing life hacks that will make your life easier. We hope that these hacks, tips and tricks will optimize things in your life. Let us know your personal life hack in the comments below.

clever life hacks 1


clever life hacks 2


clever life hacks 3


clever life hacks 4


clever life hacks 5


clever life hacks 6


clever life hacks 7


clever life hacks 8


clever life hacks 9


clever life hacks 10


clever life hacks 21

clever life hacks


ideas to make life easy 1


ideas to make life easy 2


ideas to make life easy 3


ideas to make life easy 4


ideas to make life easy 5


ideas to make life easy 7


ideas to make life easy 8


ideas to make life easy 9


ideas to make life easy 10


ideas to make life easy 11


ideas to make life easy


Life Hacks 1


Life Hacks 2


Life Hacks 3


Life Hacks 4

Life Hacks 6


Life Hacks 7


Life Hacks 8


Life Hacks 9


Life Hacks 10


Life Hacks


life-hacks-to-simplify-your-life-4


life-hacks-to-simplify-your-life-9


life-hacks-to-simplify-your-life-10


life-hacks-to-simplify-your-life-11


life-hacks-to-simplify-your-life-12


life-hacks-to-simplify-your-life-14


life-hacks-to-simplify-your-life-15


life-hacks-to-simplify-your-life-16


life-hacks-to-simplify-your-life-17


life-hacks-to-simplify-your-life-19


life-hacks-to-simplify-your-life-20


life-hacks-to-simplify-your-life-21


when you do not have visa card

Sursa: wonderfulengineering.com


100 Clever Life Improving Ideas That You Can Use in Everyday Life

There is always an easy way to do a task. All you need are the right tips for every task. These 100 life improving ideas are meant to help you in carrying out everyday chores. Check out these tips and tell us your favourite tip in the comments section below.

Related: 50 Lifehacks That Will Make Your Life Easier

awesome life hacks


clever life hacks


improve my life 2


improve my life


ketchup-holder-cup-unroll-unfold-the-rim


life hacks 0


life hacks 1


life hacks 2


life hacks 3


life hacks 4


life hacks 5


life hacks 6


life hacks 8


life hacks 9


life hacks 10


life hacks 11


life hacks 12


life hacks


life improving ideas 0


life improving ideas 01


life improving ideas 1


life improving ideas 2


life improving ideas 3


life improving ideas 4


life improving ideas 5


life improving ideas 8


life improving ideas 9


life improving ideas 10


life improving ideas 012


life improving ideas 13


life improving ideas 23


life improving ideas 31


life improving ideas 91


life improving ideas s


life improving ideas


life improving ideas1


life improving ideas12


life-hacks-how-to-make-your-life-easier


life-hacks-how-to-make-your-life-easier-2


life-hacks-how-to-make-your-life-easier-3


life-hacks-how-to-make-your-life-easier-6


life-hacks-how-to-make-your-life-easier-7


life-hacks-how-to-make-your-life-easier-9


life-hacks-how-to-make-your-life-easier-11


life-hacks-how-to-make-your-life-easier-12


life-hacks-how-to-make-your-life-easier-14


life-hacks-how-to-make-your-life-easier-15


life-hacks-how-to-make-your-life-easier-16


life-hacks-how-to-make-your-life-easier-17


life-hacks-how-to-make-your-life-easier-18


life-hacks-how-to-make-your-life-easier-21


life-hacks-how-to-make-your-life-easier-23


life-hacks-how-to-make-your-life-easier-25


life-hacks-how-to-make-your-life-easier-27


life-hacks-how-to-make-your-life-easier-30


life-hacks-how-to-make-your-life-easier-34


life-hacks-how-to-make-your-life-easier-35


life-hacks-how-to-make-your-life-easier-38


life-hacks-how-to-make-your-life-easier-43


life-hacks-how-to-make-your-life-easier-46


7 Simple Exercises That Will Transform Your Body in Just 4 Weeks

The new year has arrived, and with it, thoughts about getting fit and ready for the spring. However, these intentions tend to not last as long as we would like them to.

To get you in shape, we at Bright Side have come up with some simple exercises that will change how you look in as little as four weeks. You won’t have to go to the gym or buy any special equipment — all you need is determination and ten minutes a day.

Plank

A plank is a static exercise, which means you don’t need to move while doing it, but simply hold your body in the correct position instead. To do it right, follow the example shown in the picture and prop yourself on your elbows, forearms, and forefeet. It’s important to keep your back perfectly straight without your waist lowered or your bottom upraised. If you don’t have difficulties keeping your body in the elbow plank, then something’s not right. While in this position, the muscles that keep you straight are being worked, such as the abs, arm muscles, back, and anterior thigh muscles.

Push-ups

To do a correct push-up, assume the plank as the initial position, and then push yourself up with your arms. The most important thing is to keep your back, bottom, and legs in a straight line — this will strain your abs as well as your arms. The next step is to return to the initial position as slowly as possible.

Toning your thigh and bottom muscles

Begin the exercise as shown in the picture, propping yourself on your hands and knees. Then, stretch one leg, trying to keep it straight and not letting it go to the side or bend while raising and stretching the opposite arm at the same time. After that, do the same for the other arm and leg.

Squats

Squatting is all about balance — put your feet shoulder-width apart and stand on the soles of your feet. Then, begin squatting as if slowly sitting down on a low imaginary chair. Your knees and feet should form a straight line. Try to pull the small of your back in as far as you can. You may also help keep your balance by stretching your arms out in front of you, as shown in the picture. When you are down, start pushing yourself up as slowly as you can.

Ab exercises

Lie on your back and stretch your arms up, then slowly raise one of your legs, bent at the knee, and touch it with your hand, as you can see above. Return to the initial position and repeat with the other leg and arm. Don’t forget about the main rule here — the left arm goes to the left leg, and the right arm goes to the right one.

Abs and buttocks

First, prop yourself on your hands and feet so that your body forms a triangle above the floor. Raise one of your legs as high as you can, as seen in the first picture, and then lower it slowly and try to touch the tip of your nose with your knee. Return to the initial position and do the same with the other leg.

Waist

Take up the initial position with your legs set widely apart and slightly bent at the knees and with your back propped against the wall. Then, lace your fingers or take a ball, as shown in the picture, and slowly move your hands from side to side, trying to touch the wall with them and, most importantly, keeping upright.

The four-week plan

Week 1:

Do the following for six days:

2 minutes plank;

1 minute push-ups;

1 minute abs and thighs;

1 minute abs;

1 minute abs and buttocks;

1 minute waist;

2 minutes plank.

Have a ten-second break between the exercises.

Week 2:

Alternate the following sets for 6 days.

Set 1:

3 minutes plank;

3 minutes abs;

3 minutes thighs and buttocks.

Have a 15-second break between the exercises.

Set 2:

3 minutes waist;

3 minutes push-ups;

3 minutes abs and buttocks.

Have a 15-second break between the exercises.

Week 3: repeat the Week 1 set.

Week 4: repeat the Week 2 sets.

If you do everything correctly, you will achieve amazing results in just a month and, as a bonus, develop a habit of doing this simple ten-minute set of exercises every day. And if you want to improve your body even more, then doubling the effort is all you need to do!

Photo credit: popsuga

Sursa: brightside.me


This Simple Guide Will Make You a Guru of Massage

A relaxing massage doesn’t require any specific methods. You can easily give a great massage by following the guide that Bright Side has prepared for you.

First of all, provide a comfortable temperature: it shouldn’t be excessively hot or cold in the room. Take into account the fact that the body cools during the process. It’s better to give a massage on a hard surface, focusing on the neck, shoulders, and back.

1.

Start with light massaging moves. You should move from the shoulders to the waist and back. The movements to the shoulders should be more intense but still soft at this stage.

2.

Use your entire palm during the process. You can start enhancing the moves.

3.

You can pay special attention to the shoulders, as they’re particularly affected by a sedentary lifestyle. Just increase the massage time in this area. You can apply acupressure techniques, gently pressing on specific points.

4.

Don’t massage the spine in any case. When working in this area, move along the back long muscle fibers.

5.

All kinds of limb massage start with light warming strokes. If there are problem areas with localized pain, they should be massaged by pressing on them alternately with thumb pads (first one calf, then the other).

6.

The basic requirements to perform facial massage are: the muscles you’re working with should be maximally relaxed; the massage is performed smoothly, rhythmically, slowly, and painlessly; you move in the direction of muscle fibers; when rubbing the captured skin, gently squeeze it and press to the facial bones.

You can end the massage session with light patting or moving across the back (bottom-up) with your fingertips. This will soothe the skin.

Illustrated by Astkhik Rakimova for BrightSide.me
Based on materials from imgur.com

Sursa: brightside.me


Reflexologia – la fel de eficienta in reducerea durerii ca unele medicamente

Originea reflexologiei isi are radacinile in vechiul Egipt in jurul anului 2.330 I.C., conform unor inscriptii descoperite pe mormantul unui medic (mastaba).

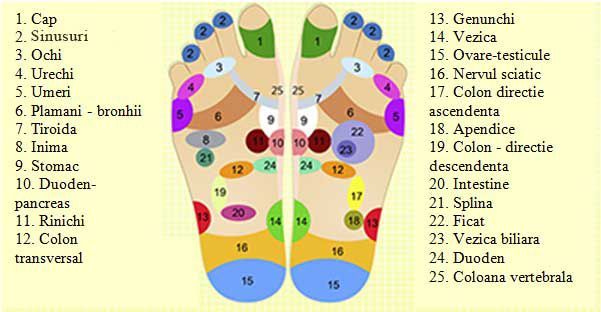
Reflexologia este o stiinta si o terapie holistica. Este o metoda antica de vindecare ce functioneaza in baza conceptului ca pe talpi si in palme exista reflexe si puncte ce corespund fiecarui organ, glanda si parte a corpului. Se foloseste o tehnica de compresie cu ajutorul degetului mare si al aratatorului pentru a face conexiunea dintre aceste puncte si zonele de energie din corp. Reflexologia este aplicabila tuturor sistemelor din corp.

Cum functioneaza reflexologia:

    • Prin zone de energie – chi; presiune exercitata asupra punctelor care au legatura cu alte parti ale corpului.
  • Prin decongestionarea circulatiei sanguine la nivelul capilarelor imbunatatind fluxul de sange in corp.
  • Prin eliberarea tensiunii din corp ca urmare a actionarii asupra sistemului nervos ajutand corpul sa reactioneze intr-o maniera sanatoasa la stimuli si stres. Exista o relatie neurologica confirmata stiintific intre piele si organe.
  • Prin ameliorarea problemelor si tensiunii de la nivelul talpilor.

Ce face reflexologia:

  • Amelioreaza stresul si tensiunea, produce o relaxare “profunda”.
  • Imbunatateste circulatia si fluxul limfei.
  • Creaza homeostaza care ajuta corpul sa se linisteasca sau sa se revigoreze.
  • Reduce durerea la nivelul picioarelor si creaza o mai buna flexibilitate.

Eunice D. Ingham, fondatorul Metodei Ingham de reflexologie, a scris intr-un fragment din cartea sa , ca

“…reflexologia este un mijloc de a echilibra circulatia. Stim ca circulatia inseamna viata. Stagnarea inseamna moarte. Tot ce se afla in jurul nostru si este viu se afla in miscare.”

Intr-o sesiune de reflexologie se actioneaza asupra depozitelor (alcatuite din calciu sau fosfor anorganic, acid uric, acid lactic sau chiar substante poluante din aer, apa sau alimente, care nu au putut fi eliminate de plamani, ficat, rinichi sau piele) care se afla in vasele mici de sange ale extremitatilor. Aceste depozite sunt impinse de la nivelul terminatiilor nervoase in decursul sesiunii de reflexologie si sparte.

Reflexologie

Exista peste 7.200 de terminatii nervoase in fiecare talpa. Terminatiile nervoase din talpi sunt legate, la randul lor, prin coloana vertebrala si creier, cu toate partile din corp.

Cercetatorii de la Universitatea din Portsmouth au descoperit in urma unui studiu ca oamenii au resimtit cu aproximativ 40% mai putina durere marindu-si in acelasi timp rezistenta la durerea fizica in medie cu 45% atunci cand au folosit reflexologia ca metoda alternativa de ameliorare a durerii.

Astfel de rezultate nu pot decât sa indice ca reflexoterapia ar putea fi folosita in completarea tratamentelor conventionale pentru tratarea afectiunilor ce implica durere fizica, precum osteoartrita,durerile de spate dar si unele tipuri de cancer.

Talpile si palmele sunt folosite in reflexologie pentru ca sunt ca o reflexie la scara mica a corpului. Talpile si palmele gazduiesc o multitudine de terminatii nervoase. Sunt locatia perfecta de lucru – pacientul se simte in siguranta si in plus tehnica nu este una invaziva.

Surse:

http://www.telegraph.co.uk/news/science/9981099/Reflexology-as-effective-as-pain-killers.html

http://www.cancerresearchuk.org/about-cancer/cancers-in-general/treatment/complementary-alternative/therapies/reflexology

http://barefootprof.blogspot.ro/2011/04/foot-anatomy-101-biofeedback.html

http://www.reflexology-usa.net/facts.htm

Sursa articol: viataverdeviu.ro


Seven fantastic exercises to give you a healthy spine

Back pain is no joke. Regardless of whether someone has a highly active lifestyle or is completely lazy, every one of us risks damaging our spine through our everday activities.
Luckily for you, we’ve found a few simple, but very effective exercises which are guaranteed to help you get rid of back pain you might experience.

Exercise 1

Lie on your back. Bend your right leg at the knee. Stretch out your left leg above your head. Grasp it with both hands under the knee, and pull it towards your torso. Hold this pulling motion for 30 seconds. Repeat this exercise twice for both legs.

Exercise 2

Lie on your back and bend both legs at the knee. Grasp your left leg with both hands at the knee and pull it towards your torso. Hold the position for 20 seconds. Repeat the exercise twice for both legs.

Exercise 3

Lie on your back. Stretch your right arm out to the side, at a right angle to your body. Stretch your left leg out so that it is straight. Try to stretch your right knee towards your left side, so that it almost touches your left hand. Hold this position for 20 seconds. Repeat the exercise twice for both knees.

Exercise 4

Lie on your back and bend your left leg at the knee. Place the lower half of your right leg crosswise over your left thigh, with your knee pointing out sideways at a right angle. Carefully pull your left leg towards your head. Hold this position for 30 seconds. Switch the position of your legs and repeat.

Exercise 5

Lean on the floor on your using your right knee and stretch out your leg behind you. Your left leg should be bent at the knee. Hold this position for 30 seconds. Repeat the exercise with the position of your legs changed.

Exercise 6

Lie on your right side. Bend your left leg at the knee, grasping your ankle with your left hand. Carefully pully on your ankle with your hand, thereby tensing the muscles in your left thigh. Your spine should not be bent to any great extent. Hold this position for 30 seconds. Then lie on your left side and repeat the exercise.

Exercise 7

Stand arms’ length from a table. Bend your upper body forward, slightly bending your legs at the knees, to the point where you can touch the edge of the table with both hands. Your arms should be stretched out and your head at the level of your shoulders. Hold this position for ten seconds. Then stand up straight and bend your body to each side, one after the other.

Once you’ve done all this, we promise you’ll fee great!

Photo credit: Vera Golubeva

Sursa: brightside.me


Cum să întreții mașina ca să reziste câteva decenii. 5 aspecte esențiale pentru a-i prelungi viața

Mașina ta va merge fără nicio problemă sute de mii de kilometri, dacă respecți câteva reguli de întreținere. Un mecanic de la American Automobile Association îți spune ce ai de făcut.

În prezent, mașinile care ies pe porțile fabricilor sunt din ce în ce mai rezistente. Mike Calkins, managerul departamentului tehnic din cadrul American Automobile Association (cunoscut sub numele de Triple A) spune ca mașinile noi rezistă fără probleme peste 320.000 de kilometri, dacă șoferii au grijă de ele. Iată care sunt cele mai importante lucruri de care ar trebui să ții cont pentru ca mașina pe care o ai să te țină câteva decenii:

1.    Ce ulei de motor să folosești

Uleiul de motor joacă un rol important în întreținerea mașinii și nu este suficient să iei repede unul de pe raft de la benzinărie. Citește cu atenție manualul care a venit cu mașina, în el se menționează care este uleiul recomandat pentru autoturismul tău. Ei bine, dacă ignori această informație, motorul nu va funcționa la capacitate maximă. Producătorii știu cel mai bine ce ulei este benefic pentru mașina ta, așa că este în avantajul tău să ții cont de asta.

Cu cât te vei informa mai bine, cu atât mai bine îți vei îngriji mașina. Nu e deloc greu să găsești produsele potrivite. Printre aceste tipuri de ulei de motor sigur vei găsi exact ce ai nevoie, pentru că este cel recomandat de cei mai mulți producători de motoare din lume. După cum vezi, fiecare tip se pliază pe nevoile mașinii –  de la cel pentru automobile noi, până la uleiul pentru cele mai vechi sau cel care ajută la creșterea performanței motorului.

Ține cont și de faptul că unii producători nu îți repară mașina când încă e în garanție dacă nu ai folosit produsele recomandate. Este un serviciu pe care ți-l faci și ție, și mașinii.

2.    Verifică roțile o dată pe lună

Un alt lucru pe care ar trebui să-l faci este să verifici o dată pe lună roțile. Dacă ele sunt bine umflate tu vei avea parte de un drum mai lin și un consum mai bun. E foarte simplu să-ți faci un obicei din asta, mai ales că te ajută să faci și economie la carburant. Un alt lucru pe care ar trebui să-l verifici periodic este geometria roților. Dacă observi că mașina nu ține drumul drept, e cazul să faci o vizită unui service, pentru că această problemă duce la o uzură inutilă a unor piese.

3.    Ce trebuie neapărat să faci după un anumit număr de kilometri

Un alt sfat de luat în calcul este să schimbi o dată la 10.000 de kilometri uleiul și filtrul de ulei, să schimbi pozițiile cauciucurilor (ca să se uzeze la fel toate), să verifici și lichidul de răcire a motorului. O data la 50-60.000 de km schimbă filtrul de polen. Acești pași sunt foarte importanți pentru ca mașina să dea randamentul pe care îl promite producătorul.

4.    Mergi periodic la service

Nu rata nicio revizie, dacă vrei ca mașina ta să meargă la capacitatea sa maximă. Vizitele periodice la un service sunt esențiale pentru a schimba piesele uzate și așa numitele consumabile. În plus, orice zgomot nefiresc pe care îl scoate mașina ar trebui verificat de un profesionist, așa încât problemele să fie preîntâmpinate înainte ca mașina să te lase când ești la drum.

5.    Folosește piese auto de calitate

Piesele auto noi și originale pot costa destul de mult, însă asta nu înseamnă că trebuie să faci compromisuri când vine vorba despre ele. Mai mult decât atât, dacă un preț ți se pare prea mic, e posibil ca piesele să fie contrafăcute și chiar să-ți pună în pericol siguranța la volan. Dacă vrei să te bucuri cât mai mult timp de mașina ta, cumpără piese originale.


Sursa: auto-bild.ro


20 clever tricks for YouTube that no one knows about

outube is undoubtedly one of the best sites on the net. There are millions of people watching videos and movies on it at any moment. But there are plenty of tricks you can apply to make your viewing experience more enjoyable and more simple. We put together 20 of the best ones.

1. How to make GIFs

Just add the letters „GIF” at the start of the YouTube URL, like this:

You will be taken to the YouTube to GIF website, where you can set the length of the GIF you want to create and give it a title.

2. How to find your favourite artist’s page

Simply write # + the artist’s name (without spaces) in the search bar:

You can find full albums of any given artist in the Albums section.

Musixmatch is a free app for Chrome which provides subtitles for music videos. It contains the lyrics to more than seven million songs in 32 different languages.

MooMa.sh can help you identify any song or melody playing in a YouTube video. All you have to do is copy and paste the link.

5. How to use Theatre Mode

If you click on the small rectangle in the lower right corner of the video, it will be displayed in ’theatre mode’.

6. How to use Autoplay

Toggle the Autoplay button to prevent the next video from starting automatically once the one you are currently watching has finished.

7. How to check the definition of a video

The Video Quality Report programme from Google allows you to check the quality of videos which your provider offers.

Go to byoutube.com/testtue and select the Try out the redesigned YouTube player function. You’ll be able to test the new player design, which has a transparent status bar that lets you set any screen resolution you want.

9. How to watch YouTube on our TV

You can start a video on your smartphone or tablet and then watch it on a larger screen via a WiFi-enabled SMART TV.

To do this, open YouTube on your device, launch a video and then find your TV’s WiFi through the app. Your device should only be connected to that one Wi-Fi network. It normally finds it automatically, but it can be done manually as well.

10. How to share a video from a certain point

Press the control key and right click the mouse and select the second option to share a video to another website which starts at a point other than the beginning.

11. How to make YouTube safe for your kids

The YouTube Kids app for iOS and Android offers videos which are suitable for children to watch.

If a video is stuttering because of your slow connection go to youtube.com/account_playback and click on the second option.

13. How to quickly find a specific video you’re looking for

In order to find a specific video, you can add the following words to your search terms:

— “channel“ or ”playlist”;

— “HD“ for higher definition videos, or ”3D” for videos in 3D;

— add quotation marks and the plus and minus signs in order to get more refined search results.

14. How to turn a YouTube audio track into an MP3

Simply go to the Peggo website.

15. How to make your own video playlist

The site Solon can combine videos from YouTube and Vimeo, as well as audio files from SoundCloud, into one playlist.

16. How to watch a video in a ’floating’ window

Floating YouTube is an app for Chrome which lets you play a YouTube video in a window which ’floats’ above the rest of the screen, allowing you to get on with other things simultaneously.

17. How to change the speed of a video

If you click on the gear symbol in the lower right corner of any video on YouTube, you will be able to change its speed.

Slowing down a video can be very useful when you are watching instructions on how to do something.

If you are registered on YouTube, go to privacy settings and check the boxes to make sure no one can see what channels you subscribe to.

19. How to use keyboard shortcuts

  • K = pause or play
  • J = rewind 10 seconds
  • L = fast forward 10 seconds
  • M = turn off the sound
  • Number 0 = jump to the start of the video
  • Numbers 1 to 9 = jump to between 10% and 90% of the way through the video.
  • “+“ = Increases font size
  • ”-” = Reduces font size

20. How to download videos from YouTube

There are several sites and apps for Chrome to help you do this. Here’s one of the best:

  1. Save From Net. You simply have to copy the video link, and it won’t take long.

Google Chrome users can install the Adblock for YouTube extension. Now you’ll be able to watch videos without any waiting!


Sursa: brightside.me


20 of the best poses for a photo shoot

This post will come in handy not only for photographers looking for inspiration, but also all the ladies out there who want to look great in every shot. Here are some of the best poses which highlight your best features and hide even the most obvious imperfections. You’ll be a supermodel in no time.


  1. This is simply a great angle which always make you look slimmer. The model faces the camera side-on, with her chin pushed down and her shoulders slightly raised.


  1. Often, the most straightforward poses turn out to be the best ones. Here, the model should put her body weight all on one leg, bending her overall stance slightly so that her silhouette is ‘s-shaped’.


  1. Here the model lightly touches a vertical surface, such as a wall or a tree, with both hands. This is a great pose for taking a portrait shot.


  1. If the model has long hair, definitly try to take an ‘action shot’ of her while she is moving. A good way to do this is to have her turn her head sharply.


  1. This is a great, comfortable pose which can be used when taking photos at home, in a studio, and in many other locations.


  1. This is a great pose for when the model is sitting on a sofa.


  1. This is a superb choice for a shot when the model is sitting on the ground. She can be photograped from many different positions.


  1. This pose is ideal for an artistic shot. There are a huge number of positions for the head, arms and legs which can be adopted.


  1. It’s believed that folded arms and legs create psychological barrier between people, and therefore is not recommended for photographs. However, it’s worth trying a shot where the model has her arms folded across her chest. 


  1. However, you don’t always have to worry too much about where to put the arms. It’s perfectly OK to leave them in a relaxed position at one’s sides. The same goes for the legs, although remember that body weight should always be on one foot only.


  1. This pose is ideal for a full-length photo. The model’s hands should be placed either partly or fully in her pockets. 


  1. Placing the hands behind the back, whilst unusual, is nevertheless an interesting idea for a photo, which gives the model an open, sincere look. The option is also available here to have her lean against a wall.


  1. Having the model sit or lean against something is also a great idea. This can work for shots taken both indoors and outside.


  1. This is another great pose for a full-length shot. It really brings out the model’s femininity.


  1. This interesting pose involves adopting a perspective from below. The model’s upper half should be raised slightly, whilst her head should be inclined downwards. The legs are bent at the knees and the feet are folded across each other.

  1. A really beautiful pose which brings out the model’s desirability and femininity.


  1. The most important thing to get right with this pose is the position of the legs. Also, the model should wear high heels to get the best effect.


  1. A nice sentimental pose. The model should be kneeling, but not leaning too hard on her feet. She should also be looking over her shoulder.


  1. A great pose for taking a full-length shot by a wall. The model’s back should be at the centre of the picture.


  1. Finally, we have this highly elegant pose. The model should be leaning forward slightly whilst sitting on the edge of the sofa, bed or bench.

Source: lepser.ru

Sursa: brightside.me


69 combinatii pe tastatura care iti usureaza munca. E bine sa le stii!

In Windows:

  1.  Ctrl+C – copiere.
  2.  Ctrl+N – crearea unui nou document.
  3. Ctrl+O– deschide.
  4. Ctrl+S – salvează.
  5. Ctrl+V – inserează.
  6. Ctrl+W – închide fereastra.
  7. Ctrl+X – taie.
  8. Ctrl+Y – repetă acțiunea anulată.
  9. Ctrl+Z – anulează ultima acțiune.
  10. Ctrl+Home – reîntoarcere la începutul documentului.
  11. Ctrl+End – revenire la sfârșitul documentului.
  12.  Windows+E – deschide browserul Windows (Explorer).
  13. Windows+D – închide toate ferestrele, accesează desktopul sau restabilește toate ferestrele.
  14. Windows+U – deconectează computerul.

MS Word:

  1. Ctrl+Space – șterge formatarea din spațiul selectat. Schimbă formatul textului scris.
  2. Ctrl+0 – schimbă intervalul între aliniate.
  3. Ctrl+1 – plasează un interval obișnuit între rânduri.
  4. Ctrl+2 – plasează un interval dublu între rânduri.
  5. Ctrl+5 – plasează un interval de 1,5 între rânduri
  6. Alt+Shift+D – inserează data actuală.
  7. Alt+Shift+T – inserează ora actuală.

MS Excel:

  1. F2 – deschide fereastra și permite redactarea.
  2. Ctrl+space – alege coloana.
  3. Ctrl+Enter — inserarea în coloană a datelor.
  4. Shift+space – alege rândul.
  5. Ctrl+Home – mutarea la începutul documentului, celula A1 devine activă.
  6. Ctrl+Page Up – mergi la pagina următoare.
  7. Ctrl+Page Down – mergi la pagina anterioară.

Google Chrome: 

  1.  F11 – deschide fereastra pe întreg monitorul, pentru a reveni la normal, reapeși F11.
  2. Alt+Home — deschide pagina HOME.
  3. Backspace sau Alt+săgeata stângă – întoarcerea la pagină anterioară, conform istoriei.
  4. Shift+Backspace sau Alt+săgeata dreaptă – deplasarea în pagina următoare conform istoriei.
  5. Ctrl+Shift+Delete – deschide pagina „Șterge istoricul”.
  6. Ctrl+Enter – adaugă www. înaintea scrii adresei și .com după(prin urmare google devine www.google.com).
  7. Ctrl+Shift+N – deschide o fereastră în modul incognito.
  8. Ctrl+Tab sau Ctrl+Page Down – deschide un nou tab.
  9. Ctrl+Shift+Tab sau Ctrl+Page Up – trecerea la tab-ul anterior
  10. Ctrl+Shift+T – din nou, deschide pagina accesată anterior.
  11. Ctrl++ (plus) – zoom +.
  12. Ctrl+– (minus) — zoom – .
  13. Ctrl+0 – redă paginii zoom-ul standard (100%).
  14. Ctrl+D – salvează pagina în bookmarks.
  15. Ctrl+F sau Ctrl+G – deschide fereastra de căutare.
  16. Ctrl+H – deschide pagina cu istoric.
  17. Ctrl+J – deschide pagina cu descărcări.
  18. Ctrl+N – deschide o fereastră nouă.
  19. Ctrl+P – permite imprimarea paginii deschise.
  20. Ctrl+R sau F5 – face refresh paginii.
  21. Ctrl+S – salvează pagina deschisă.
  22. Ctrl+T – deschide un nou tab.

Mozila Firefox:

  1. F5 – face refresh paginii.
  2. Shift+space – derulează pagina în jos.
  3. Alt-Home – deschide pagina HOME.
  4. Ctrl+Shift+T – din nou deschide un tab.
  5. Ctrl++ (plus) – zoom +.
  6. Ctrl+- (minus) — zoom -.
  7. Ctrl+D – salvează pagina ca marcaj.
  8. Ctrl+F – deschide căsuța de căutare a textului.
  9. Ctrl+T – deschide o fereastră nouă.

Gmail:

  1.  Tab+Enter – expediază o scrisoare.
  2. A – trimite un răspuns tuturor.
  3. C – scrie o nouă scrisoare.
  4. F – redirecționează scrisoarea.
  5. N – deschide următoarele scrisori din listă.
  6. P – deschide scrisorile anterioare din listă.
  7. R – scrie răspuns la scrisoare.
  8. G+C – deschide agenda contactelor.
  9. G+I – deschide mapa scrisorilor primite.
  10. Ctrl+S – salvează scrisoarea ca ciornă.

Sursa: eustiu.com