No matter where you are, get that body fit with this new and wonderful 7-minute workout. It requires no gym equipment whatsoever, therefore no excuses. All you need is in your house already, a chair, a wall and your own body weight.
This routine combines the best 10 exercises to burn calories and stay fit and strong, and you should do each for 30 seconds with a 10 second rest in between in order for the workout to be effective.
Remember to always keep your abdominal muscles contracted in every exercise and in every position as well.
#1 Jumping Jacks The first step is to stand up straight with your feet together and your arms at your side, then bend your knees slightly and follow this with a jump. In mid-jump, bring your legs out to the side about shoulder width or slightly wider. As you are moving your legs outward, you should raise your arms up over your head to elevate your heart rate.
#2 Wall Sit Stand approximately 2 feet in front of a wall with your back facing it, and lean against the wall slowly and begin to slide down the wall until your knees are bent at 90 degree angles, as though you are sitting in a chair. Keep this position for a minimum of 20 seconds or a maximum of 60 seconds.
#3 Push-Up This exercise is great for targeting your pectoral muscles, triceps, and anterior deltoids. Push-ups are performed by pushing your body up and down using your upper body and arm strength. To do a correct push-up, you must raise your body up onto your toes so you are balanced on your hands and toes. It is important to keep your body in a straight line from head to toe without sagging your torso or arching your back.
#4 Abdominal Crunch Lie on the floor, facing up, with your knees bent, then curl your shoulders towards your pelvis. You can either place your hands beside your neck, resting gently behind your neck, or placed across your chest. To perform a proper crunch, your lower back must remain resting against the floor allowing your hip flexors to rest so all of the attention can be focused on your abdominal muscles.
#5 Step-Up onto Chair The step-up onto chair routine is super effective for your body. Not only does it work on your abdominal muscles, but it also builds lean muscle mass, boosts your metabolism and aids in weight control – Bonus!
Position a sturdy chair in front of you and stand with your feet about hip-width apart and your arms at your sides. Next, step up onto the seat with one foot and press down while bringing your other foot up next to it. Step back with the leading foot and bring the trailing foot down beside it to finish one complete step-up.
#6 Squat To perform a proper squat, your feet should be flat on the ground, about shoulder-width apart and point your feet slightly facing outward, rather than straight ahead. Never let your knees extend beyond your toes, as this will increase the likelihood of damage to your knees. Keep your back straight and bend at your knees as if you were going to sit back in a chair, thrust your hips forward and pull in your abs whilst keeping your back only slightly arched. Slowly lower your body so that your legs are almost parallel to the floor.
#7 Triceps Dip On Chair Sit on the chair with the palms of your hands on the edge, and then slowly slide your buttocks off the seat whilst supporting your weight with your hands. First, straighten your right leg and keep your left leg bent at a 90-degree angle keeping your elbows bent all the time, slowly lower your buttocks towards the floor. Push back up until your arms are straight.
#8 Plank This exercise is vital for building your core and arm strength.
Lie face down on the floor with your elbows resting on the floor and your arms in a 90-degree position. You then push down on the toes of your feet to extend your feet and push your body so it is off the ground and resting on your elbows and toes. Hold the position for as long as you can.
#9 High Knees Running In Place Perform a typical running motion while lifting your knees high into the air. Ensure that your legs are at 90-degree angles when being lifted high into the air and point your toes forward in order to maintain the correct form and to really benefit from this simple exercise. This exercise is great for the muscles in your legs and hips, and can even improve your lower body flexibility.
#10 Lunge Lunges are great for toning a number of different areas of your body, so they are a particularly useful exercise.
To perform a basic lunge, you must first begin by standing up straight with your shoulders back and relaxed and your chin up, step forward with one leg, lowering your hips until both knees are bent at about a 90-degree angle. Maintain the weight in your heels as you then push up to the starting position.
In cazul in care te confrunti zilnic cu dureri de spate si orice ai incercat pana acum, pur si simplu nu te-a ajutat deloc, de azi inainte nu va mai fi asa intrucat Echipa Secretele iti va dezvalui un set de 4 exercitii pe care sa le faci chiar la tine acasa, seara dupa ce te intorci de la serviciu, exercitii ce te vor ajuta sa scapi de dureri fara ajutorul calmantelor.
Citeste mai jos despre ce exercitii este vorba si cum sa le faci la tine acasa:
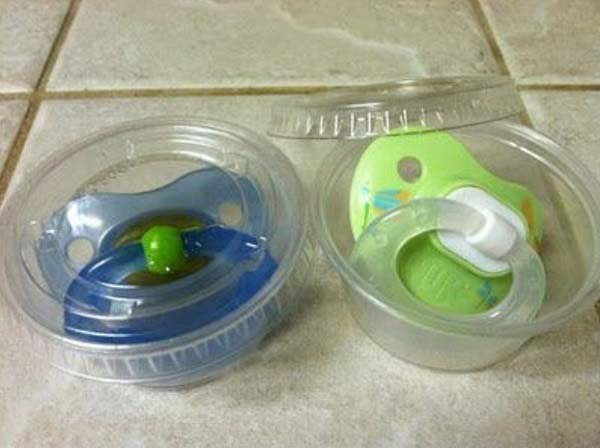
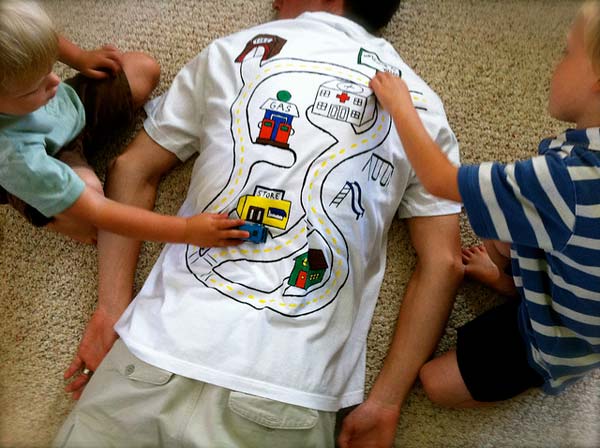
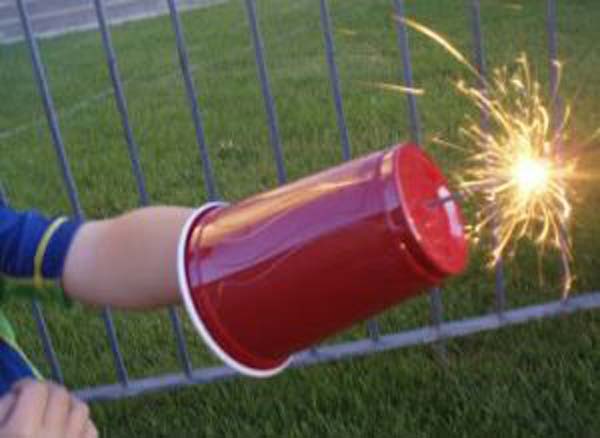
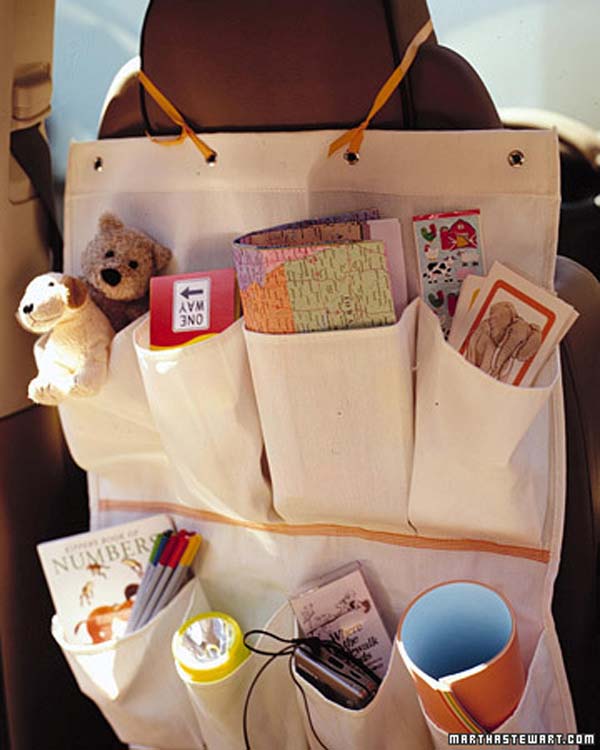
27 Genius Parenting Hacks To Make Parenting Life Fun & Easier
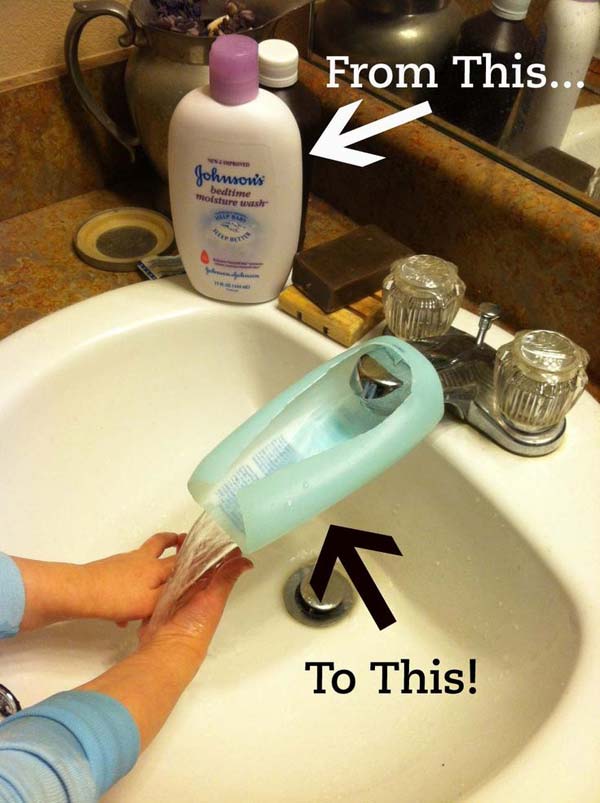
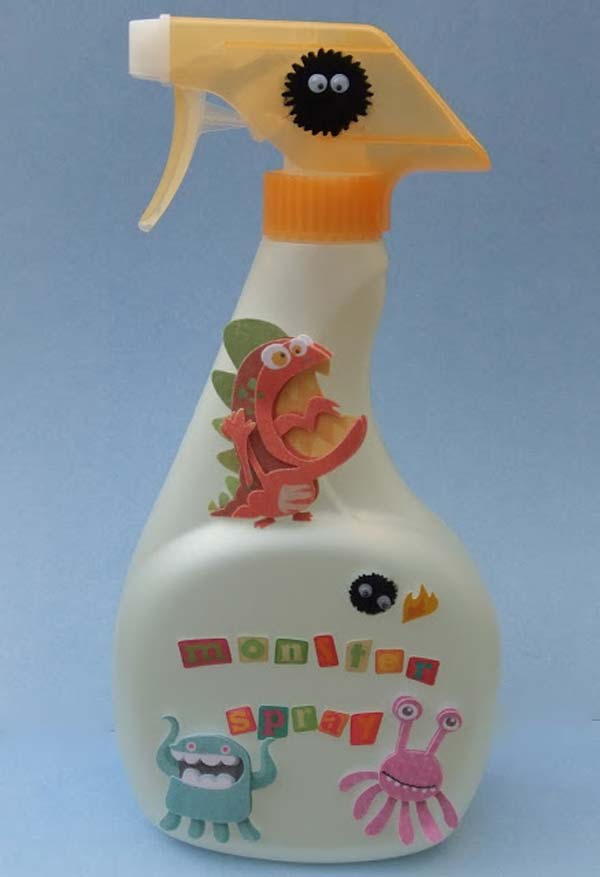
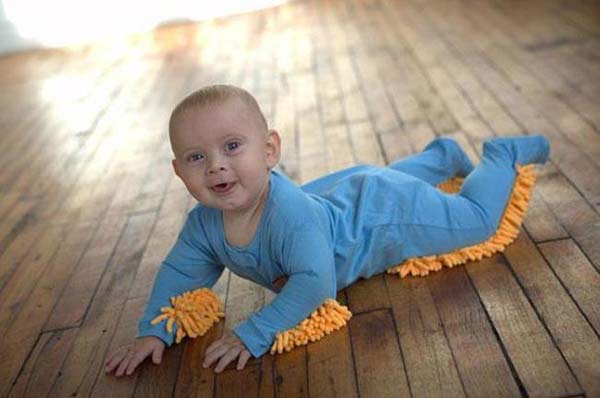
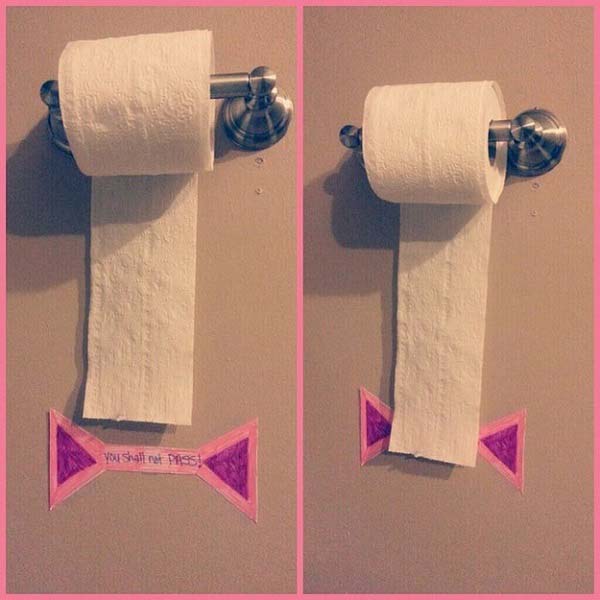
As a parent, you must be also and always worried about your kids. They are small and vulnerable. You should take good care of them to make them grow up happily. But parenting is never an easy job, sometimes you feel tiresome and helpless. To be a “good parent”, maybe you are always asking are there any hacks that help me? Luckily yes. Don’t be despair! Come to us, we can help you. Here are all kinds of funny parenting hacks you can find to solve your troubles. The hacks here make the life full of smile both you and your child, and let you be a perfect parent. Enjoy!
1. Prevent Your Child’s Toys From Floating Away In the Bathtub
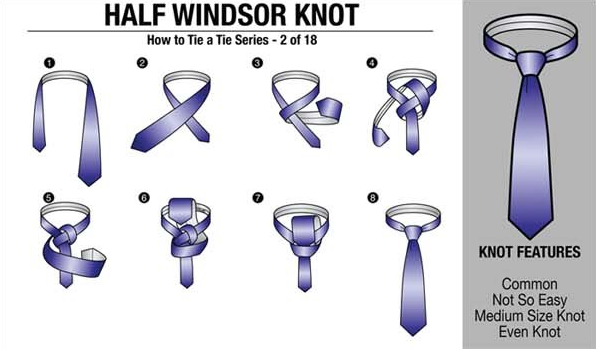
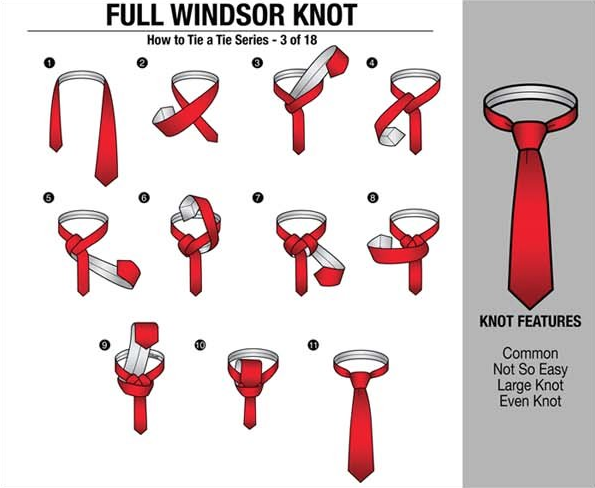
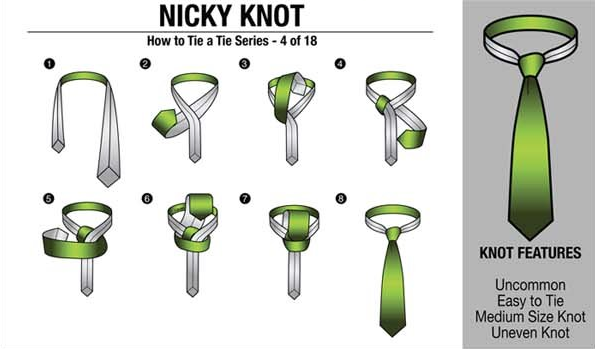
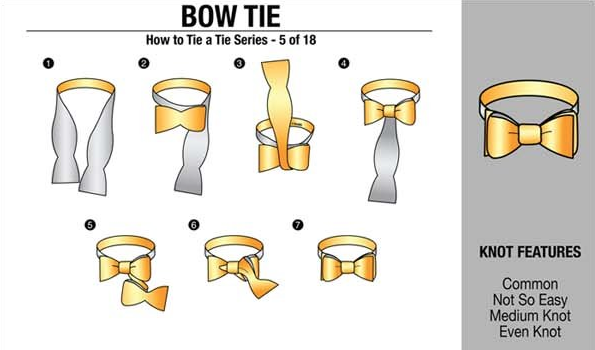
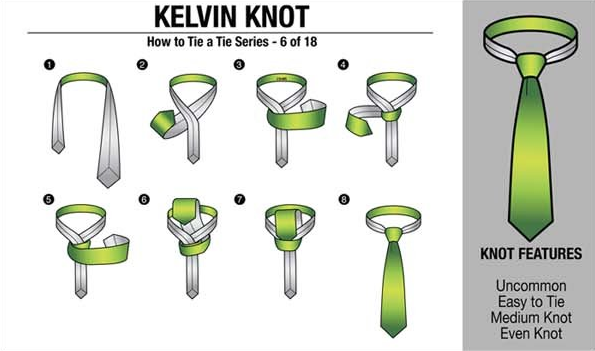
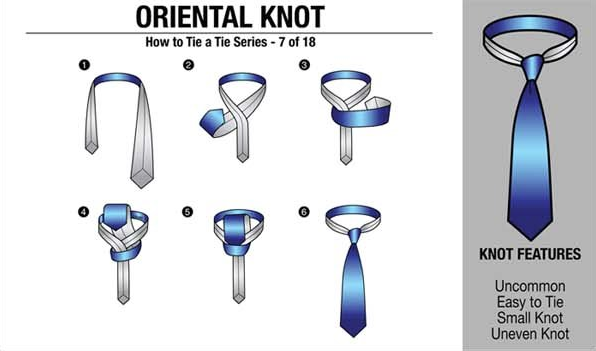
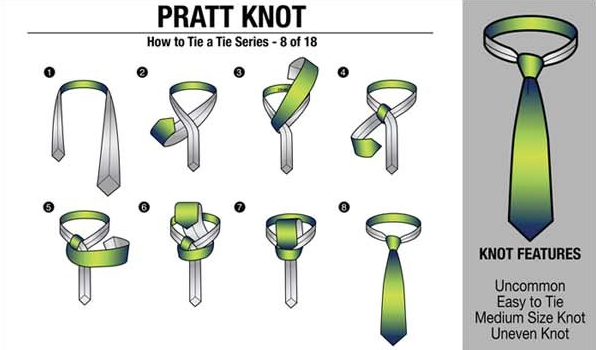
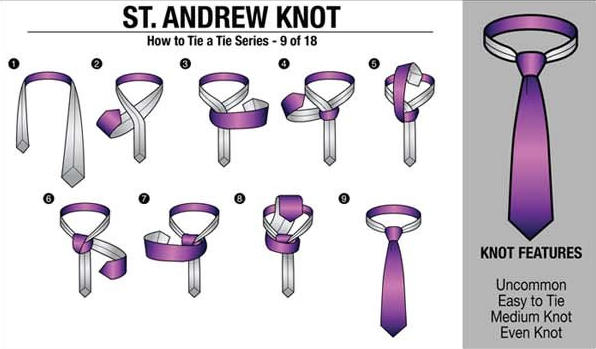
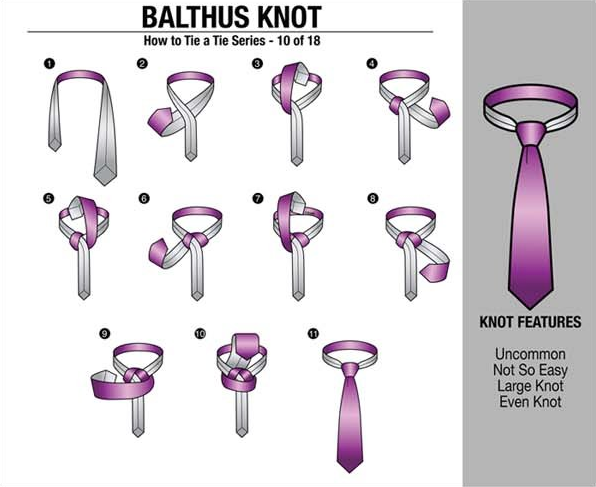
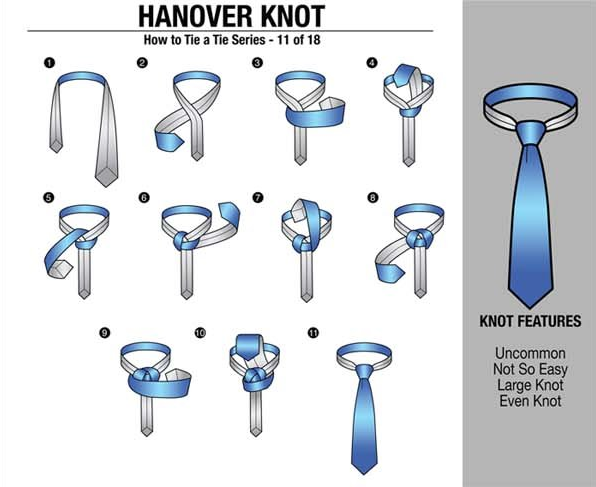
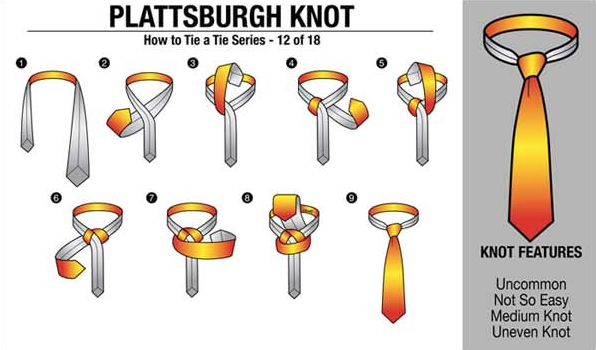
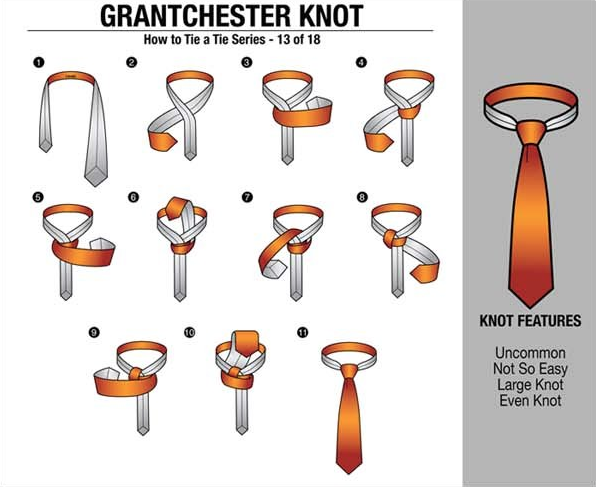
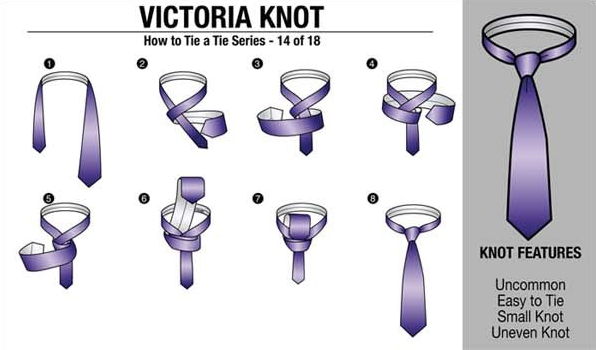
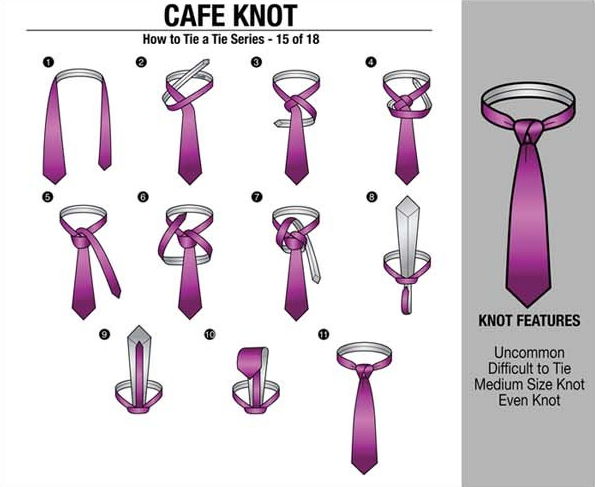
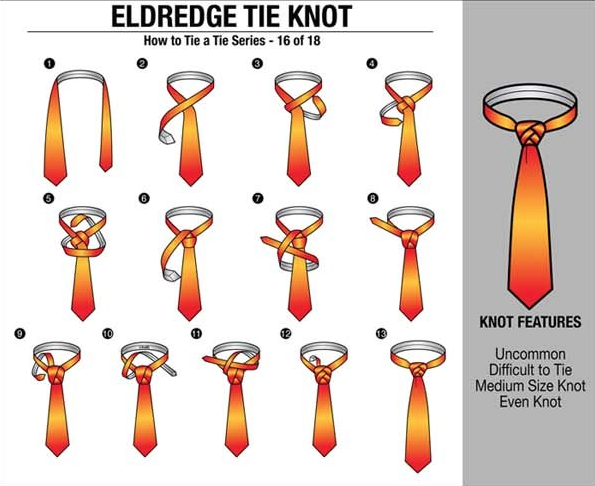
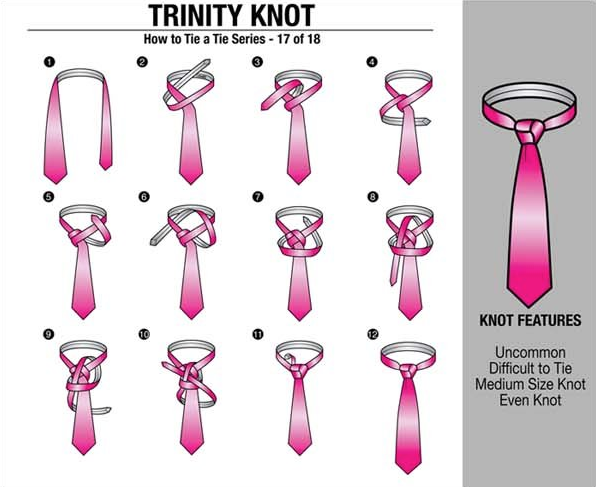
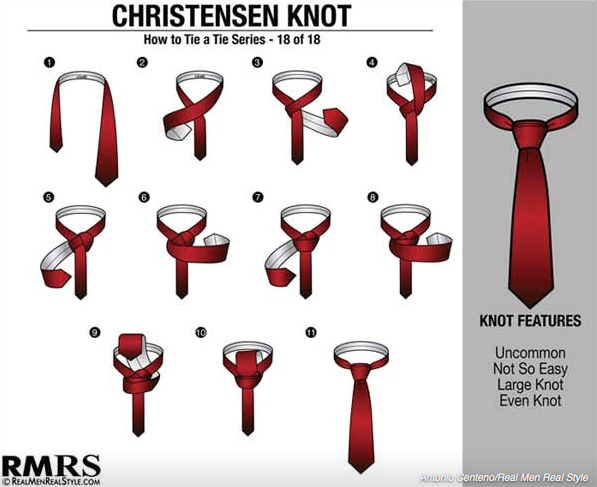
Most men use one tie knot their entire lives. You could say it’s because we’re creatures of habit -that we’re boring- that we don’t like to experiment and try new things.
Well, I think that’s a bunch of BS! No, I think most of us tie one necktie knot as we don’t have an easy guide showing us why and how to experiment with others ways to tie a tie. Well now you do!
Here are 18 very clear and succinct diagrams showing you how to tie various necktie knots for work and casual wear. The Knots listed are:
How Should a Suit Fit? Your Easy-to-Follow Visual Guide
If you’re dressing on a budget, one of the most popular pieces of advice out there is to buy off-the-rack suits in the best fit you can get, and then take them to a tailor for custom adjustments.
That’s good advice. You’ll find it in several articles right here on the Art of Manliness.
But if you’re really going to get any benefit out of having your suits adjusted, you need to know a little bit about tailors and the kinds of adjustments they can (and can’t) make.
You also need to know what a “good” fit actually looks like.
Tailors vary in skill and in how they communicate the work they’re doing, so getting a suit adjusted is only going to deliver a good return if you can make your exact needs clear.
Below, we give you an easy-to-follow rundown on how your suit should fit.
What a “Good Fit” Looks Like
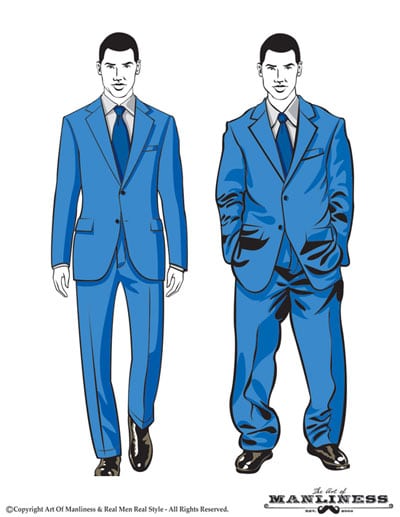
Can you guess which man had his suit tailored to fit?
When you try on a suit, you’re looking for a good fit in what’s called your “natural stance.”
That means standing up straight, preferably in the kind of dress shoes you’ll be wearing with your suits, with your arms relaxed at your side.
It’s not actually a very natural posture for a lot of us, but it is the base from which most of our movement flows. If the suit doesn’t fit well in this stance, it’s not going to move comfortably with your body either.
Practice standing in that relaxed, upright pose, and then start trying on suits in that posture. Look for a good fit in the following areas when you’re in your natural stance:
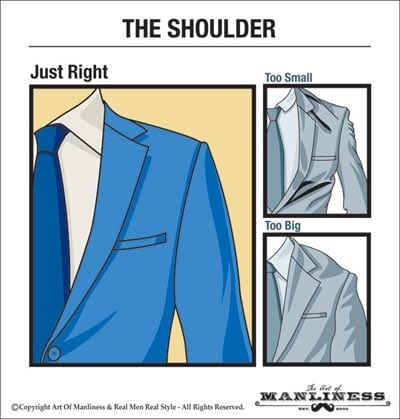
The Shoulder
A well-fitted shoulder lies flat. The seam on top of the shoulder should be the same length as the bone under it, and should meet the sleeve of the suit right where your arm meets your shoulder.
If the seam that connects the sleeve to the jacket is hiked up along your shoulder bone, or dangling down on your upper bicep, the jacket is never going to sit properly. In these instances, you’ll see “ripple effects” that create lumps or wrinkles on the sleeve and the top of the jacket.
Shoulders are one of the hardest parts of a jacket to adjust after construction, so don’t buy a piece with an ill-fitted shoulder. Odds are you’ll never be able to get it quite right with post-purchase alterations.
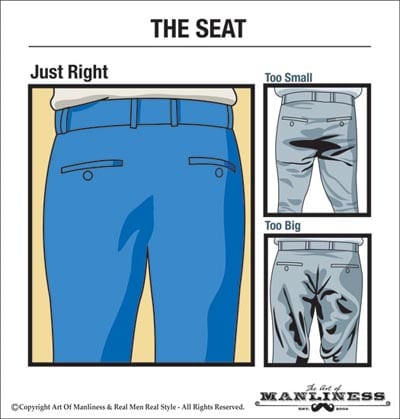
The Seat
The back of your trousers should be a smooth drape over the shape of your rear end — whatever that happens to be.
A good fit in the seat will lie loosely against your underwear, without pulling tight against your butt or draping loosely down your thighs.
You can spot a bad fit in the seat when there are horizontal wrinkles just under the buttocks (caused by too tight of a fit), or by loose, U-shaped sags on the backs of the thighs (caused by too loose of a fit).
A tailor can “take in” a seat to make it tighter in the back without too much difficulty, but there’s a limit to how far he can go. If the seat was way too loose to begin with, it’s not possible to adjust it to fit without pulling the pockets out of place.
Unless the pants have an unusual amount of spare cloth on the inside, seats can’t be “let out” very far to make the fit looser. Err on the side of too loose rather than too tight when buying.
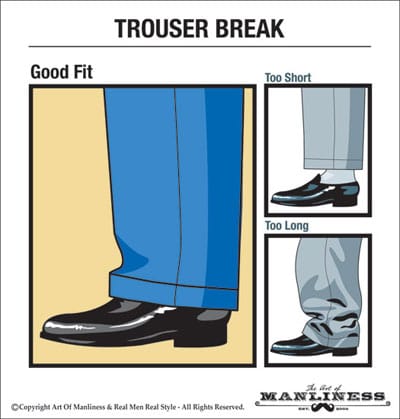
Trouser Break
The “break” is the small wrinkle caused when the top of your shoe stops your trouser cuff from falling to its full length.
This should be a small, subtle feature. One horizontal dimple or crease is usually ideal. The cuff should indeed rest on the top of your shoe — there needs to be contact — but it shouldn’t do much more than that. The trouser can fall a touch longer in the back than in front, so long as it’s still above the heel of the shoe (the actual heel, not just the back of the shoe).
This is one of the easiest adjustments to make, so you can rely on making some changes here if you need to. In fact, dress pants are often sold unhemmed, with the assumption that the purchaser will take the trousers to a tailor (or make use of the store’s tailor if there is one) to have the cuffs fitted.
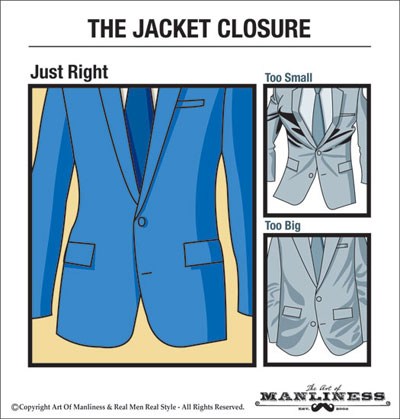
The Jacket Closure
When you are wearing a suit and standing, you should have the jacket buttoned (you know the jacket buttoning rules, right? Click here to learn!).
This means that part of the trying-on process is checking how the front of the jacket closes over your body.
Close a single-breasted jacket with only one button when you’re testing the fit, even if it’s a three-button jacket. You’re looking to see if the two sides meet neatly without the lapels hanging forward off your body (too loose) or the lower edges of the jacket flaring out like a skirt (too tight).
The button should close without strain, and there should be no wrinkles radiating out from the closure. A little bit of an opening at the bottom of the suit is fine, but the two halves beneath the button shouldn’t pull apart so far that you can see a large triangle of shirt above your trousers. (Ideally, you shouldn’t see any, though a bit is socially acceptable, especially when you move.)
Taking in or letting out the waist to help the jacket close more comfortably is not a difficult adjustment, but it’s one with limits. Don’t expect a tailor to be able to make huge changes here. If the jacket closure looks really bad unaltered, it’s probably due to problems beyond the waist measurement, and you should be looking for a different jacket rather than planning on getting that one altered.
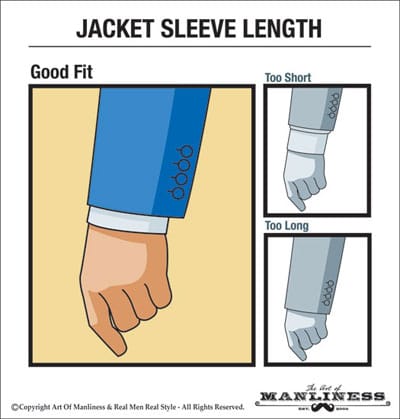
Jacket Sleeve Length
“A half-inch of linen” is a good, old-fashioned guideline for the relationship between a suit jacket and the shirt worn under it — about half an inch of the shirt cuff should be visible beyond the jacket cuff.
That said, it’s a general guideline, and you don’t need to get too obsessive. What you do need to be sure of is that the suit sleeve doesn’t rise above the cuff entirely — the seam where the shirt cuff joins the shirt sleeve should never be visible.
Similarly, the jacket sleeve should never hide the shirt sleeve entirely. At least a small band of shirt cuff should always be visible.
For most men, that ends up being a jacket sleeve that terminates just above the large bone in the wrist. But everyone’s arms are slightly different, and sleeve length is a very easy adjustment for a tailor to make, so get the best sleeve length you can (erring on the side of too long if possible) and then have it adjusted to fit.
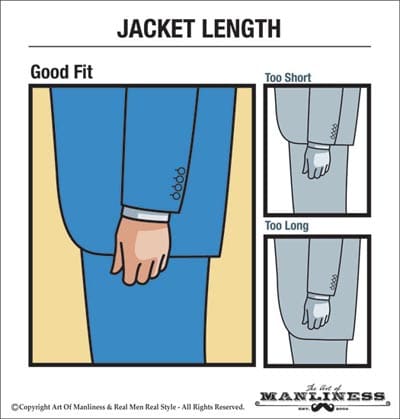
Jacket Length
Not enough time or writing gets devoted to the overall length of men’s jackets. It’s more important than most people think!
A good suit or sports jacket should fall past the waist and drape over the top of the curve formed by the buttocks. An ideal fit will cover a man down to the point where his butt starts to curve back inward, and stop there (but anywhere in that general region is okay).
The hands are also a good marker here, and this is why it’s important to have your arms relaxed in your natural stance. The hem of the jacket should hit right around the middle of your hand — at or just past where the fingers meet the palm.
If the hem of the jacket is sitting on top of the butt, with a small little flare in the back, it’s too short. If it falls past the bottom entirely, longer than the arms, it’s too long. The hem can be adjusted upward without too much trouble, but if you go too far the front pockets start to look out of proportion, so don’t count on more than an inch or two of adjustment here.
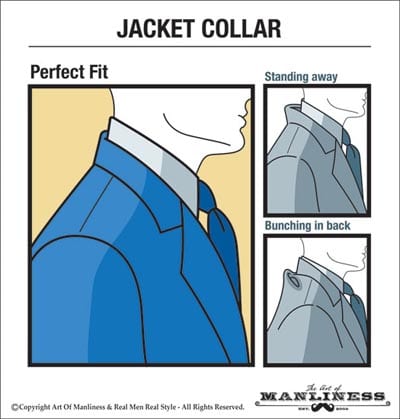
Jacket Collar
It’s easy to tell a well-fitted collar from a poorly-fitted one, although identifying the cause of the bad fit can be challenging.
Your jacket collar should rest against your shirt collar, which in turn should rest against the back of your neck. All of these should touch lightly, without significant gaps in between.
If the collar is too loose, it’s very easy to spot — there will be a gap where it’s flopping back off your neck.
A tight collar is a little harder to spot on a jacket, since (unlike a shirt collar) it’s almost all in the back. Turn from side to side as needed and check it out in a mirror. A tight collar will create bunching and folds just beneath it, and often wrinkles the shirt collar underneath it as well.
Bad collar fit could just mean the neck size is wrong for you, but it’s often caused by a larger fit issue: bad shoulder sizing, a back panel that’s too small for you, or even a jacket that’s constructed with more of a forward or backward tilt than your neutral stance.
Since these adjustments cost time and money to fix, you want to get as good of a fit in the original jacket as possible at the collar.
Four Automatic “Bad Fit” Warnings
There are a couple of easy to spot problems that are major warning signs. A suit with these “bad fit” signs is one that you probably won’t ever be able to adjust to a really good fit.
Unfortunately, most of them are caused by the core structure of the suit — and that means that your body just isn’t a good match for the way that particular brand makes its pieces.
Be patient, try on lots of brands, and don’t compromise (unless you know it can be fixed!).
If you can’t afford bespoke (made to order), an adjusted off-the-rack suit can work — but you have to start with a pretty good fit in the first place, or it’s never going to get the results you want.
Unless you want to pay for alterations, be careful buying any jacket that’s showing these serious warning signs:
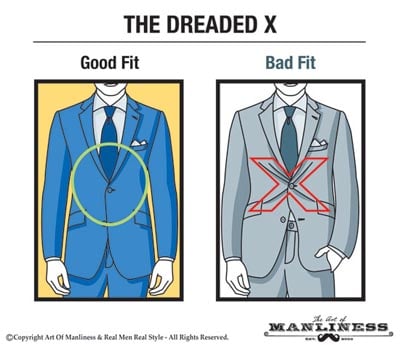
The Dreaded X-Shaped Button Strain
If you can see wrinkled lines radiating outward from your jacket button when you close the jacket, it’s too tight and will need adjustment.
The Dreaded X, as my friend Barron over at Effortless Gent likes to call it — is not a look you seek in a well-fitted jacket.
Front button strain is indicative of a bad fit in the torso, and it can go beyond just the waist size — you’re probably straining at the shoulders or in the back, too. On a more basic note, it also means the button is going to be prone to popping off.
Don’t buy a jacket that shows strain lines radiating outward from the button. If you’ve got an old jacket that used to fit but has started showing them, it’s possible that you’ve either gained weight or accidentally shrunk the jacket in a wash — in that case (assuming the fit was good before), you may be able to have the waist let out a little and keep the jacket in use.
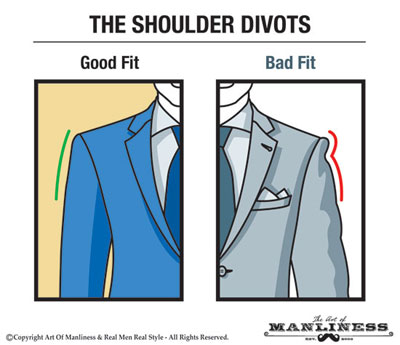
Shoulder Divots & Upper Arm Wrinkles
If the sleeve of the jacket seems to dip in slightly just under the shoulder, and then flare back out again, the shoulders are too big. What you’re seeing is the shoulder padding protruding beyond your arm, and the cloth of the sleeve tucking back in underneath it.
You can also get those wrinkles if you’ve got a somewhat slouched stance and the jacket is stiffly-constructed for a more upright posture. In either case you’ll need to get a smaller size, so that the seam where the shoulder meets the sleeve matches up with your body’s shoulder, or give up and try a different brand.
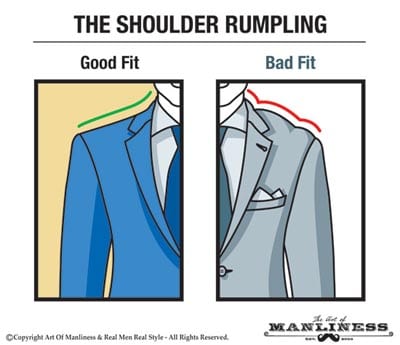
Shoulder Wrinkles — Top Rumpling
If you’re getting noticeable bunching on top of your shoulder, rather than on the upper sleeve, the jacket is too large in the shoulders.
This could be a simple length problem, but more likely it’s that the interior space is simply too large — your shoulders aren’t broad enough, front to back, to fill out the jacket.
Try a slimmer fit, if the manufacturer offers multiple styles, or a smaller size. If you’re still seeing wrinkles on the tops of your shoulders, the brand probably isn’t going to work for you.
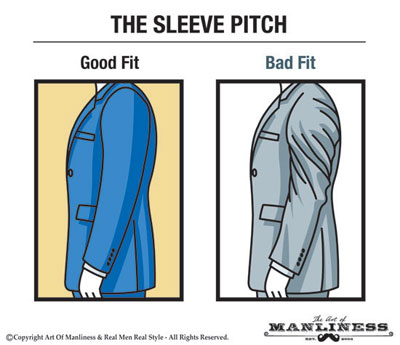
Twisted Sleeves — Bad Sleeve Pitch
Faint spiraling wrinkles on the outside of the sleeve occur when the angle of your arm in its natural stance doesn’t match the angle that the sleeve was constructed with. The result is a sleeve that looks slightly twisted even when your arms are hanging still at your sides.
A tailor can theoretically remove the sleeves and reattach them at a slightly different angle, but it’s not a simple or a cheap fix. Generally speaking, you can consider this one a deal-breaker. Keep trying until you find a jacket where the sleeves fall smooth and straight when your arms are resting in their natural stance.
Buying jewelry, even costume jewelry, can be expensive. Knowing how to make handmade jewelry means more than making nice pieces at lower costs, but also closely matching the style to your personal taste. By learning a few basic techniques, you should be able to construct unique styles of jewelry sets, necklaces, bracelets, earrings and more.
Steps
1. Gather all the necessary tools and supplies.
2. Begin using your creative abilities! Take your stringing material and add all types of elements to your project!
Method 1 of 3: Necklace
Here is just an example of a design layout:
Arrange beads in the grooves of the beading design board in the following pattern:
5 pearls, 1 spacer, 1 bicone crystal, 1 spacer. Repeat the pattern until you have reached the marks for an 18-inch design (45.72 cm).
1. Using wire cutters, cut a 20-inch (50.8 cm) piece of beading wire.
2. Thread 1 end of the wire through a crimp tube, then through one side of a clasp. Pass the wire back through the crimp tube, leaving about 1/2 inch and close the tube with the crimping pliers.
3. Starting at one end of your design layout, begin stringing the beads from the board onto the wire, threading the wire tail from the crimp through the first 3-4 beads.
4. Thread a crimp tube and the other half of the clasp on the wire. Go back through the crimp tube and the last 3-4 beads. Pull the wire until it is close to the edge of the crimp tube; it may be easier to do this with chain-nose pliers. Close the tube with the crimping tool. Trim any loose wire ends with the flush-cutters.
Method 2 of 3: Bracelet
1. Arrange beads on the beading board for a 6 to 7-inch bracelet, depending on the size of your wrist (15.24 cm to 17.78 cm).
Use this pattern: 2 pearls, 2 spacers, 2 pearls, 1 spacer, 1 bicone crystal, 1 spacer. Repeat until you have reached the desired length.
2. Thread the crimp tube and one side of the toggle clasp on a 9-inch piece of beading wire.
Go back through the tube and close it with the crimping tool.
3. String the beads onto the wire.
4. Add another crimp tube and the other part of the clasp. Return through the crimp and close it.
Method 3 of 3: Earrings
1.On each of 4 headpins, string 1 pearl, 1 spacer, 1 bicone crystal, 1 spacer and 1 pearl.
On 2 headpins, string 2 pearls, 1 spacer, 1 bicone crystal, 1 spacer and 2 pearls.
2.Make an open loop just above the last bead on each headpin.
Use the chain-nose pliers to bend the headpin to a 90-degree angle.
Grasp the wire at the bend with the round-nose pliers and bend the tail around the jaw of the pliers with your finger.
Cut away the extra wire with the flush-cutters.
3.Open a jump ring and add 1 short element, 1 long element and 1 short element. Slide the jumpring through the earring finding and close the jumpring. Repeat with the remaining headpin elements and wire or clip-ons.
Now that you know the basics of how to make handmade jewelry, you might add the dangles from the earrings to your necklace for an added design piece or make similar but shorter ones to dangle between the beads on your bracelet.
You can use the same steps for adding crimps and clasps to any beaded jewelry. Arrange the beads on the board until you have a pattern you like, then add them to the wires. Use 2- or 3-strand spacers to make multi-strand necklaces or bracelets. Use the same patterns designed for bracelets to make an anklet by extending its length to fit your foot.
We spend 1/3 of our lives laying on a mattress that can’t be washed. Or can it? Pour vodka into a spray bottle, spritz lightly across your mattress and leave it to air-dry. The alcohol kills odor-causing bacteria while it disinfects the mattress.
Halve a couple lemons and put in a glass dish with water. Zap until the water starts to boil. Let it sit and steam for a minute before opening. The gunk can now be wiped away with little effort. You might want to share this one with that co-worker who’s always exploding spaghetti in the break room.
Hook an old pillowcase over one fan blade at a time and slowly wipe it backward. The blade will be clean and the dust will be trapped inside (instead of in your hair).
Got greasy fingerprints on the walls? Cover the stains with white chalk, wait a few minutes and then wipe the chalk away with a damp cloth. Works on clothes too!
Do you live with a four-legged friend who loves to shed? Sweep your carpet with a rubber squeegee (or run your hand over it while wearing a rubber dish washing glove) and prepare to be horrified by what comes up.
Pressed for time? Throw one clean dry towel in with wet clothes before starting the dryer. 15 minutes later, take it out. The dry towel will actually absorb some of the excess moisture floating around and speed up drying time.
Love smoothies but hate cleaning the blender? Just fill it with warm water and a drop of dish soap, then turn it on and blend for a few seconds. Dump, rinse with clean water, and dry.
Cruddy air vent or A/C intake? Moisten a clean towel with your favorite cleaner and wrap around a butter knife. Now you’ve got the perfect tool to clean the narrow grate.
Halve a white onion and use a fork to rub it back and forth over the grates of a hot grill. The onion will clean the grates and add a little extra flavor.
Fill the bottom of the pan with water and add a cup of white vinegar. Simmer. Take the pan off the stove and add 2 tablespoons baking soda. Empty the pan and scrub lightly to remove burn marks.
You can’t put this appliance in the dishwasher and cleaning by hand will likely result in a cut-up hand. Instead pulverize bread or uncooked white rice to remove old odors. Then grind 1 tablespoon baking soda to clean, and wipe thoroughly.
Shower head covered with nasty hard water deposits? Pour distilled white vinegar in a plastic bag and fit it over the shower head with a rubber band. Let it soak for an hour (or overnight) then remove the bag and wipe scum away with a cloth.
After they’ve freshened your laundry, use dryer sheets to clean anything–baseboards, your television or laptop screen, bookshelves–and the anti-static chemicals will actually repel dust in the future.
Remember this kids: oil attracts oil. Next time your bacon breakfast makes a mess of the stove, add a few drops of vegetable oil to paper towel, then wipe the greasy surface and watch the oil disappear!
There’s nothing grosser than a couch that looks like you pulled it out of the alley. Use a spray bottle to cover your couch with rubbing alcohol, then use a clean white sponge to rub the couch. Fluff the fibers with a hard bristle brush when done, and it’ll look good as new.
Even though it cleans other things, occasionally your dishwasher needs to be cleaned as well. Run it on its hottest cycle with nothing but a container filled with white vinegar in the top rack. Then, sprinkle some baking soda on the bottom, and run it again on a short-hot cycle. Be prepared to shield your eyes from the sparkle.
Instead of scrubbing, spray cooking spray on your glass shower door and/or walls. Give it about 5 minutes and wash it off with soapy water and dry it. The oil in cooking spray will dissolve the soap buildup and lime deposits.
Bathroom sink draining slow? Drop 4 Alka-Seltzer tablets down the drain, followed by 1 cup distilled vinegar. After 10 minutes, rinse with boiling water.
Ring around the tub? Cut the grapefruit in half and sprinkle the pink fruit with salt. Wet your tub and sprinkle additional salt on the bottom. Use the fruit as a scrubber, being sure to get the juice on every surface. Rinse clean and enjoy the fresh scent!
Carpet stain driving you crazy? Spray stain with a mixture of 2 parts water with 1 part vinegar. Lay a damp rag over the spot, then press a hot iron–set on the steam setting–on the rag for about 30 seconds. Repeat for really stubborn stains. It’s like a mini Stanley Steamer!
If you’re addicted to caffeine, your coffee pot probably shows it. Fill the reservoir with equal parts white vinegar and water. Run the brew cycle halfway through, then turn off and let it sit. After an hour, turn it on and let the cycle repeat. When it’s done, run two cycles with fresh water only.
If you have actual silver cutlery or dishes, you know polishing it can be a pain. Line a large dish with aluminum foil, add a 1/2 cup of table salt and a 1/2 cup of baking soda. Fill the foil-lined sink with hot water, and then dump in all your silver. After a 30 minutes soak, the tarnish will be gone. Just rinse and wipe dry.
If your kid (or roommate) hurls on your sofa, don’t panic. Make a paste of baking soda and water, and take a spatula or spoon, generously spreading it onto the affected area (be sure to hold your breath or you might vomit too). Let it dry overnight, and you’ll be able to easily vacuum the whole thing up. Also works for urine and carpets (hooray).
If you don’t clean it right away, you’ll never get all the gunk out of the tiny ridges of your Foreman grill. Try this instead: When you’re done cooking, unplug it, and press a couple of damp paper towels between the lid and the surface. The leftover heat will steam clean the grill. Wipe it dry with another paper towel and you’re done.
Scrubbing the toilet sucks, especially if more than one person has been using it. Instead of scrubbing, “fill a mason jar with vinegar. Punch a couple of small holes in the metal lid with a nail. Drop that jar into your toilet’s water tank upside down. With each flush, a little vinegar will seep out of the jar and keep your toilets clean and yucky growth-free!,” explains Organic Authority. No mason jar handy? Snip off a section of one of those Mr. Clean Magic Eraser sponges and drop it right in the bowl before you go to sleep. In the morning, the ring will be gone! Just be sure to get it out before you flush.
There’s nothing worse than stepping on a tiny remnant of that glass you broke last week. Carefully press a piece of white bread all over the area to pick up even the tiniest shards.


 Source:
  Source:
  Source:
  Source:
  Source:
  Source:
  Source:
  Tutorial:
  Source:
  Source:
 Source:
  Source:
  Source:
  Source:
  Source:
  Source:
  Source:
 Source:
  Source:
  Source:
  Source:
  Source:
  Source:
  Souece: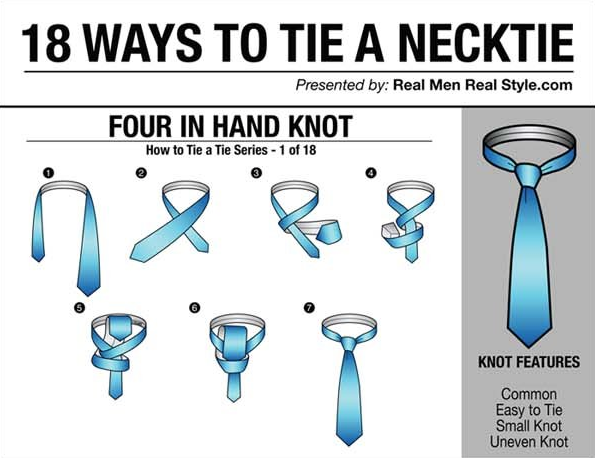


 Source:
  Source:
  Source:
  Source:
  Source:
  Source:


 Source:
  Source:
  Source:
  Source:
  Source:
  Source:

 Source:
  Source:
  Source:
  Source:
  Source:
  Source:
  Source:
  Source:
  Source:
  Source:
  Source:
  Source:
  Source:
  Source:
  Source:
  Source:
  Source: