Cum comanzi pe Amazon, din Romania si cat costa

Cum comanzi pe Amazon, din Romania ?

Pasi simpli pentru a face comenzi pe Amazon, explicati pe intelesul tuturor.

Cum comanzi pe Amazon din Romania si cat costa sunt intrebari la care, tot mai multi romani cauta raspunsuri.

Dupa cum toata lumea stie Jeff Bezos CEO Amazon este cel mai bogat om al platenei (cel putin la data acestui articol). A ajuns cel mai bogat om, datorita succesului pe care platforma online o are la nivel mondial.

Totul a inceput cu vanzarea on-line de carti si a ajuns la vanzarea on-line de… aproape orice iti poti imagina.

Avantajele pentru cumparatorii de pe Amazon sunt diversitatea foarte mare de produse si preturile mici.

In cele ce urmeaza, va voi arata cum sa-ti faci un cont pe Amazon.co.uk , cum poti sa comanzi din Roamania si la ce costuri.

Sa incepem …

Cum creezi un cont pe Amazon

Pentru a putea comanda de pe Amazon, trebuie sa avem un cont activ.

Pentru asta intrati aici: amazon.co.uk si urmati pasii de mai jos:

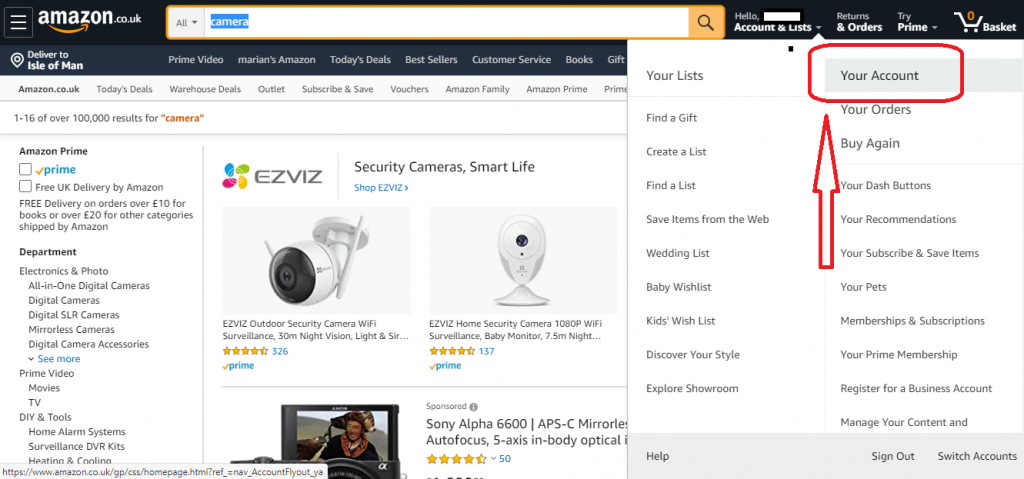
Accesati „Account and Lists„:

Dati click pe „Sign In

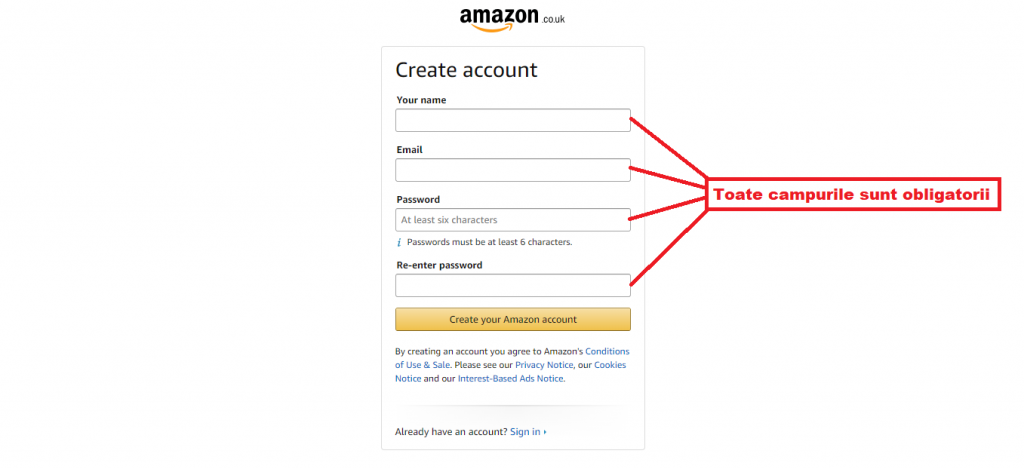
Completati toate campurile pentru crearea contului (toate campurile sunt obligatorii).

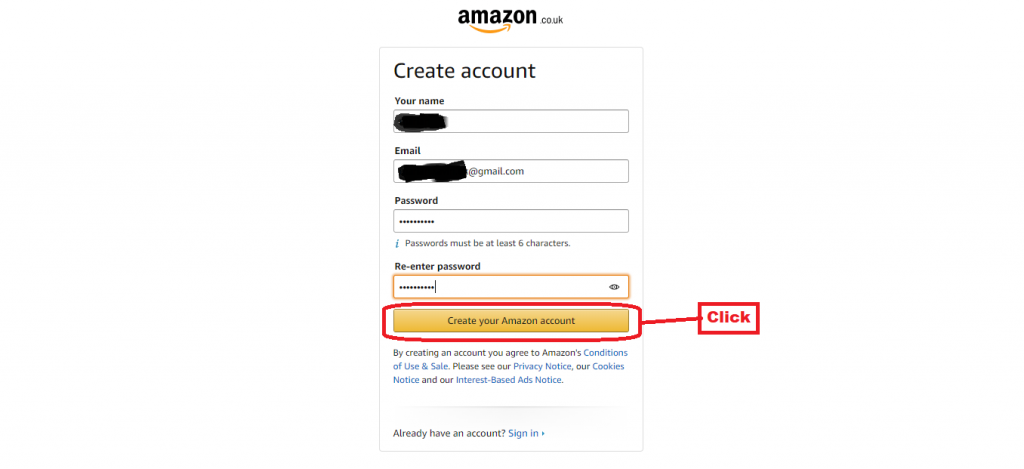
Dupa completare, click pe „Create your Amazon account

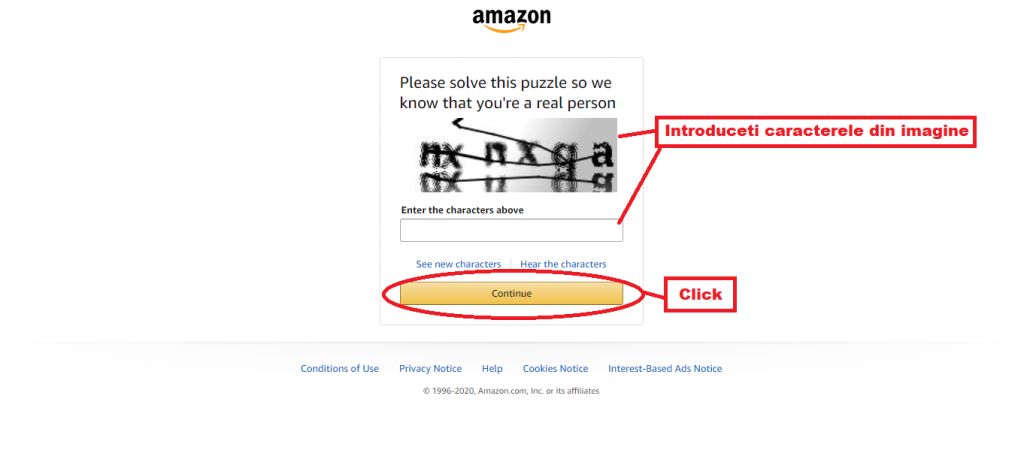
Exista o verificare a faptului ca sunteti o persoana reala si nu program automat. Va trebui sa introduceti caracterele pe care le vedeti in imagine si apoi clic pe „Continue

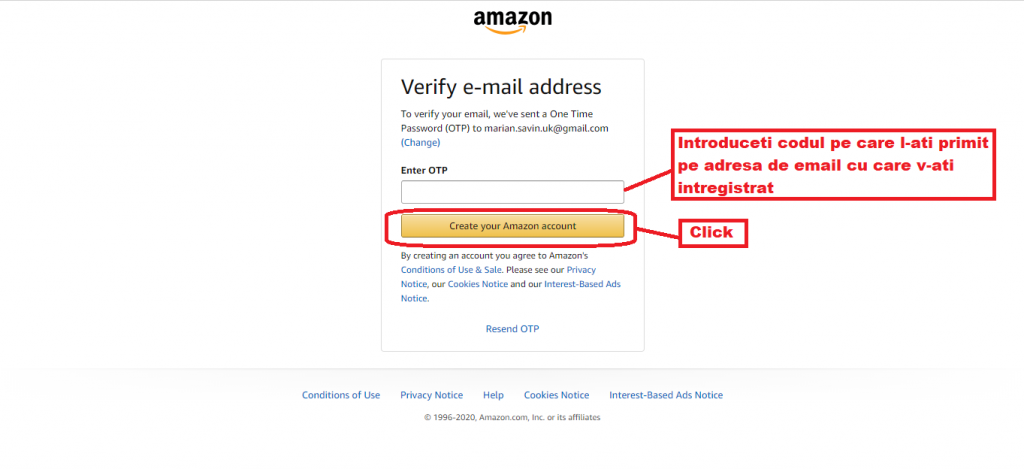
Pe adresa de e-mail cu care v-ati inregistrat veti primi un cod de confirmare a contului. Introduteti acest cod si click pe „Create your Amazon account” pentru verificarea adresei de e-mail

In acest moment aveti un cont de Amazon creat

Cateva setari de baza pentru contul Amazon

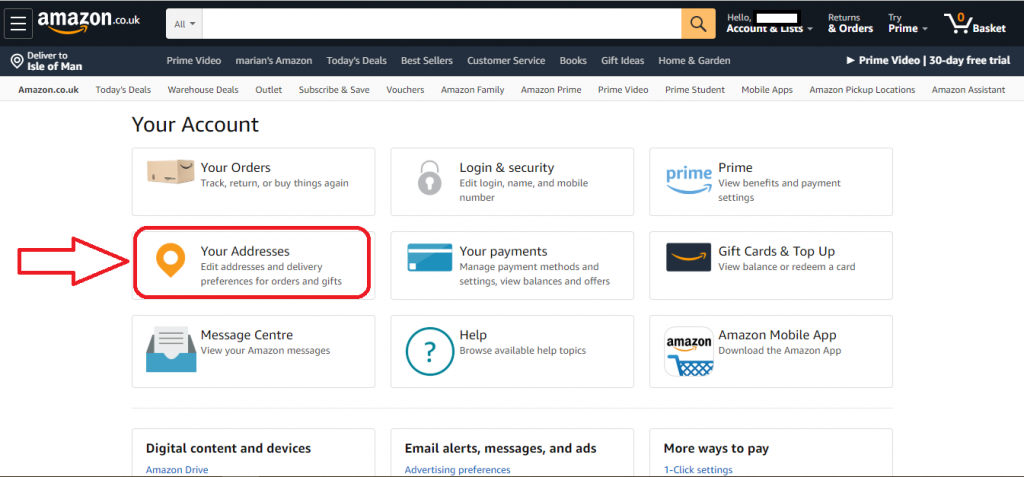
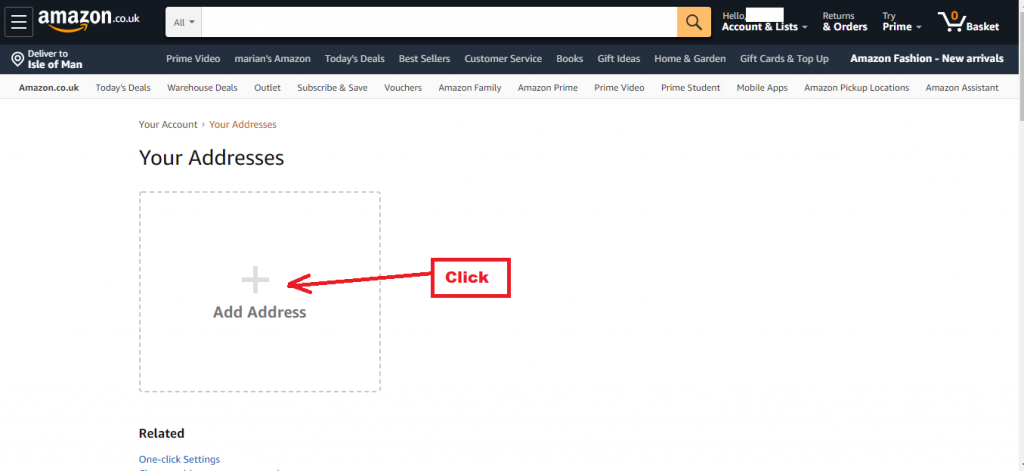
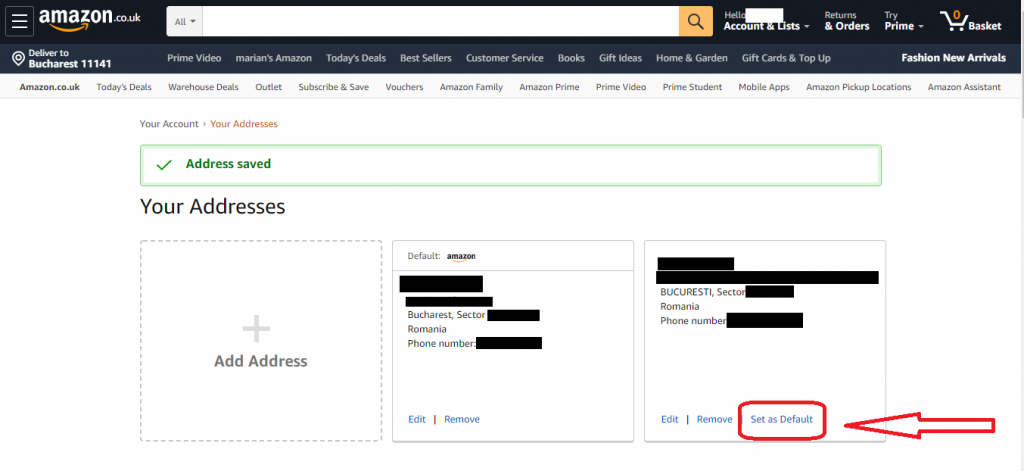
Recomandarea mea este ca, prima data cand folositi contul sa intrati in setarile contului, sa introduceti adresa sau adresele de livrare si sa setati o adresa principala (clic pe „Set as default„).

Dupa cum veti vedea mai jos, in momentul in care ati setat o adresa de livrare, pe pagina produsului dorit va va aparea si data aproximativa de livrare.

Cum comandam efectiv si cat costa

Dupa ce ati facut aceste setari puteti accesa Amazon.co.uk si sa incepeti cautarea produselor dorite in bara de cautare

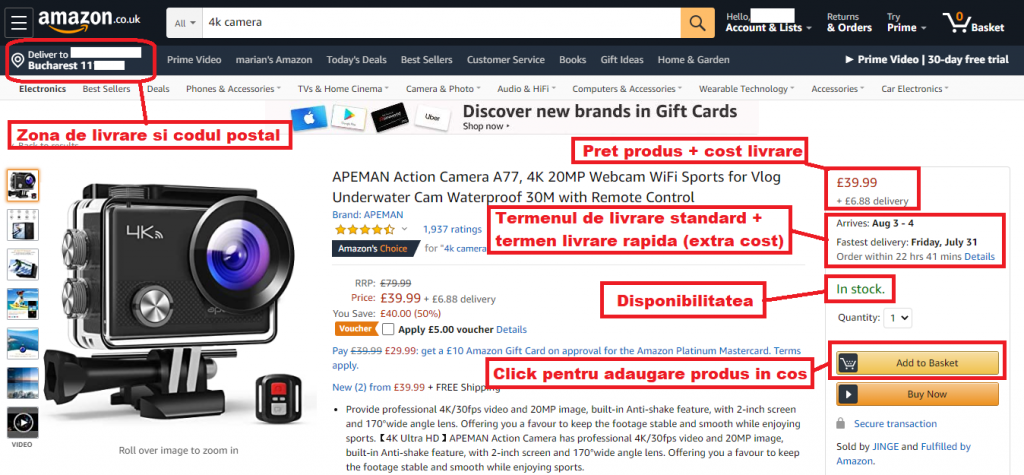
In momentul in care ati intrat pe pagina produsului dorit, veti observa mai multe informatii importante:

  • pret produs
  • cost livrare (catre adresa principala setata)
  • termen livrare standard
  • termen livrare rapida
  • disponibilitate
  • zona (orasul) de livrare si codul postal

Pentru a adauga produsul in cosul de cumparaturi, click „Add to Basket

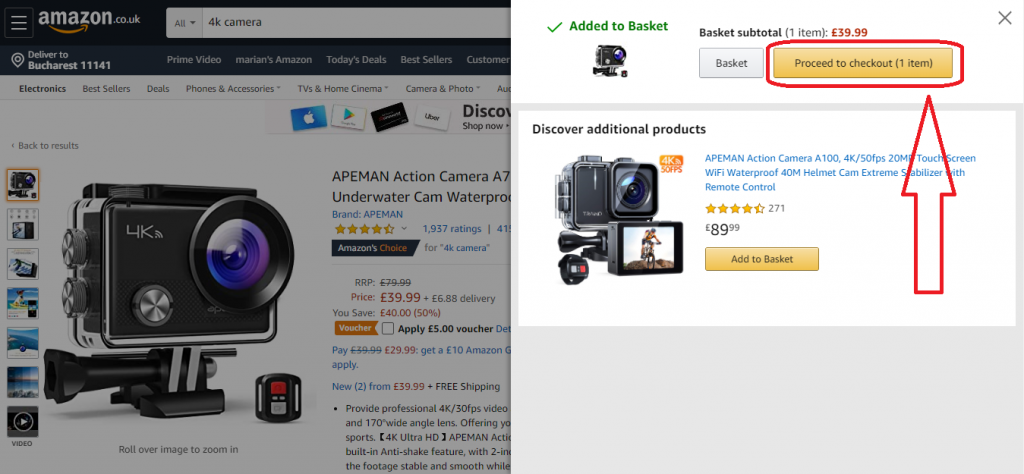
Puteti proceda la fel cu mai multe produse. Dupa ce ati adaugat in cos produsele dorite, click „Proceed to Checkout” pentru a finaliza comanda.

La urmatorul pas, vi se va cere sa setati adresa de livrare (in cazul in care ati introdus mai ulte) sau sa introduceti o adresa de livrare noua.

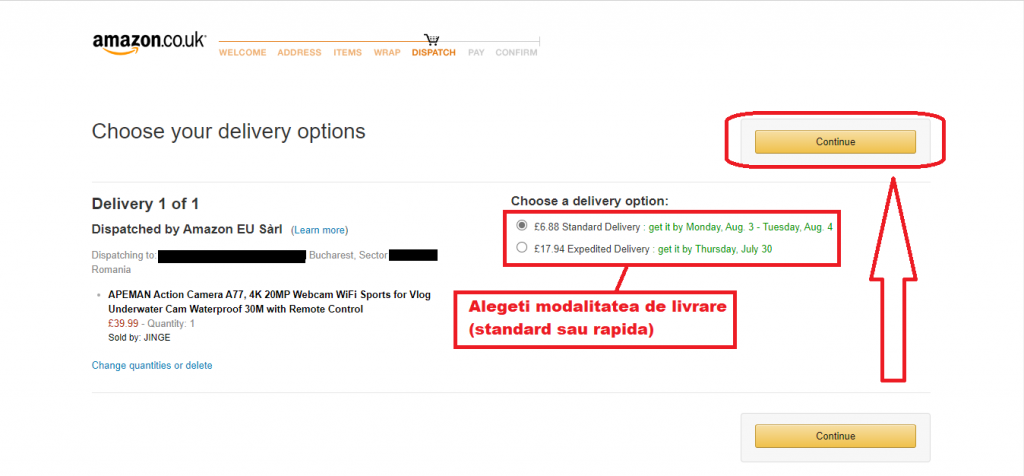
Urmatorul pas va ofera posibilitatea de a seta optiunea de livrare (standard sau rapida) apoi , click pe „Continue

Cum platim pe Amazon

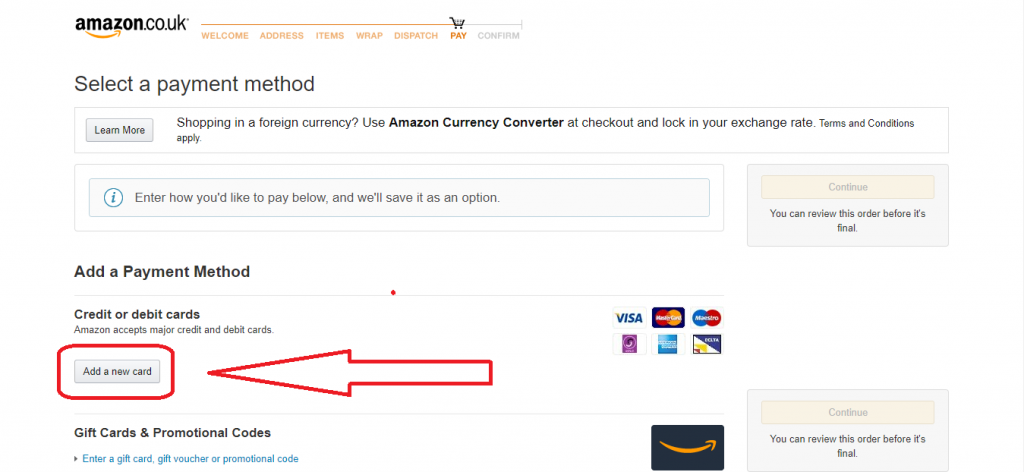
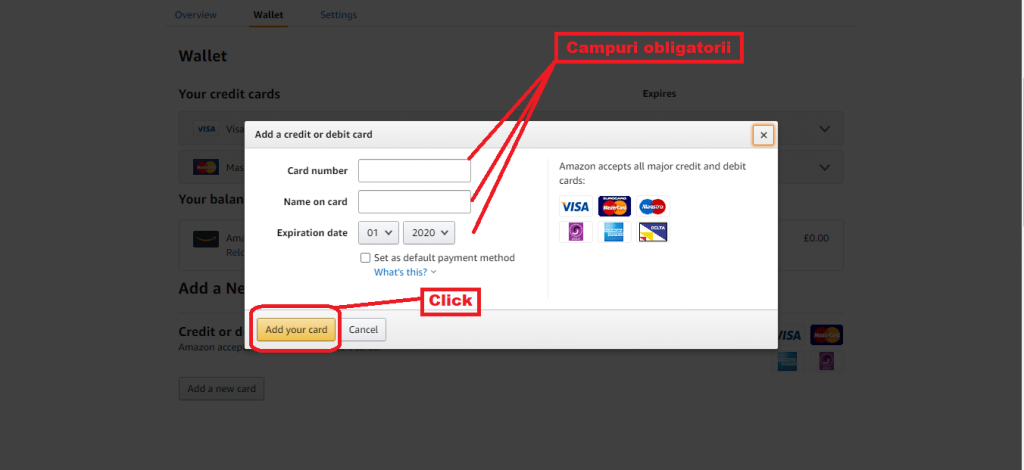
Acum a venit momentul sa introduceti un card cu care veti face plata produlelor adaugate in cosul de cumparaturi.

Aveti posibilitatea sa faceti plata si cu vouchere sau coduri de promotie („Gift Cards” or „Promotional Codes„)

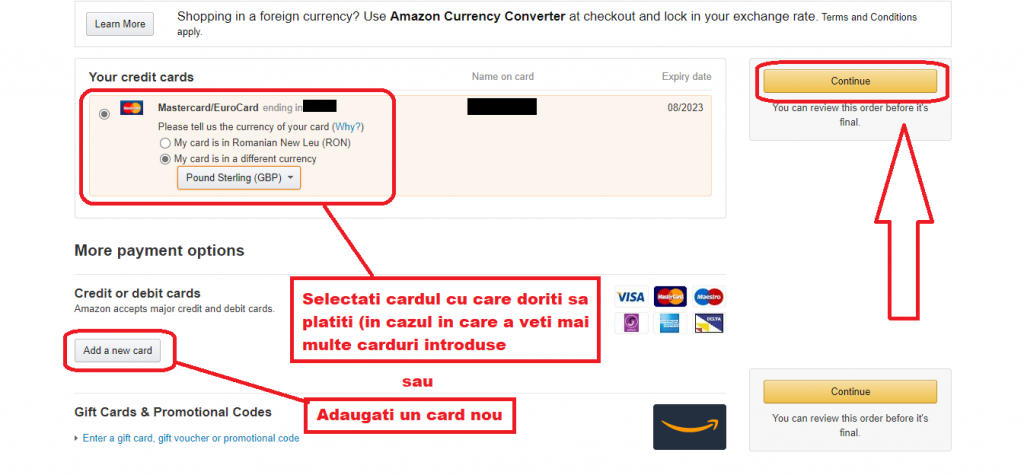
Urmatorul pas, va ofera posibilitatea de a selecta cardul cu care doriti sa faceti plata (in cazul in care ati introdus mai multe carduri) apoi, click pe „Continue

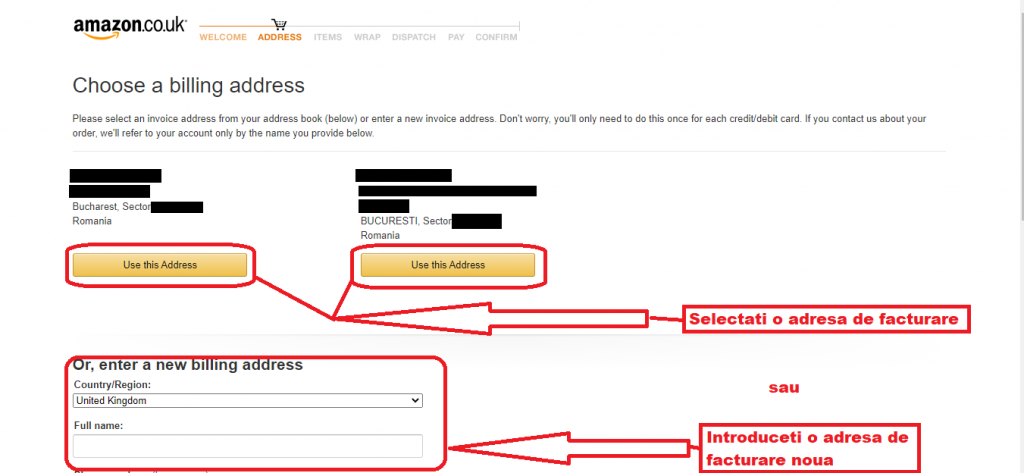
Pasul urmator, alegerea adresei de facturare. Puteti alege dintre adresele deja introduse sau puteti introduce o adresa noua.

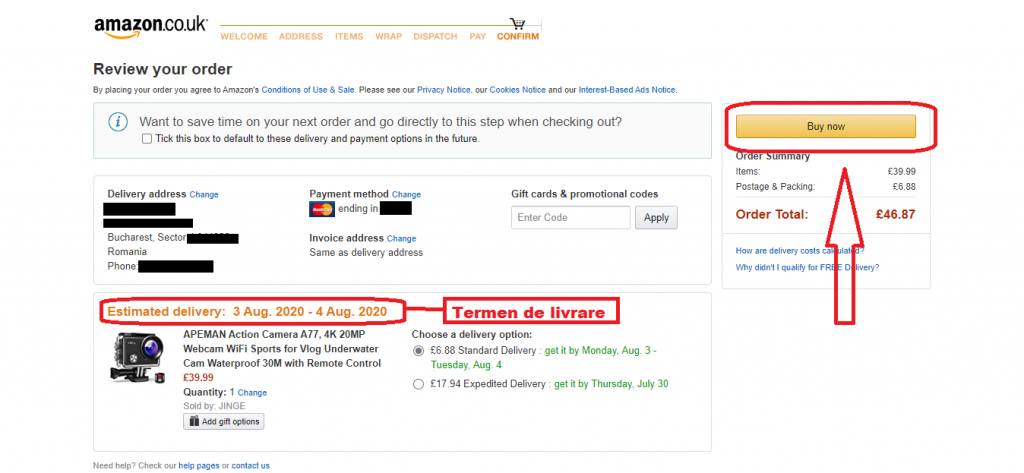
Ultimul pas este revizuirea comenzii, unde puteti verifica comanda. La acest pas puteti modifica adresa de livrare, cardul cu care faceti plata si modalitatea de livrare.

Daca totul este asa cum doriti, puteti da click pe „Buy now” sau puteti edita comanda.

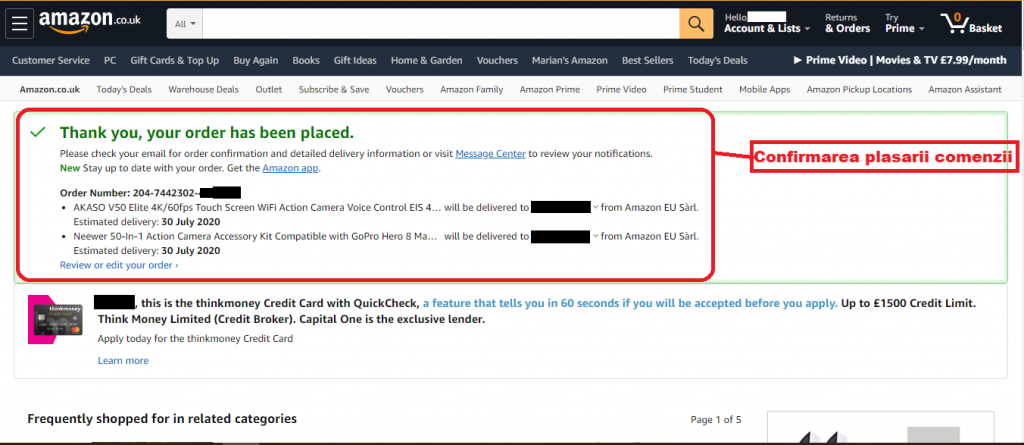
Ultimul pas: confirmarea plasarii comenzii.

Pe adresa de e-mail veti primi un mesaj cu confirmarea si detaliile comenzii.

Urmarire comanda

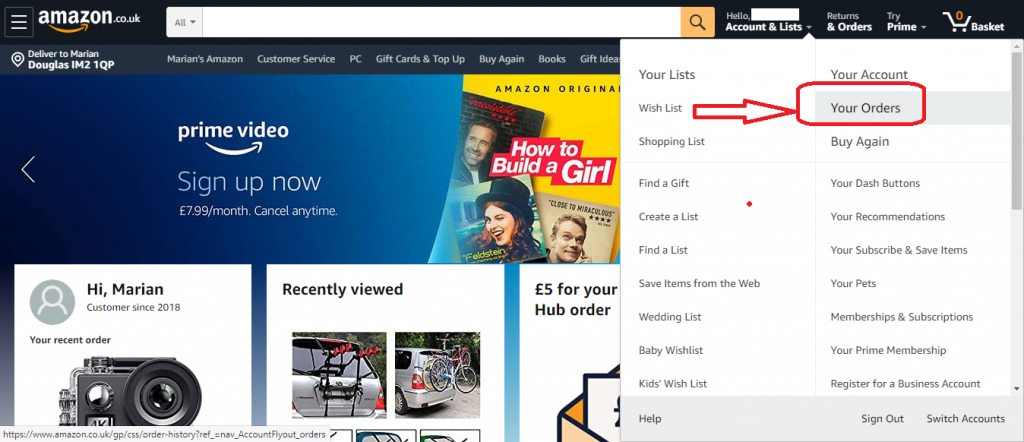
Pentru a urmari comada mergeti la „Account & Lists” apoi „Your Orders

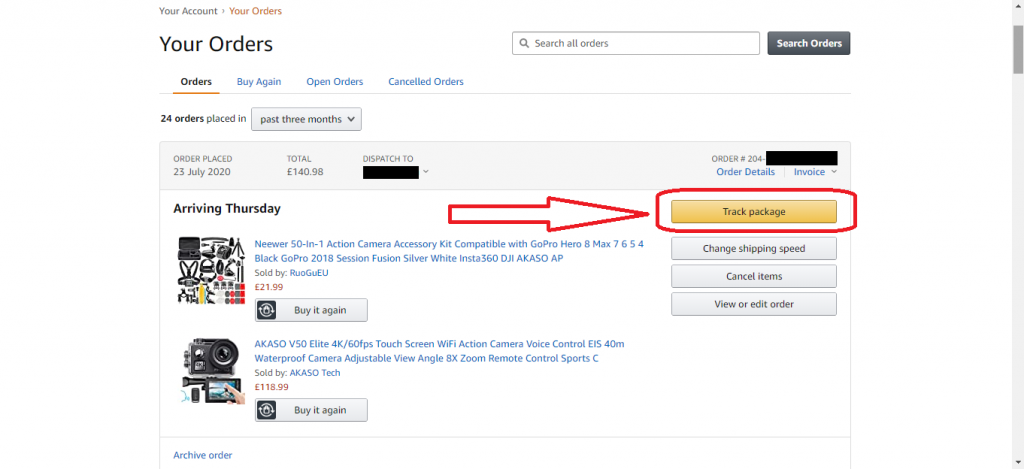
Apoi ” Tracking Package„…

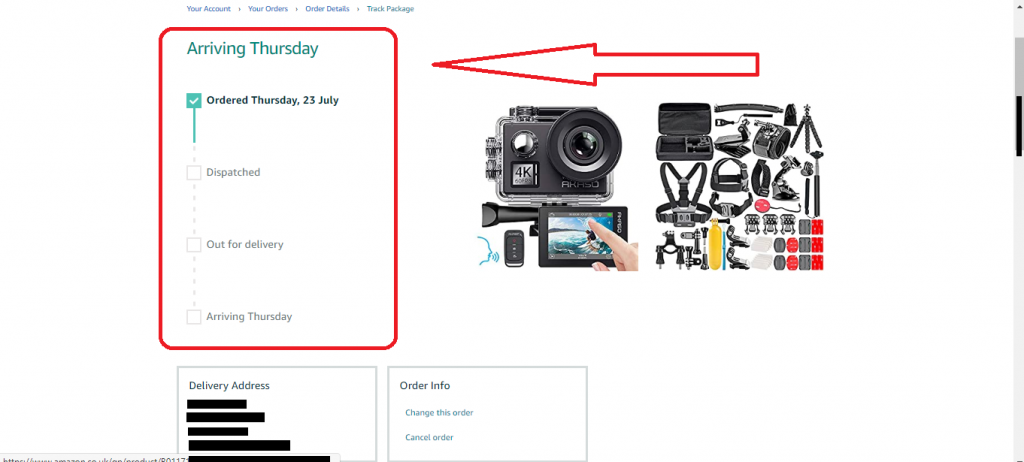
Mai jos , vedeti cand va ajunge comanda si in ce stadiu este la momentul respectiv

Cum comanzi pe Amazon din Romania si cat costa? Sper ca acum aveti raspunsuri la aceste intrebari.

Pentru a accesa Amazon.co.uk click pe imaginea de mai jos:


9 Awesome Techniques That Will Make You a Skillful Driver

It isn’t difficult to drive a car. But if you make some efforts to improve your driving skills, you’ll be surprised at how comfortable you feel sitting in your favorite set of wheels.

Bright Side gathered 9 tips to make your driving safer and more satisfying.

9. Take a defensive driving course.

Everyone can take additional courses in order to master their skills. Defensive driving courses are taken not only by beginners but by experienced drivers as well. There isn’t anything shameful in the desire to keep other drivers and yourself away from danger. Live and learn!

8. Brake with your left foot.

Left-foot braking is a difficult technique that requires regular practice. It is usually used by auto racers, but this skill can help you in case of emergency. Using this technique, you will be able to turn very quickly by keeping up the necessary engine speed, maintaining the same driving speed, and controlling oversteering at the same time.

7. Move at the same speed as the other vehicles.

Everybody learns this rule in driver education courses. But not all drivers follow it. Driving at a speed that is lower or higher than the speed of other traffic is dangerous as it can cause accidents. That’s why when choosing your speed, you should first take into account traffic density.

6. Keep your hands on the wheel at the proper position.

For years, driving instructors taught students to keep their hands on the steering wheel at the 10 and 2 positions (as on a clock). But in the last few years, instructors advise keeping your hands at either 9 and 3 or 8 and 4. This provides you with better control when driving. It is also the most ergonomic position to hold your hands in for a long period of time.

5. Control understeering and oversteering.

In cases of understeering, the front tires lose traction on the road surface while turning because of the speed of acceleration. In cases of oversteering, the same thing happens with the rear tires. If you’re driving on a wet or icy road, don’t accelerate too much. Driving at a moderate speed will help you avoid most cases of understeering or oversteering.

Attention: In cases of understeering or oversteering, never release the gas or brake pedals too quickly.

4. Park precisely.

If you can parallel park perfectly, you won’t be afraid of crowded parking lots. In addition, you will be more confident when driving a car in reverse. Parking sensors (or parktronics) can help you a great deal. They can be useful in both forward and reverse movements.

3. Use the handbrake to perform a handbrake turn.

This technique, like left-foot braking, requires practice. Again, it can help you only in an emergency or if you have to perform a sharp fast turn in winter. But don’t do it on dry asphalt if you don’t want to expose the tires to premature wear.

2. Use heel-toe downshifting.

The sense of this technique consists in shifting the transmission down from a higher gear to a lower one by hitting the gas pedal with your heel and braking with your toe at the same time. It reduces the time required for shifting gears, prevents the unloading of rear wheels, and allows fast and smooth downshifting before turning.

1. Adjust the mirrors to eliminate blind spots.

If the side mirrors mostly reflect the flanks of your car, it means that you are not making proper use of the whole reflecting surfaces. In order to adjust the rearview mirrors properly, you should remember some simple positions:

  • The driver-side mirror should reflect only a quarter of the car (a part of its rear wing).
  • The passenger-side mirror, like the driver’s one, should reflect only the rear quarter of the car.
  • The cabin’s rearview mirror should reflect the rear window right in the center of it.

Sursa: brightside.me


15 Unexpected Beauty Hacks You’ll Wish You’d Known About Sooner

Looking beautiful is any lady’s desire, but there seem to be issues you can’t take care of yourself.

To counter that, Bright Side gathered several secrets that will save you a lot of time and money, while making you look gorgeous.

15. For beautiful hair

If you have greasy hair, simple cooking salt or, even better, sea salt is what you need. Add 2-3 tbsp to your favorite shampoo, and the roots of your hair will stay clean for longer.

14. For thick eyebrows and lashes

Don’t throw out your old mascara bottle. Wash it, and use it to mix together some castor oil, vitamin E, and aloe vera juice. A mascara brush is perfect for applying the mix to your eyebrows and lashes. Do it every night for a month before going to bed.

13. For circles under the eyes

If you like coffee, don’t dispose of spent coffee grounds — they can help keep your eyes fresh. Mix them in a 1:1 solution with coconut oil, and apply to the skin under your eyes for 15 minutes. Apply this mask 3-4 times a week.

12. For a healthy body

It’s possible to make an anti-cellulite wrap even at home. Mix 2 tbsp of ground ginger, 5 tbsp of cosmetic clay, and 10 tbsp of warm water together. Apply the mix to the problem areas (belly, sides, hips, arms), and wrap them with plastic wrap. Leave it all like this for an hour, then unwrap yourself and take a warm shower. Do this once a week.

11. For smooth legs

Sugaring is considered one of the best depilation methods. It’s less painful, doesn’t irritate the skin, and disposes of ingrown or bristle-like hairs. Mix 1/4 of a glass of lemon juice, 2 glasses of sugar, and 1/4 of a glass of water together. Heat the mix on a low heat until it’s golden, cool it down, and apply it to your legs against the hair growth. Then sharply remove the paste.

10. For beautiful and strong nails

A 1:1 mix of coconut oil and honey with a few drops of lavender oil is perfect for strengthening the nails. To make it more convenient, pour it into a used nail polish bottle.

9. For blackheads on your face

If you’re tired of having blackheads on your nose or chin, make a simple mask: mix 1 tsp of warm water, 1 tbsp of flour, and 1 tsp of honey together. Dip a cotton pad or a piece of cloth into this mix, and apply it to the problem zone. Remove after 10-15 minutes.

8. For gorgeous armpits

You can lighten the skin of your armpits with the help of compresses made of raw ground potatoes. Leave them there for half an hour.

7. For sunburn

baking soda solution will help to calm the skin down and get rid of the redness caused by sunburn. Apply the cool poultice to the painful area for 10-15 minutes.

6. For tender heels

To make your heels always soft, use foot soaks: take 2 cups warm water, add 1/2 cup baking soda, and 1 cup vinegar. Soak your feet for 15-20 minutes, then dry with a towel and apply some nutritious cream.

5. For a clear complexion

That famous black facial mask can also be made at home. Mix together 2 tbsp of ground-up activated charcoal and 1.5 tbsp of gelatin dissolved in warm water. Heat in a microwave until it turns into jelly. Apply to your face for 30 minutes, then remove the mask.

4. For the whitest teeth

Strawberries will help you gently whiten your teeth. Mix 1 tsp of grated berries with 1 tsp of baking soda, and use this paste instead of toothpaste twice a month.

3. For a fresh face all day long

If you want your face to look fresh even at the end of the day, use a freshening facial spray. Prepare it by mixing together aloe gel (bought at a drugstore or made yourself) with purified water in a 1:3 ratio. Pour the mix into a spray bottle, and carry it with you wherever you go.

2. For a pleasant fragrance

To keep your hair fragrant for the whole day, spray your perfume onto your hairbrush and brush your hair with it a few times.

1. Firming up your breasts

If you want to retain the shape of your breasts, rub Vaseline on them every night before going to bed. After two weeks you’ll notice that the skin has become more elastic and moisturized, and is generally firmer.

Preview photo credit shutterstock, imgur

Sursa: brightside.me


12 Easy Ways to Know If Your Computer Is Being Hacked

Cyber attacks happen very often, and everyone is worried about the safety of their data. To prevent your passwords and other important data from being stolen, you have to pay attention to any changes on your computer.

Bright Side invites you to read this article to learn how to check if your computer has been hacked. If you find out that it was, we will tell you what to do.

12. The antivirus is switched off.

If you didn’t turn off your antivirus but noticed that it’s off, your computer is most likely hacked. It cannot turn off on its own. The first thing hackers do is shut down the antivirus to get easy access to your files.

11. Passwords don’t work.

If you didn’t change your passwords but they stopped working all of a sudden and you can’t access your accounts, you should be alert — your computer is most likely hacked.

10. Your number of friends has grown.

If you notice that you suddenly have many more friends on your social networks who you don’t know and don’t remember adding, it means that your account has been hacked and is being used to send spam.

9. New icons appear on your dashboard.

When you launch your browser and notice new icons on your dashboard, this might be a sign of the infiltration of some dangerous code into your computer.

8. The cursor moves on its own.

If you notice that your cursor is moving on its own and is highlighting something, your computer was definitely hacked.

7. Your printer doesn’t work properly.

Cyber attack signs influence not only the computer itself but also your printer. For example, when it refuses to print or when it prints out something you didn’t want it to.

6. You are forwarded to different websites.

If your browser keeps forwarding you to different websites, it’s time to be alert. The same goes for situations when you type something into a search engine and instead of Google pages, you go to another page you don’t know. If you see pop-up windows too often, it also signals a hack.

5. Files are deleted by someone else.

Your computer is definitely hacked if you notice that some of your programs or files were deleted without your knowledge.

4. Your personal data is on the internet, even though you didn’t put it there.

Check this using your search engine: look for information about yourself that you definitely didn’t put online. If you find it, your computer was hacked for stealing information.

3. You receive fake antivirus warnings.

If you see antivirus warnings but they look different than usual, this is a clear sign of a hack. Another bad sign is if you have a new antivirus you didn’t install.

2. There’s unusual webcam behavior.

Check your webcam: if its indicator blinks on its own, reboot the computer and check if it blinks again in about 10 minutes. If it does, it means that your computer was hacked.

1. The computer works very slowly.

If the simplest operations take your computer a very long time to complete, and if you notice a significant drop in the speed of your internet connection, it might mean that somebody hacked your computer.

What you should do:

  • Warn your friends and other people to whom you sent emails that your computer has been hacked. Tell them not to open messages from you and not to click on any links from you.
  • Tell your bank about a possible leak of your personal data. Find out how to protect your money.
  • Delete all unfamiliar programs and also those you can’t launch.
  • Install a reliable antivirus, and scan your system. Some companies make trial versions.
  • Change the passwords on all your accounts.
  • If you still feel that the problem is not solved, ask a specialist.

Bonus: When you install a new antivirus

Preview photo credit HP

Sursa: brightside.me


Top 40 of the Best Excel Shortcuts You Need to Know

Everyone uses Excel in some form or fashion, so check out our top 40 list of the most useful excel shortcuts to speed up your work!

Almost everyone uses Excel in some form or fashion in the modern workforce, but many of us may be wasting a little too much time trying to format those pesky spreadsheets. In order to help you work a little bit faster, or maybe more efficiently, we have assembled 40 of the best Excel shortcuts that you need to know!

F2 : Edit selected cell

By pressing F2, Excel will enter cell edit mode with the cursor at the end of the cell. A hand shortcut for making quick changes.

F4 : Repeat last edit

Pressing F4 will repeat your last action or edit. If you want to repaste something again or repeat a formula insert, this key will save time.

CTRL + ALT + F9 : Calculates all worksheets

Using this Excel shortcut force calculates all worksheets that have open workbooks.

F11 : New chart

Using F11 is a handy and quick way to create a new chart without having to navigate through Excel’s native toolbars. When you have data selected and press F11, a default chart will automatically appear with the selected data inside.

ALT : Access the ribbon for formulas

Pressing the ALT key makes small letters appear on the toolbar ribbons. These are called KeyTips which will help you navigate the ribbons using only your keyboard.

ALT + = : Automatically SUM() selected

If you have a block of data and you want to add all of the columns and the rows, using this command will Autosum the data and put all of the equations in one swoop. Make sure you include a spare column on the right and a spare row on the bottom for the summation data.

ALT + EnterStart a new line in the same cell

This shortcut is handy for those of us who need to put a lot of data into one cell. It essentially functions as a line break inside of a cell. If you need to write a large paragraph inside a worksheet, knowing this function is essential.

ALT + H + O + I : Autosize columns

This shortcut functions as more of a sequence. First press Alt + H to naviate to the home tab. Then type O to select the format menu (while still holding Alt). Then type I to autofit the column width.

PG + UP : Go to next worksheet

This command switches worksheet tabs to the right.

PG + DOWN : Go to previous worksheet

This command switches worksheet tabs to the left.

CTRL + ` : Display Formulas

By using this Excel shortcut you can quickly switch between displaying a cell’s formula and its values in a snap.

CTRL + Backspace : Show active cell

If you have absolutely no idea where the active cell your working on is because you scrolled so far, this one is for you. Pressing CTRL + Backspace will quickly navigate your window right back to the active cell.

CTRL + Shift + # : Change Date format with day, month and year

This shortcut quickly gives you access to the default date format.

CTRL + K : To insert Hyperlink

First, you need to select where you want a hyperlink to appear. Then press these keystrokes and the insert hyperlink box appears, making the process that much easier.

CTRL+ Shift + $ : Applies the currency format to the selected cells

If you quickly want to change a cell to the currency format, you can select it and hit this shortcut. It will apply to multiple cells as well if you have them selected.

CTRL + Shift + & : Applies border to cells

Instead of navigating through endless menus, use this Excel shortcut to quickly add borders to the cells you have selected. Borders are generally a good idea to use if you want to organize your worksheet and make it more professional.

CTRL + B : Bold

Use this to quickly bold or unbold a cell or text.

CTRL + I : Italics

Use this to quickly italicize or un-italicize a cell or text.

CTRL + U : Underline

Use this to quickly underline or un-underline a cell or text.

CTRL + Shift + ~ : General style number

This command styles your cell to a general style number.

CTRL + Shift + % : Percentage style Number

This command styles your cell to a percentage style number. Make sure your original number has the right number of decimals. If you want 20 percent, you will need to have .2 in the cell before formatting.

CTRL + Shift + ^  : Scientific notation style

Working with a big number? Use this shortcut to quickly convert to scientific notation. This useful for all us engineers out there.

CTRL + Shift + @ : Time Style

This shortcut will give you quick access to the time of day style and allow you to add it into a cell.

CTRL + Shift + ! : Number Style

Using this will give you access to a cells number style.

CTRL + F12 : Open

Forgot that the data you needed was in another workbook? Hit this shortcut and quickly navigate to opening another file.

CTRL + SpacebarSelect the entire column

Instead of using your mouse to click on the header, use this shortcut to automatically select the entire column that you are working in.

CTRL + [ : Select all cells directly referenced by formulas in the selection

This shortcut is especially useful in excel worksheets that have seemingly endless formulas. If you quickly want to see what cells are referenced in a nother cell, use this Excel shortcut to see them. Of all of the shortcuts, this one I use the most as it keeps me from having to look through a formula and see what is referenced where.

CTRL + ; : Insert actual date in active cell

Can’t get a date? Hit this shortcut to get one quickly. (Only works in Excel, not real life)

CTRL + : : Insert actual time in active cell

Need to remember right when you input some data into your spreadsheet? Using this function will place the exact current time in a cell of your choosing.

CTRL + A : Select All

If you are frustrated with your worksheet and just and to start over, use this shortcut to select all and delete. When the frustration abides and you want all your work back, just hit CTRL + Z and your job will be saved.

CTRL + Shift + J : List Constants

Hitting this will list your properties/methods/constants within a worksheet.

CTRL + D : Copy equation down

This command will make an exact copy of the formulas in the cell above it. Useful for repeating cells or if you want a new cell with a slightly altered formula quickly.

CTRL + F : Find

Forgot where you put that crucial piece of data, use this shortcut to quickly find it.

CTRL + H : Find&Replace

If you misspelled a word or just want to replace something with a new something, the find and replace function is the best way to go about it.

CTRL + Right arrow : Move right

Essentially, this pages right in your Excel worksheet.

CTRL + Left arrow : Move left

This does the same thing as the page right above, except it pages left.

CTRL + Up arrow : Move up

Use this function to page up in a worksheet.

CTRL + Down arrow : Move down

Use this function to page down in a worksheet.

CTRL + Enter : Same data in multiple cells

If you need to enter the same data into various cells, this function allows you to do it incredibly quickly.

Shift + SpacebarSelect the entire row

If you are working in a cell and realize you need to select the entire row that cell is in, hitting this Excel shortcut will automatically select the row. You can then delete the entire row or make whatever changes you think are necessary.

Shift + F3 : Find Previous

If something in your data is starting to look a little repetitive, you can use this shortcut to make sure you aren’t just going crazy. Find Previous is especially useful for finding patterns in a spreadsheet or seeing when something occurred before.

Using some of these shortcuts can seem tedious at first, but as soon as you get the motions down, it can speed up your work pace by a lot! All of these shortcuts should work on Windows machines, but Mac keystrokes will likely be different. Some will be similar but others won’t exist. If you know of a Mac shortcut that does the same as some of the shortcuts listed here, post them in the comments to help everyone out!

If we missed anything, or you just want to share your favorite Excel shortcut, let us know in the comments!

SEE ALSO: Best Hidden Tricks in Microsoft Excel

Written by Trevor English

Sursa: interestingengineering.com


Cele mai bune 37 de site-uri cu care vei învăța ceva nou

Uită de cursuri scumpe, audiențe înfundate și rezultate lamentabile.

Aceste site-uri și aplicații sunt dedicate unei game variate de subiecte din domeniul științei, artei și tehnologiei.

Ele te vor învăța totul, de la gătitul cartofilor prăjiți până la crearea aplicațiilor în node.js, și în cele mai multe cazuri – absolut gratuit!

Acum nu ai nicio scuză pentru a nu dobândi o nouă abilitate și multiplica cunoștințele.

Poți învăța interactiv, în ritmul propriu și fără a vă părăsi casa. Este greu să îți imaginezi ceva mai simplu.

Cursuri online

edX – Cursuri online de la cele mai bune universități din lume

Coursera – Cele mai bune cursuri online gratuite din lume

Coursmos – Micro cursuri în orice moment și pe orice suport

Highbrow – Abonament la cursuri, la ora convenabilă

Skillshare – Lecții online și proiecte pentru dezvoltarea creativității

Curious – Extinde-ți abilitățile cu ajutorul cursurilor video

lynda.com – Studiază tehnologiile, creativitatea și afacerile

CreativeLive – Lecții gratuite de creativitate de la experții de frunte din lume

Udemy – Dezvoltă aptitudini reale și utile online

Învață să programezi

Codecademy – Curs gratuit și interactiv de programare

Stuk.io – Învață programarea de la zero

Udacity – Obține o diplomă, recunoscută de liderii industriei

Platzi – Streaming video cu lecții de design, marketing și programare

Learnable – Cel mai bun mod de a învăța programarea web

Code School – Află cum să programezi în practică

Thinkful – Dezvoltă-ți cariera prin sesiuni 1 la 1

Code.org – Începe să înveți astăzi cu o practică ușoară

BaseRails – Învață Ruby on Rails și alte tehnologii web

Treehouse – Învață aplicații HTML, CSS, aplicații pentru iPhone și multe altele

One Month – Învață cum să programezi și să creezi aplicații web într-o lună

Dash – Învață să dezvoți site-uri cool

Învață să lucrezi cu datele

DataCamp – Tutoriale online și cursuri de lucru cu date

DataQuest – Învață să lucrezi cu datele în browser

DataMonkey – Dezvoltă-ți abilitățile analitice într-un mod simplu și interesant

Învață o limbă nouă

Duolingo – Învață limbi străine gratuit

Lingvist – Învață o limbă nouă în 200 de ore

Busuu – Comunitate gratuită pentru învățarea limbilor străine

Memrise – Memorează cuvintele cu ajutorul cardurilor

Extinde-ți cunoștințele în toate domeniile

TED-Ed – (Tehnologie Divertisment și Design) Sunt o serie de conferințe globale, organizate pentru a răspândi “ideile care merită promovate”

Khan Academy – Vizitează o vastă bibliotecă de conținut interactiv

Guides.co – Aici găsești cea mai mare colecție de ghiduri online

Squareknot – Ghiduri utile pas cu pas

Learnist – Învață după un conținut foarte bine selectat

Prismatic – Învață lucruri interesante pe baza recomandărilor sociale

Bonus

Chesscademy  – Învață gratuit să joci șah

Pianu – Un nou mod de a învăța interactiv pianul online

Yousician – Profesorul tău personalul de studiere a chitarei în format digital

Sursa: lifter

Sursa: eustiu.com


How to Choose a Safe Seat in 7 Means of Transport

Taking any transport, in most cases we think about comfort during the trip. Yet we shouldn’t forget about safety because every vehicle has seats where we most probably won’t get hurt in an accident.

Bright Side collected for you a list of such seats in 7 various means of transport, the safety of which was determined on the basis of different studies and statistics.

7. Car

  • Safe seats: in the back seat behind the driver and in the middle since this part of the car is least deformed in a front-to-front crash.
  • Dangerous seats: next to the driver because in an accident they reflexively try to dodge, and the person sitting next to them will be in danger.

6. Minibus

  • Safe seats: located against the direction of travel since there are fewer chances of hitting your head on the back of the chair with sudden braking.
  • Dangerous seats: next to the windows and doors as broken glass can cut you in an accident. As in a car, it’s better to avoid seats next to the driver.

5. Trolley bus

  • Safe seats: in the right row on the aisle (in case of right-hand driving) since the oncoming transport moves on the left, and there are fewer chances to get hurt. The seats in the middle of the cabin, located with their backs in the direction of travel, are also considered safe.
  • Dangerous seats: as in minibuses, it’s better to avoid seats next to windows and doors in order not to suffer from glass shards.

4. City bus

  • Safe seats: rightmost seats in the middle of the cabin, located in the direction of travel, as they’re farther than the rest from oncoming traffic.
  • Dangerous seats: the first two rows of seats as foreign objects and fragments often get in through the huge windshield. The same applies to the places next to the windows and doors. The back row of seats is dangerous in case of a hit from behind.

3. Train

  • Safe seats: closer to the middle of the carriage. It’s better to choose the 5th or 6th carriage, one closer to the middle of the train, as in a collision the first and last carriages either deform or go off the rails.
  • Dangerous seats: seats in the direction of travel as there are fewer chances you’ll fall down with a sudden braking.

2. Ship

  • Safe seats: deck and cabins located closer to it since the upper part of the ship is the last to sink.
  • Dangerous seats: the lower cabins since in the case of a hole they’re flooded from all over, and it’s much more difficult to get out.

1. Plane

Experts still cannot agree in which part of the plane the safest seats are located. Yet most experts say the back of the plane is less dangerous than the first rows at the front.

Yet the most important thing is to stay calm, remember the safety principles, and follow the rules of the road and behavior on public transport. In this case, the probability of getting into an accident will be reduced to a minimum.

Sursa: brightside.me


How to Fix All Your Sleep Problems With Science

We spend about a third of our life sleeping. Both the quality of our night’s rest and our overall health depend directly on our sleep posture and on what we do before going to bed.

We at Bright Side have put together recommendations from top specialists on how to sleep properly to fix all of your health problems.

Shoulder pain

If you wake up with a sore shoulder, avoid sleeping on your side, especially on the painful shoulder. It is also not advised to sleep on your stomach since it causes misalignment of the shoulders.

The best sleeping posture is lying on your back. Put a thin pillow (an orthopedic pillow will work best for you) under your head. Take another pillow, place it on your stomach, and hug it. Your shoulders will now be in the correct and stable position.

If you don’t like sleeping on your back, try lying on the side that is not painful. Draw your legs up slightly toward your chest, and place a pillow between your knees. Sleeping with your hand under your head is not advisable since it produces an unnatural position of the shoulder.

Back pain

If you have back pain, maintaining the normal curves of your spine is very important. If your mattress is overly soft, it’s time to get a new one.

Sleeping on your back is probably the best position for you. Place a pillow under your knees to help restore natural spinal curves and reduce the tension in your tendons. You might also try a small rolled towel under your lower back for additional support.

If you’re a stomach sleeper, put a pillow under your lower abdomen and pelvis so that the small of your back doesn’t move forward.

If you like sleeping on your side, then it’s best to take the fetal position. Draw your legs up slightly toward your chest, keeping your back naturally arched. Put a small pillow between your knees. This can help you take the load off your lower back.

Neck pain

Just like with back pain, your neck needs to be supported while you sleep.

In general, sleeping on your back with a pillow under your head and a pillow under each arm is the best option. People with neck problems should choose their pillows very carefully, and it’s best to go for orthopedic or roll pillows.

If you prefer to sleep on your side, make sure your pillow is not too high. It shouldn’t be thicker than 6 inches. Ideally, the height of your pillow should match the width of one shoulder to help keep your neck in the correct position.

If you’re a stomach sleeper, use the thinnest pillow you can find. It’s better not to sleep in this position at all since lying all night with your head turned to one side will strain your neck.

Can’t fall asleep

It can be tough to banish phones and computers before bedtime, but you should. It really helps if you have trouble falling asleep. The light from screens affects our sleep-wake cycles.

Avoid consuming caffeine — coffee, energy drinks, soda, black tea, chocolate — at least 6 hours before going to bed.

Exercise in the morning and afternoon. This helps to tone your whole body, improves your blood circulation, and helps you fall asleep much faster.

Can’t stay asleep

If you often wake up in the middle of the night, you should not only stop using your gadgets before going to sleep but also avoid alcohol before bedtime. Alcohol disrupts the water balance in your body and affects your sleep cycle.

Moreover, check your room temperature. The ideal sleeping temperature is 20-22°С.

Can’t wake up

Everyone seems to suffer from this problem, but, oddly enough, it’s very easy to solve. Set your alarm for the same time every day (even on the weekends). If you want to wake up early, you need to go to sleep early in the evening.

Snoring

If you tend to snore, avoid sleeping on your back. In this position, throat tissues sag and your tongue falls backward into your throat narrowing the airway.

Choose your pillow carefully. Overly soft pillows can cause your head to tilt backward and increase snoring. Use an extra pillow or elevate the head of your bed a few inches to stop your tongue from falling back over your windpipe.

Sleep on your side. With your head lying in a natural position, nothing will restrict the airflow.

Do special exercises. Exercising the muscles of your tongue and throat can help strengthen them and reduce snoring.

Leg cramps

Leg cramps are usually sudden spasms, or tightening, of muscles in the calf, feet, or thighs. Almost 80% of people suffer from this problem, regardless of age. Night leg cramps are most often related to some disease, nerve damage, or lack of trace elements. If you experience this condition too often, talk to your doctor.

One good way to stop leg cramps is to get the calf muscle stretched and strengthened. You can try doing yoga or massaging your legs before bedtime. Just remember: if you want to achieve good results, you should exercise regularly.

Other problems

Sleep disorders can be caused by many factors, from fatigue and uncomfortable shoes to problems with the digestive or nervous system. Only a doctor can determine the cause of the problem and advise on the treatment.

If you suffer from frequent heartburn it’s a good idea to lie on your left side while catching some z’s. The left-side sleeping position prevents stomach contents from coming back up into the esophagus, preventing heartburn.

Do you have aching legs at night? Use a roll pillow or the foot of your bed to keep your legs lifted during sleep. The venous blood accumulated in your legs will run downward, and you’ll feel better. Also, try rubbing or lightly massaging your legs before retiring for the night, and avoid consuming caffeine at least 6 hours before bedtime.

Preview photo credit Illustrated by Natalia Kulakova
Photographer Roman Zakharchenko, Model Olga Zakharchenko for BrightSide.me
Based on materials from thisisinsider

Sursa: brightside.me


6 Stylist Tricks to Make You Appear Taller​

There isn’t a single girl who doesn’t want to be stylish, but, unfortunately, not all fashion trends go well with all types of heights and figures. That’s why when one woman wears fashionable clothes like they were made for her, another lady may find herself literally ’shortened’ by them with undesirable added volume to boot.

We at Bright Side will show you how to avoid such mishaps. Here are six simple ways to appear taller and slimmer.

Pick the ’right’ shoes and accessories

The easiest way to become taller is with high heels. The color of your shoes is also of great importance: any neutral-colored footwear will make your legs seem longer, while black shoes, especially those with high lacing, will make your legs look shorter instead.

In our example, you can also see that you shouldn’t wear accessories that ’cut’ your image in a horizontal line, like the now-trendy choker which makes your neck look thicker and your whole body a little stocky.

Be careful with striped prints

From this example, you can see that you shouldn’t wear the currently fashionable striped clothes without careful thought. Horizontal stripes add volume, while the incorrect combination of this print and a knee-length skirt will make you look about an inch shorter. A striped top with a monotone midi-skirt, on the contrary, will ’lengthen’ your shape.

Choose jeans and bags according to your height

If you are of a smaller height and wear shortened jeans, they can make you even smaller. Combine such jeans with high-heeled shoes and a crop top. High-waist jeans may also help you adjust your height and look taller. Vertical line accents will add to the effect — for example, pant stripes will lengthen your legs.

Pay special attention to the size of your bag. The best choice for petite ladies is a small bag of no more than ten inches in width. A fashionable shopper bag will make your image heavier.

Try palazzo pants

Palazzo pants are a great way to conceal high heels or platform shoes while still making your legs much longer and making you look taller. Try choosing calm and simple single-tone styles. A shortened top with high-waist pants is a combination that has been fashionable for many seasons. This trick will maintain your upper and lower body proportions and make your legs look longer. If you’ve chosen a sweater or a blouse, you could wear a thin belt or, like in our example, tuck it into the pants.

Don’t disregard pencil skirts

Pencil skirts should be noted in particular: they make you look much slimmer and taller. If you don’t have a short top, a white shirt or blouse will help you, so always have one at hand. In our case, it should be tucked inside the skirt, which will make you look significantly slimmer.

Wear shirtdresses correctly

A shirtdress has an interesting design and goes well with almost any kind of figure. However, petite girls may find it looks awkward on them, as though it was made for a person of greater height. It also can give you some excess volume in the waist. This is easily adjusted, though: just apply a belt and roll up your sleeves. The perfect sleeve length for petite girls is 3/4. In addition, try choosing a single-tone shirtdress.

Sursa: brightside.me


Cheat Sheet: How to Choose the Perfect Pair of Jeans

Jeans are a magic wand that can easily give you the answer to the question of what to wear. The most important thing is they should fit well, hide your body’s drawbacks, and emphasize your best features. Bright Side prepared a cheat sheet to help you choose the best-fitting and most flattering pair of jeans.

Illustrated by Astkhik Rakimova for BrightSide.me

Sursa: brightside.me