Cum comanzi pe Amazon, din Romania si cat costa

Cum comanzi pe Amazon, din Romania ?

Pasi simpli pentru a face comenzi pe Amazon, explicati pe intelesul tuturor.

Cum comanzi pe Amazon din Romania si cat costa sunt intrebari la care, tot mai multi romani cauta raspunsuri.

Dupa cum toata lumea stie Jeff Bezos CEO Amazon este cel mai bogat om al platenei (cel putin la data acestui articol). A ajuns cel mai bogat om, datorita succesului pe care platforma online o are la nivel mondial.

Totul a inceput cu vanzarea on-line de carti si a ajuns la vanzarea on-line de… aproape orice iti poti imagina.

Avantajele pentru cumparatorii de pe Amazon sunt diversitatea foarte mare de produse si preturile mici.

In cele ce urmeaza, va voi arata cum sa-ti faci un cont pe Amazon.co.uk , cum poti sa comanzi din Roamania si la ce costuri.

Sa incepem …

Cum creezi un cont pe Amazon

Pentru a putea comanda de pe Amazon, trebuie sa avem un cont activ.

Pentru asta intrati aici: amazon.co.uk si urmati pasii de mai jos:

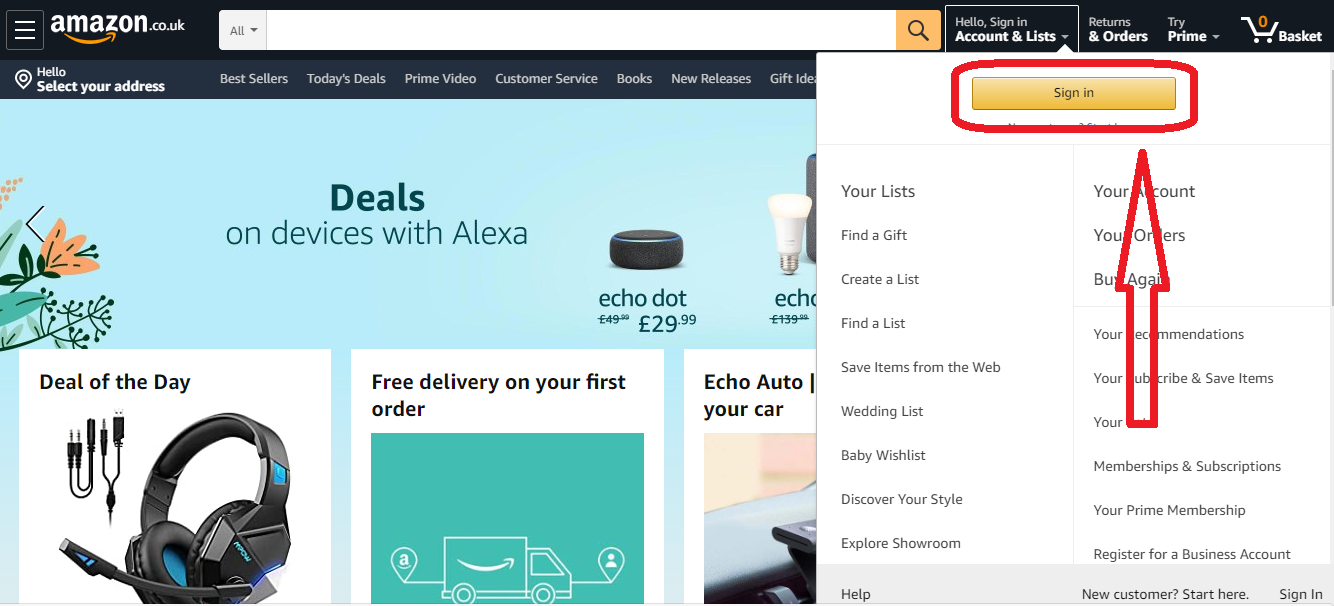
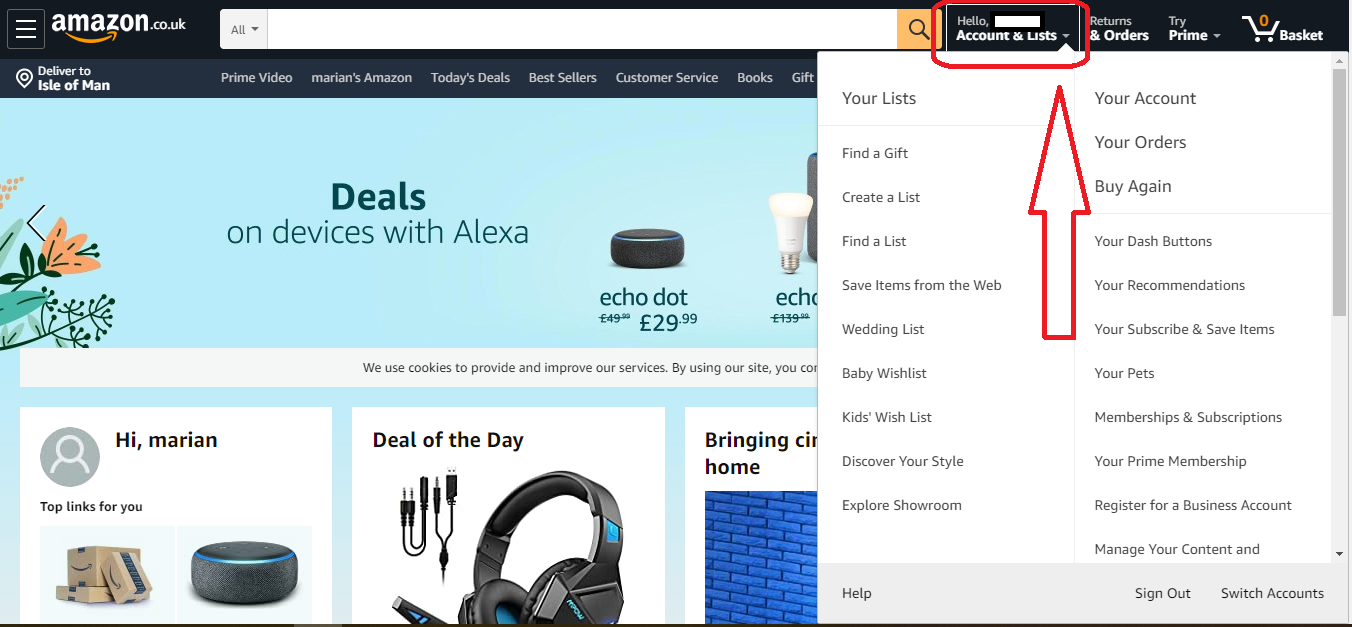
Accesati „Account and Lists„:

Dati click pe „Sign In

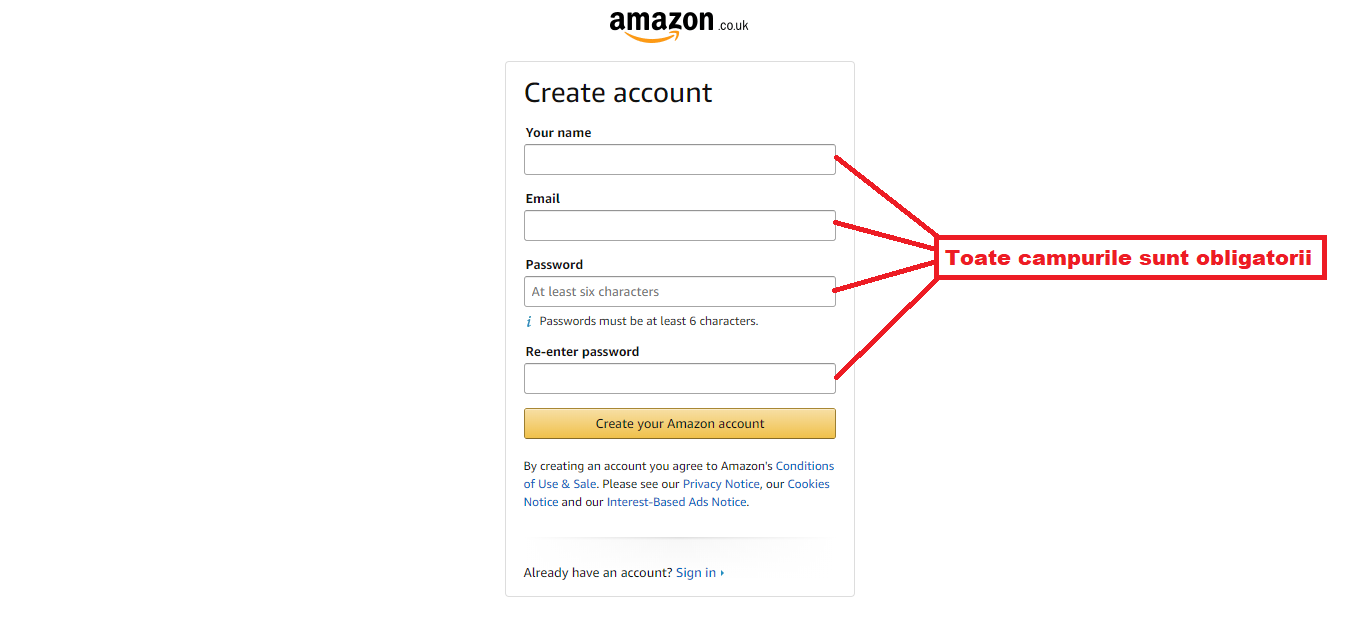
Completati toate campurile pentru crearea contului (toate campurile sunt obligatorii).

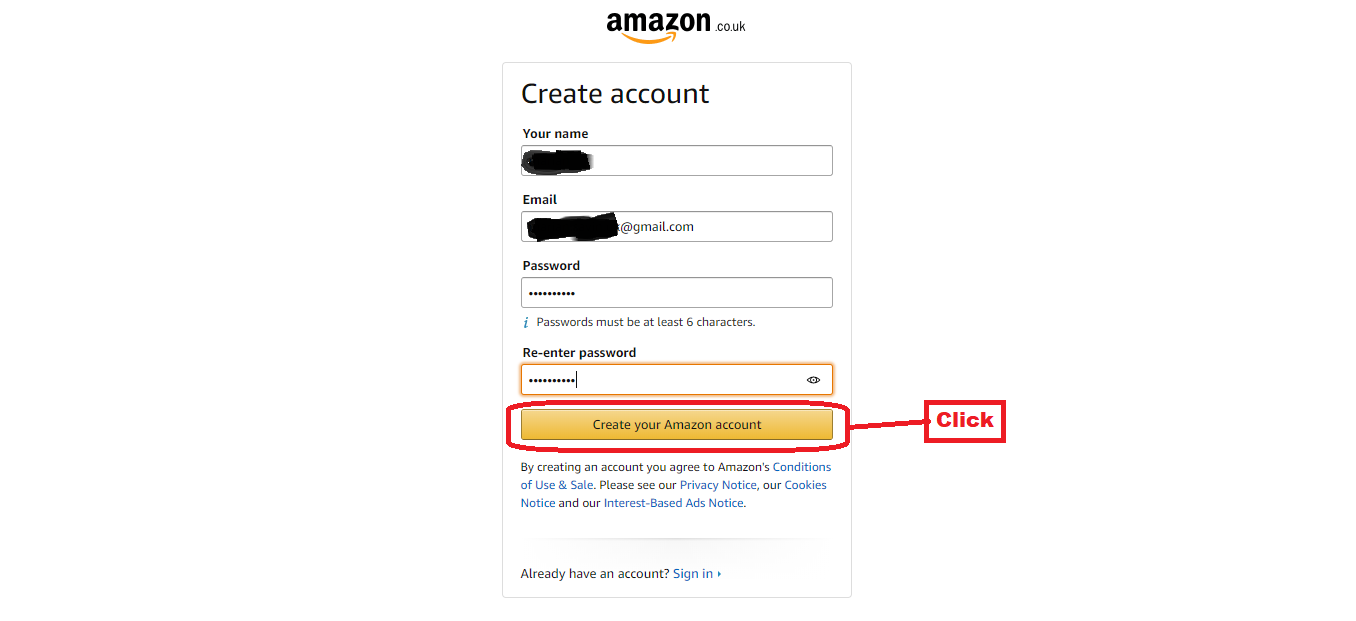
Dupa completare, click pe „Create your Amazon account

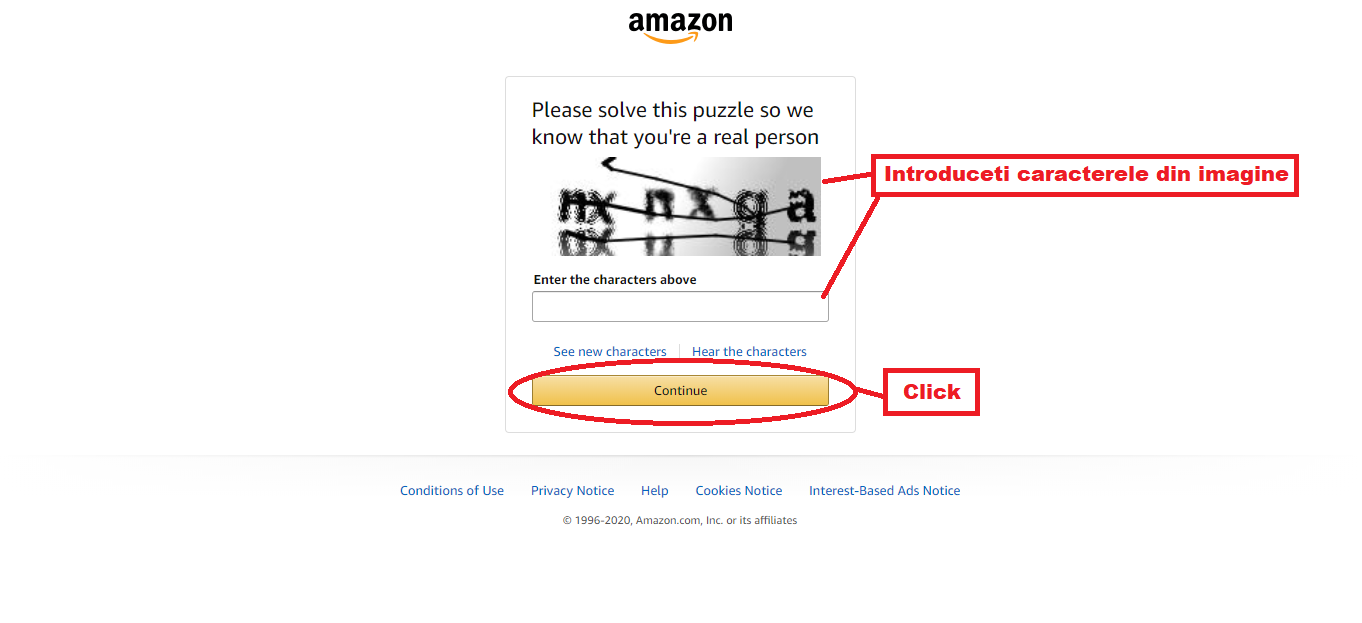
Exista o verificare a faptului ca sunteti o persoana reala si nu program automat. Va trebui sa introduceti caracterele pe care le vedeti in imagine si apoi clic pe „Continue

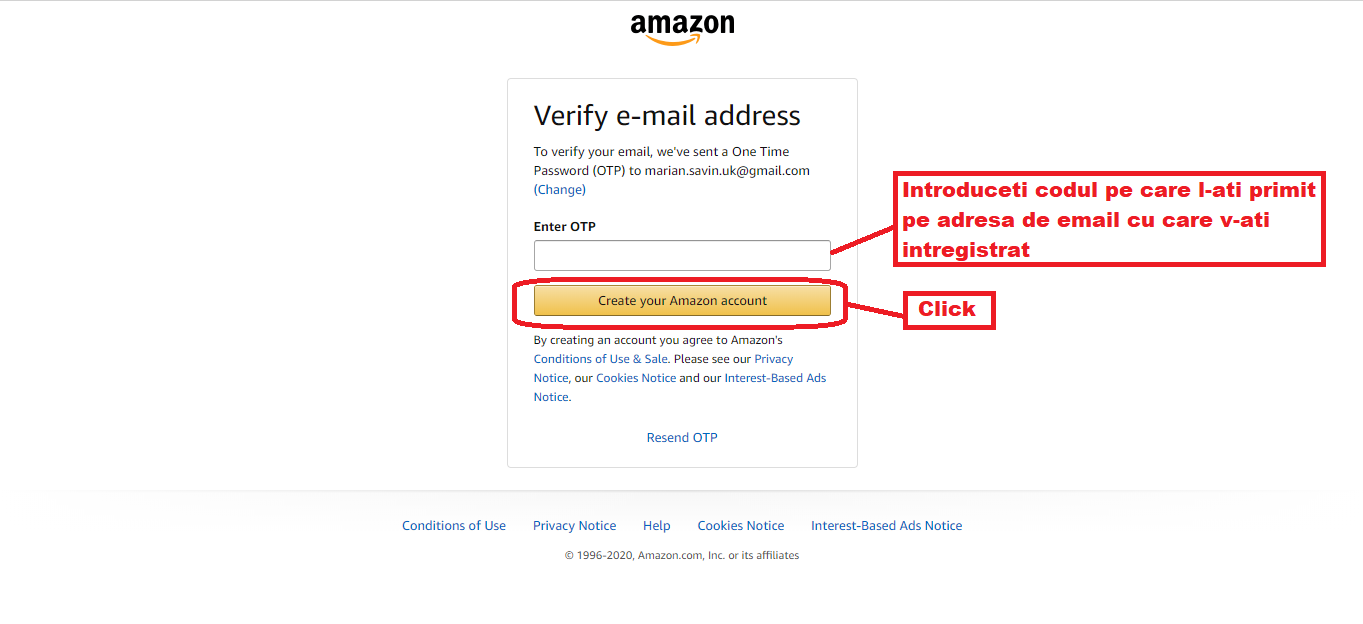
Pe adresa de e-mail cu care v-ati inregistrat veti primi un cod de confirmare a contului. Introduteti acest cod si click pe „Create your Amazon account” pentru verificarea adresei de e-mail

In acest moment aveti un cont de Amazon creat

Cateva setari de baza pentru contul Amazon

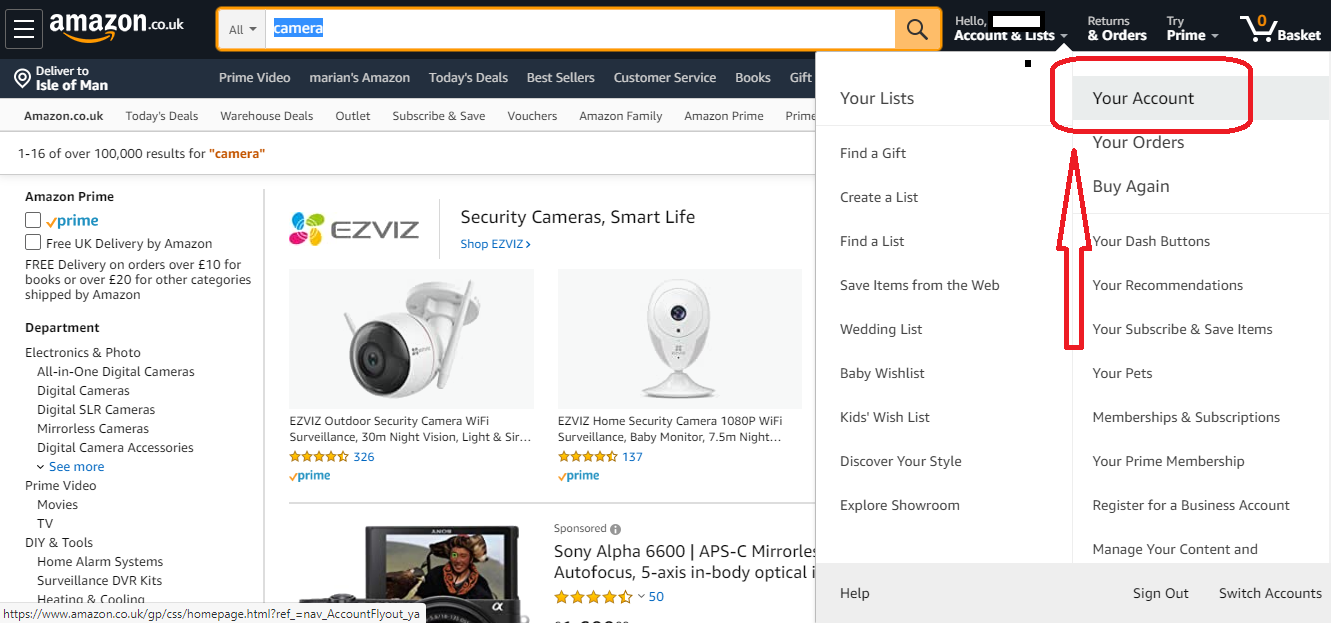
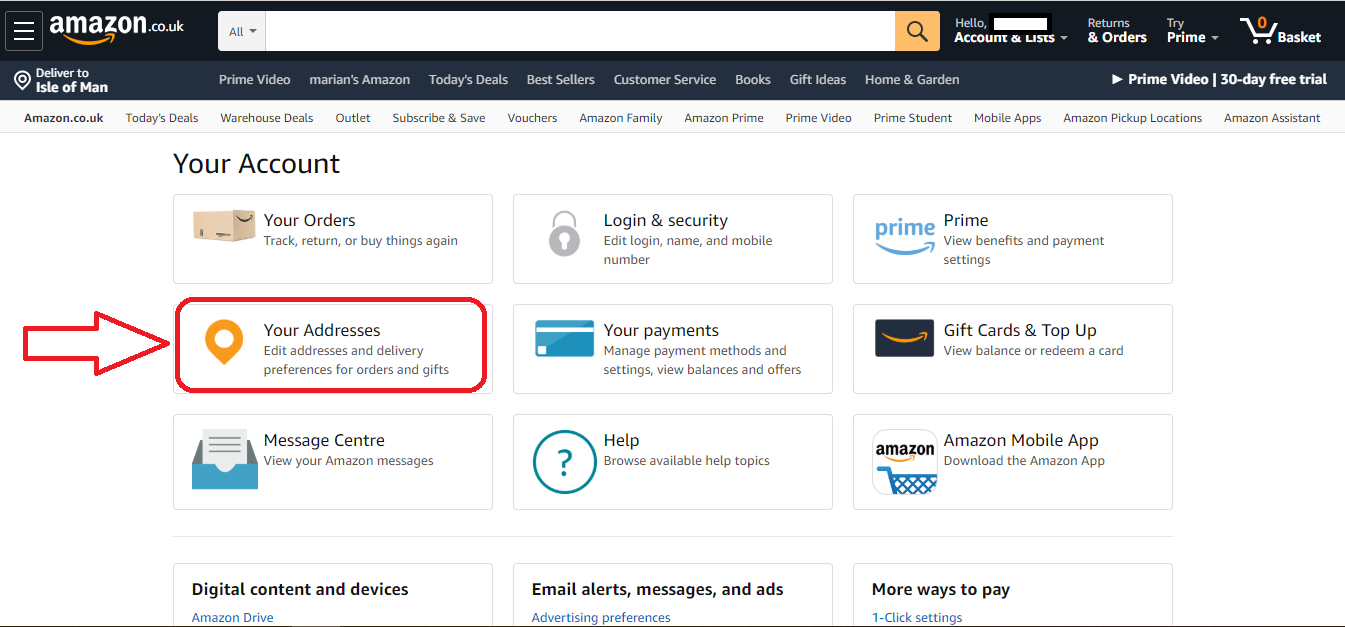
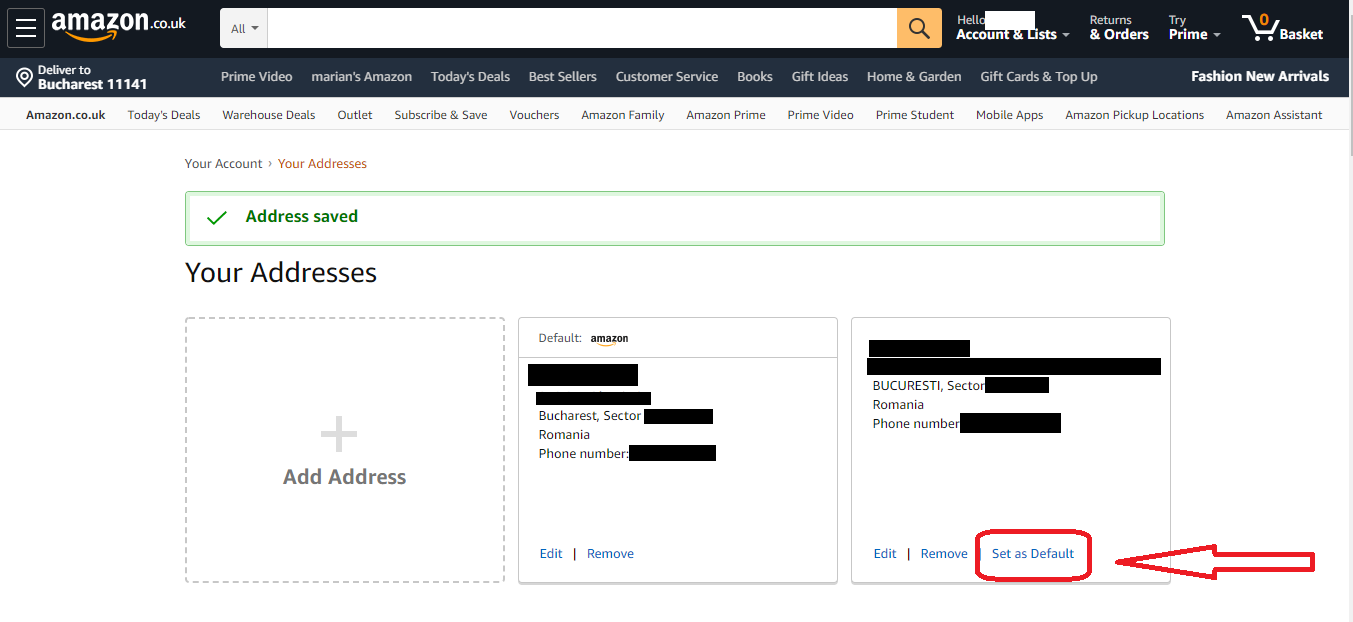
Recomandarea mea este ca, prima data cand folositi contul sa intrati in setarile contului, sa introduceti adresa sau adresele de livrare si sa setati o adresa principala (clic pe „Set as default„).

Dupa cum veti vedea mai jos, in momentul in care ati setat o adresa de livrare, pe pagina produsului dorit va va aparea si data aproximativa de livrare.

Cum comandam efectiv si cat costa

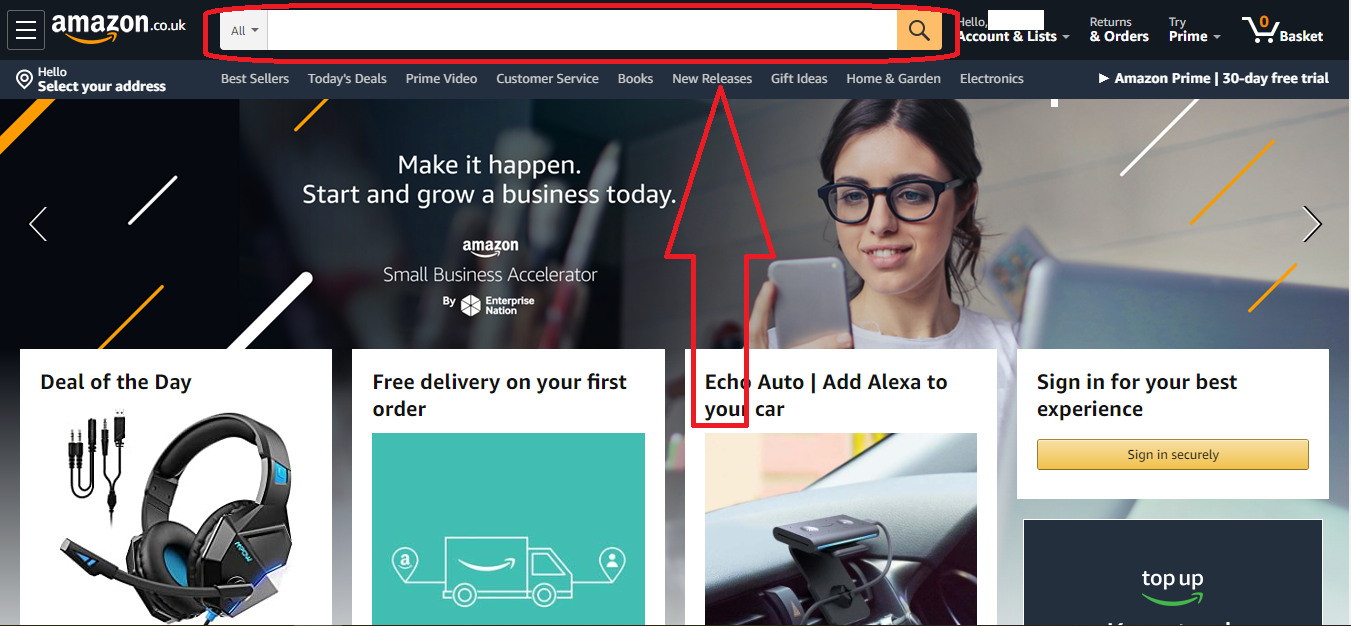
Dupa ce ati facut aceste setari puteti accesa Amazon.co.uk si sa incepeti cautarea produselor dorite in bara de cautare

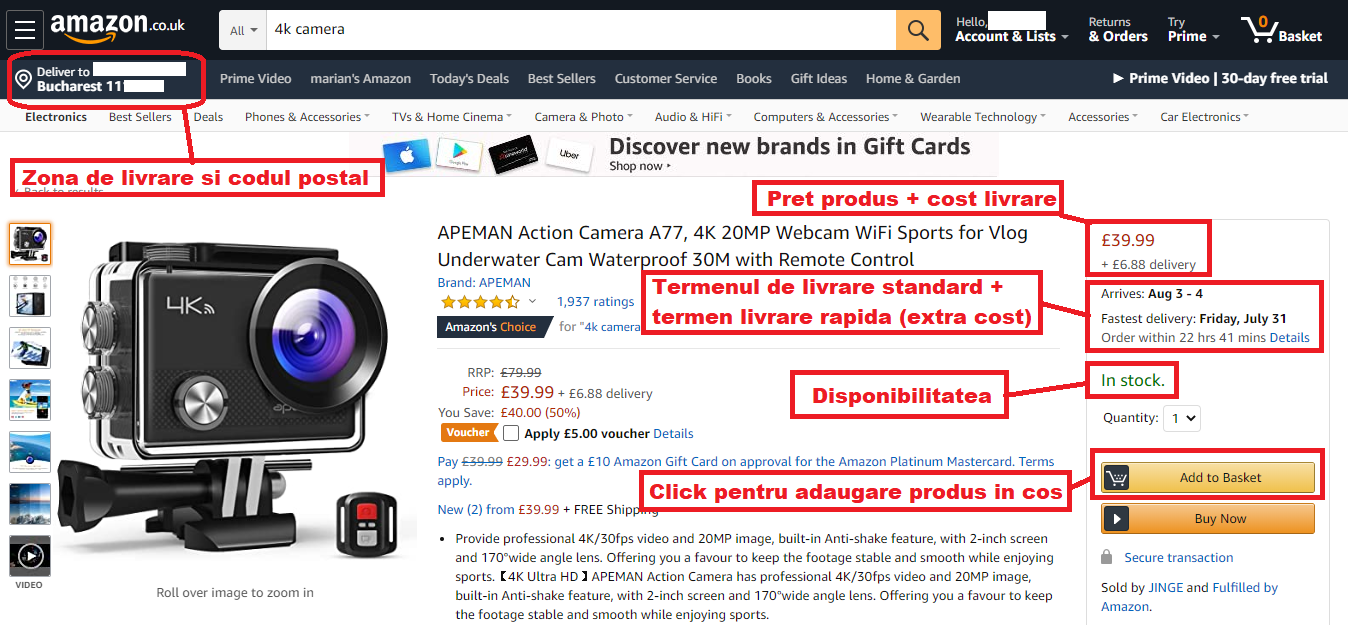
In momentul in care ati intrat pe pagina produsului dorit, veti observa mai multe informatii importante:

  • pret produs
  • cost livrare (catre adresa principala setata)
  • termen livrare standard
  • termen livrare rapida
  • disponibilitate
  • zona (orasul) de livrare si codul postal

Pentru a adauga produsul in cosul de cumparaturi, click „Add to Basket

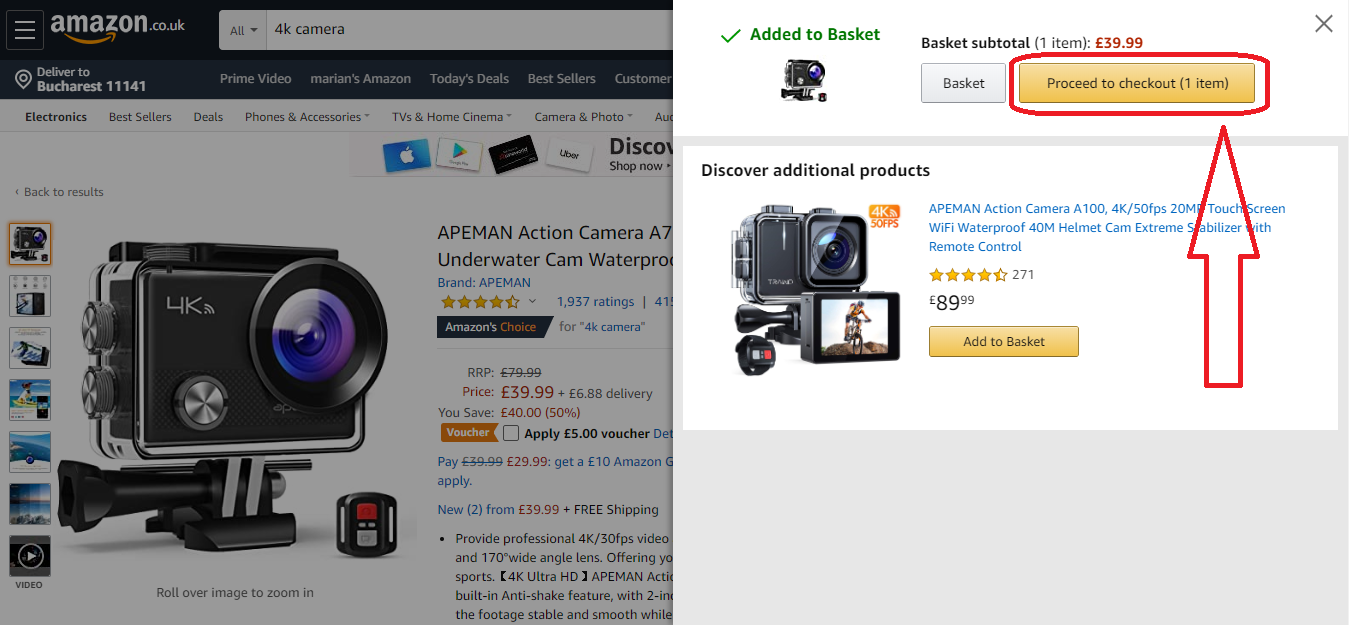
Puteti proceda la fel cu mai multe produse. Dupa ce ati adaugat in cos produsele dorite, click „Proceed to Checkout” pentru a finaliza comanda.

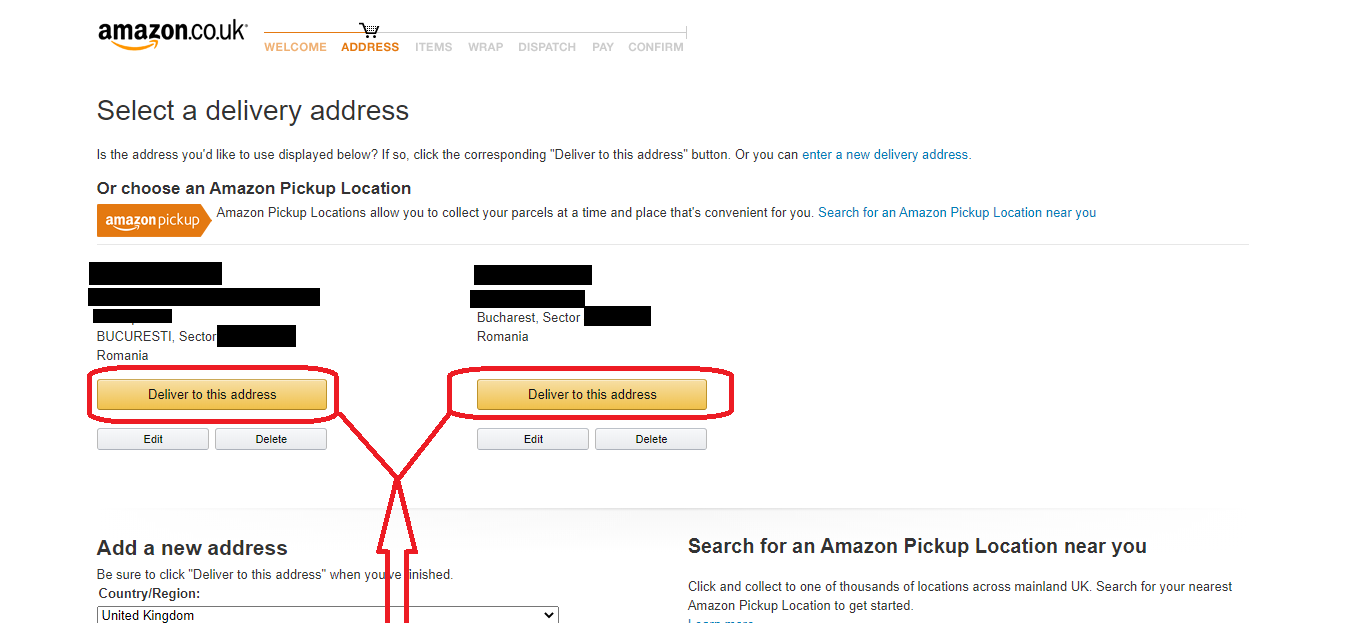
La urmatorul pas, vi se va cere sa setati adresa de livrare (in cazul in care ati introdus mai ulte) sau sa introduceti o adresa de livrare noua.

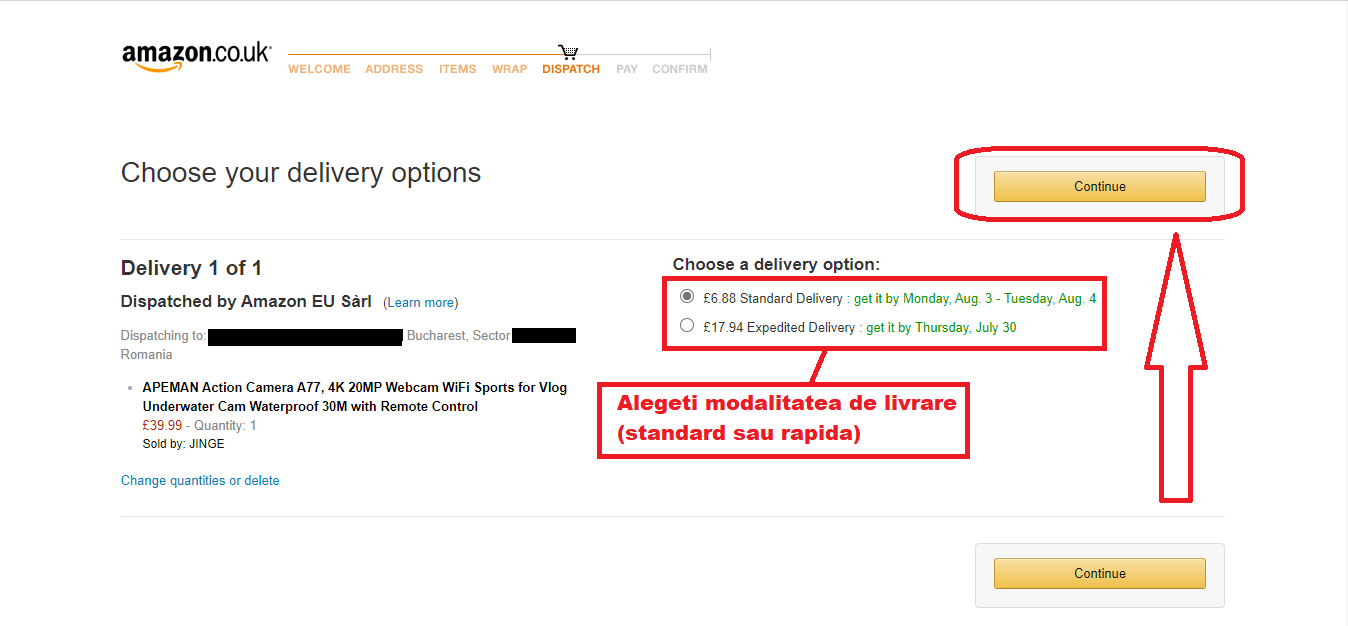
Urmatorul pas va ofera posibilitatea de a seta optiunea de livrare (standard sau rapida) apoi , click pe „Continue

Cum platim pe Amazon

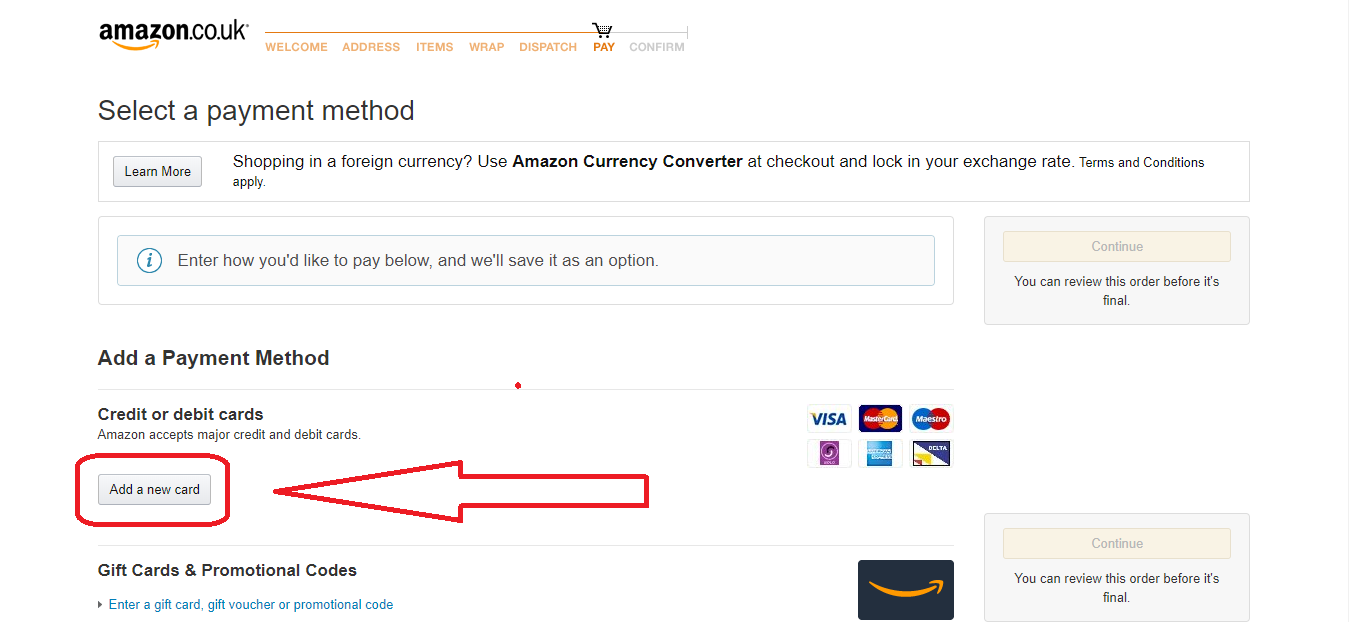
Acum a venit momentul sa introduceti un card cu care veti face plata produlelor adaugate in cosul de cumparaturi.

Aveti posibilitatea sa faceti plata si cu vouchere sau coduri de promotie („Gift Cards” or „Promotional Codes„)

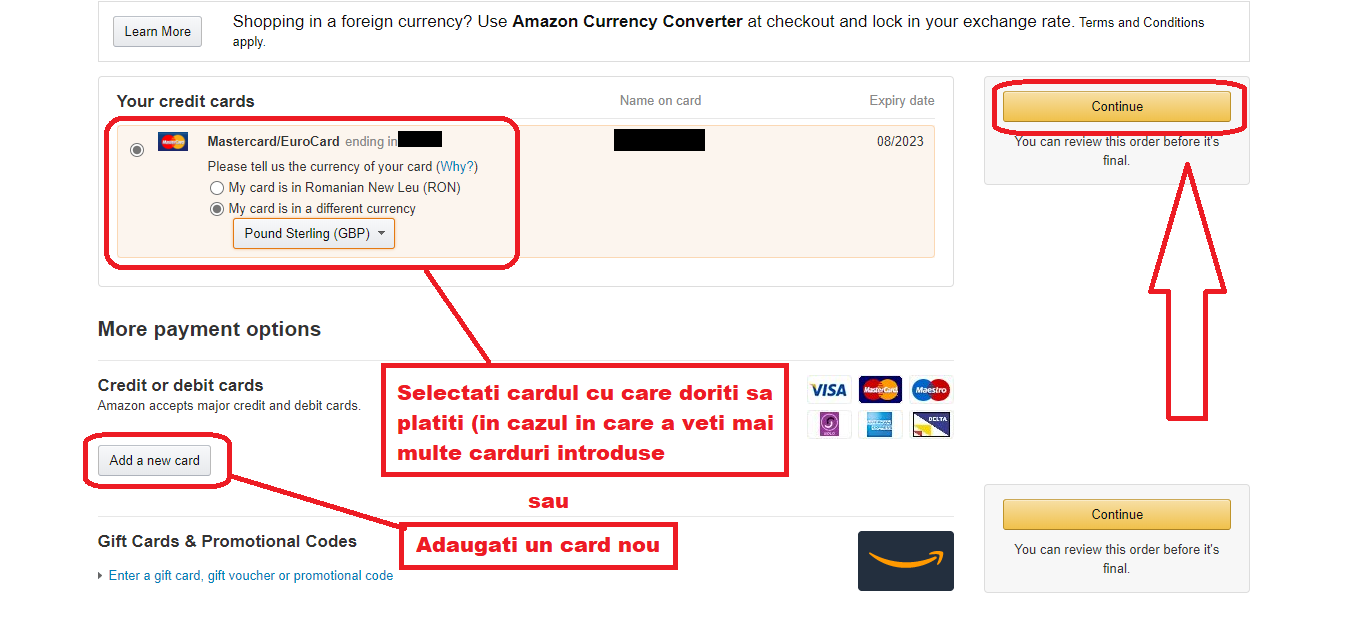
Urmatorul pas, va ofera posibilitatea de a selecta cardul cu care doriti sa faceti plata (in cazul in care ati introdus mai multe carduri) apoi, click pe „Continue

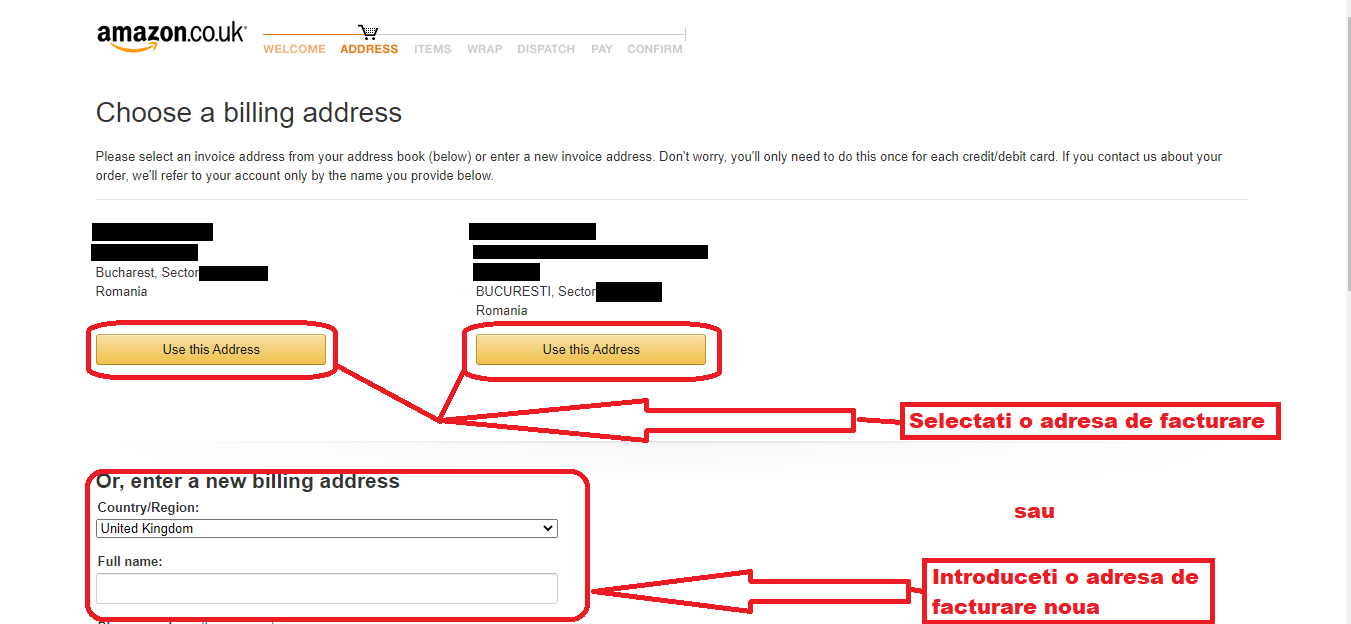
Pasul urmator, alegerea adresei de facturare. Puteti alege dintre adresele deja introduse sau puteti introduce o adresa noua.

Ultimul pas este revizuirea comenzii, unde puteti verifica comanda. La acest pas puteti modifica adresa de livrare, cardul cu care faceti plata si modalitatea de livrare.

Daca totul este asa cum doriti, puteti da click pe „Buy now” sau puteti edita comanda.

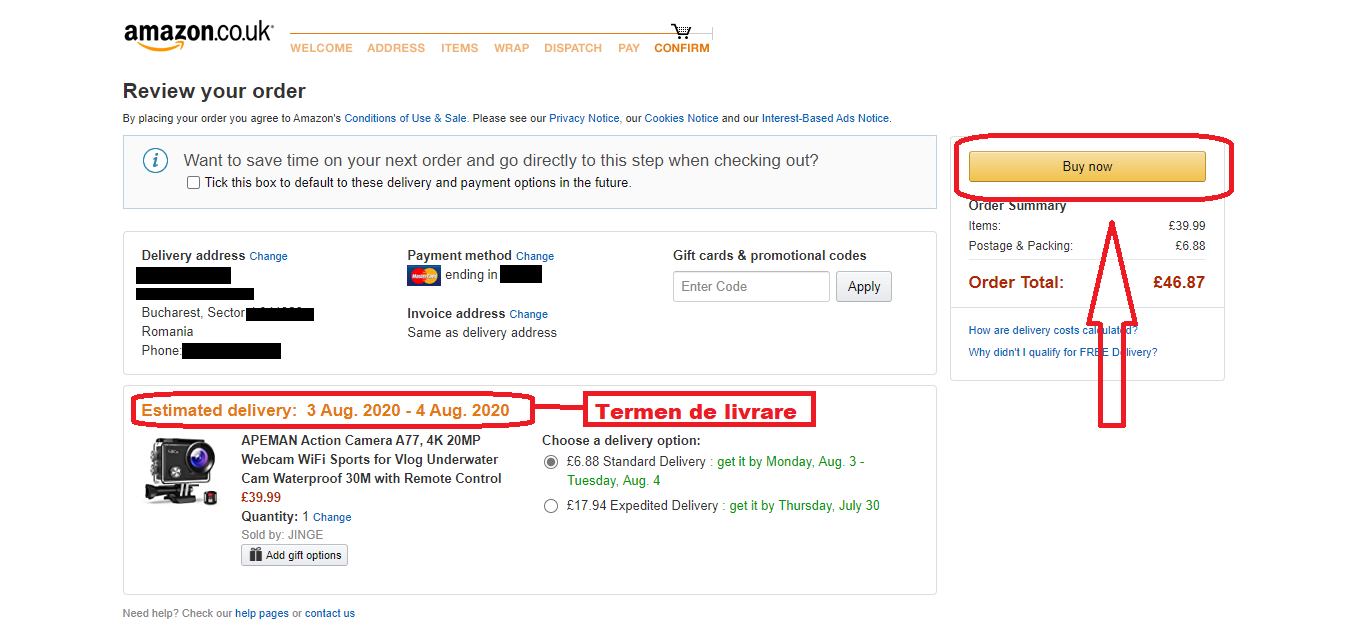
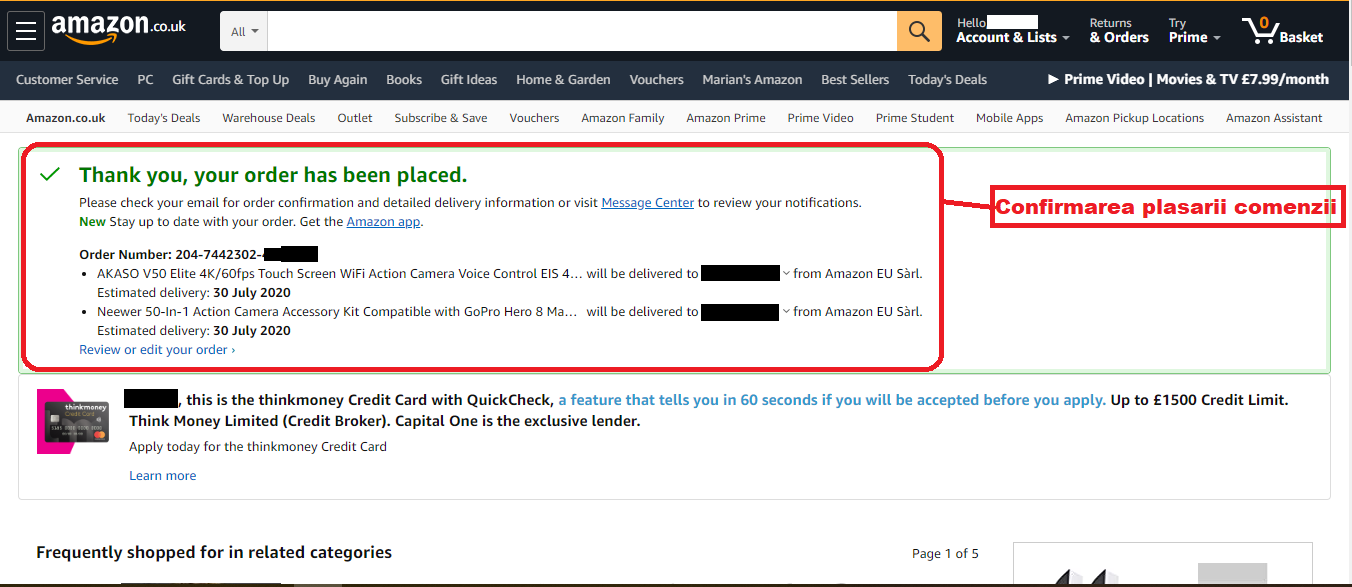
Ultimul pas: confirmarea plasarii comenzii.

Pe adresa de e-mail veti primi un mesaj cu confirmarea si detaliile comenzii.
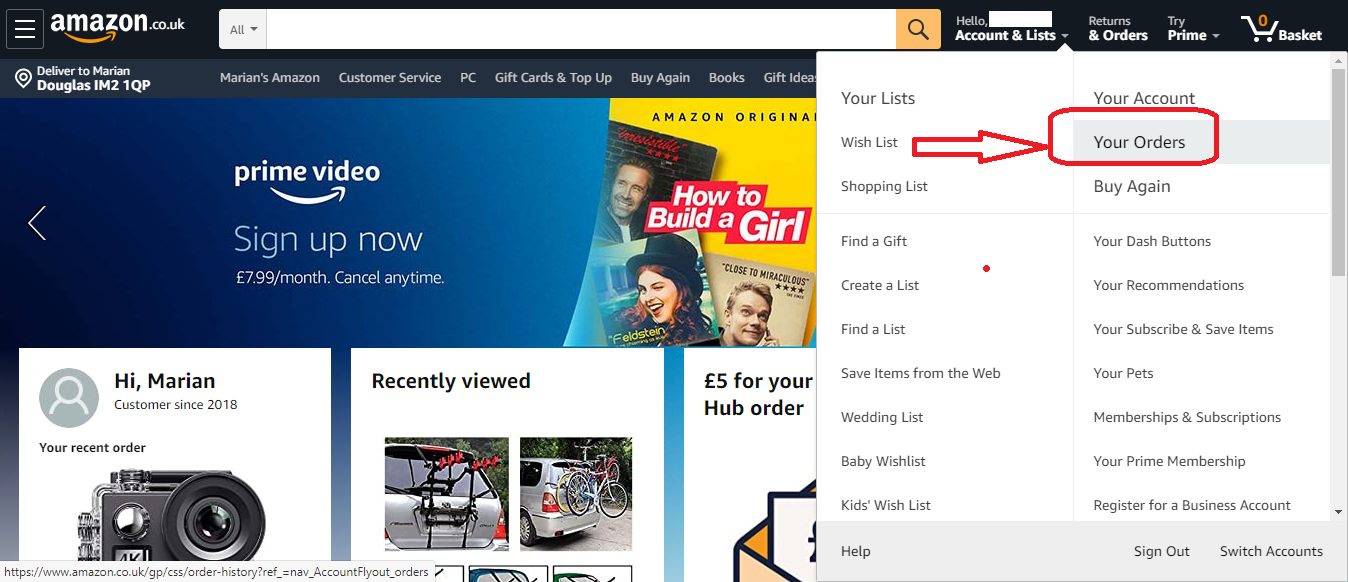
Urmarire comanda

Pentru a urmari comada mergeti la „Account & Lists” apoi „Your Orders

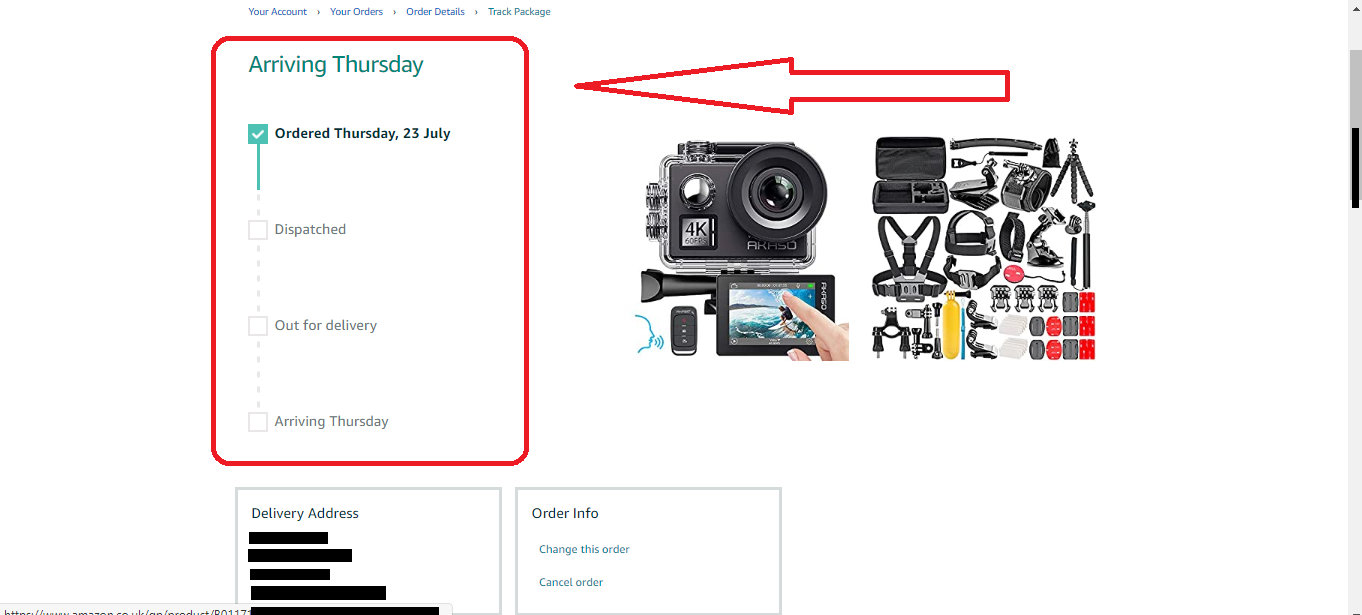
Apoi ” Tracking Package„…

Mai jos , vedeti cand va ajunge comanda si in ce stadiu este la momentul respectiv

Cum comanzi pe Amazon din Romania si cat costa? Sper ca acum aveti raspunsuri la aceste intrebari.

Pentru a accesa Amazon.co.uk click pe imaginea de mai jos:


Folosește oțet să păstrezi mașina curată și parbrizul dezghețat

Știi deja cât este de folosit oțetul la curățenia casei, dar te ajută să păstrezi și mașina curată. Iată cât de repede cureți petele cu oțet și cât de util este la mașină pe timp de iarnă.

Este bine să păstrezi în portbagaj un pulverizator cu oțet și apă. Folosește această combinație mai ales în sezonul rece, când parbrizul se încarcă de noroi și îngheață peste noapte. Iată cum te ajută oțetul să faci mașina curată lună.

Curăță ștergătoarele cu oțet

Dacă s-a terminat soluția cu care ștergi de obicei geamurile mașinii, folosește o combinație din 3 părți oțet și o parte apă. Cu ea poți curăța foarte ușor ștergătoarele murdare și înghețate, ca să nu mai lase urme pe parbriz.

Dezgheață parbrizul în câteva secunde

Nu este indicat să golosești iarna nici apă caldă, nici alcool sau sare pentru a dezgheța parbrizul. Mai bine pulverizează apă cu oțet și scapi de stratul de gheață în câteva secunde. Oțetul dizolvă și mizeria și vei curăța mult mai ușor geamurile mașinii, precum și oglinzile.

Oțetul scoate mirosul neplăcut din covorașe

Covorașele mașinii se murdăresc mai mult iarna, când intri cu încălțămintea plină de noroi și apă. Lasă covorașele să se usuce bine, îndepărtează noroiul uscat cu o perie aspră și apoi pulverizează oțet și apă și curăță-le temeinic cu un burete. Nu doar că vei scăpa de mizerie și de pete, dar vei scăpa și de mirosul de cauciuc și vei avea mașina curată!

Oțetul dizolvă stickerele de pe geamuri

Dacă te-ai plictisit de abțibildurile lipite pe geamurile mașinii sau pe caroserie, înmoaie-le bine cu apă caldă și oțet. Repetă acțiunea până când oțetul dizolvă lipiciul și le poți îndepărta fără să zgârii geamurile.

Cu oțet cureți banchetele și păstrezi mașina curată

Tapiseria banchetelor din mașină se pătează adesea cu sucuri, cafea și diverse alimente pe care le mănânci în mașină. Dar o poți curăța ușor tot cu ajutorul oțetului. Așteaptă o zi însorită, pulverizează oțet pe pete și freacă bine cu un burete moale. Lasă ușile deschise cel puțin o oră să se usuce bine tapiseria și să iasă mirosul de oțet. Sau dă căldura la maximum în mașină, dacă le cureți pe timp de iarnă, și tapiseria se va usca imediat.

sursa foto: 123rf.com

Sursa articol: libertateapentrufemei.ro


Cum se curata usor o tigaie arsa! Sigur nu stiai acest truc

Orice gospodina a avut cel puţin o dată în viaţă parte de o experienţă culinară dezastruoasă în urma căreia şi mâncarea şi oală în care a fost gătită s-au ars. Sigur ți s-a întâmplat și ție să se mai ardă tigaia sau oala atunci când faci mâncare, iar timpul petrecut frecând la ea să iasă arsura nu este deloc plăcut. De cele mai multe ori, cand gatim, suntem nevoiti sa facem mai multe lucruri odata, asa ca fie că le uiți pe foc, fie că nu reușești să le cureți impecabil după fiecare întrebuințare, grătarul, friteuza, oalele și cratițele se aleg, cu timpul, cu un strat rezistent de murdărie urscată. Dar toata lumea stie ca urmele de grăsime întărită sau mâncarea arsă sunt cele mai greu de curățat. Cu timpul, oalele și tigăile tale noi se înnegresc, iar vasele strălucitoare din aluminiu sau din inox își pierd luciul.

Cele mai multe gospodine cauta cele mai bune, ieftine si rapide solutii pentru curatarea vaselor arse, si, pentru ca a curata o astfel de oala nu este usor, iti prezentam o metoda inedita de a curata usor o tigaie arsa. Ai nevoie doar de un cartof mare si bicarbonat de sodiu. Sucul de cartof in contact cu bicarbonatul de sodiu curata extrem de bine!

  • Se taie cartoful in jumatate si se inmoaie in bicarbonat de sodiu.
  • Se sterge tigaia cu o jumatate de cartof. In unele locuri va trebuie sa depui putin mai mult efort, dar rezultatele vor aparea imediat.
  • Se continua procedura pana cand tigaia este curata.
  • Cartoful se inmoaie din cand in cand in bicarbonatul de sodiu.

Aceasta metoda poate fi utilizata si pentru a curata depunerile de grasime de pe aragaz si vesela.

Alte metode de curatare, mai putin cuoscute:

Cu făină: grăsimea arsă se înlătură și cu făină, fiindcă acest aliment acționează ca un burete, absorbind grăsimea. Inainte de toate, scurge uleiul din vasul ars, apoi pudreaza vasul cu un strat generos de făină, pe care o amesteci, cu ajutorul unei spatule din lemn, cu resturile de grăsime, până când se formează o pastă cu care freci toată suprafața friteuzei. Aduni pasta astfel formată în cocoloașe pe care le arunci în coșul de gunoi, după care ștergi toată suprafața friteuzei cu hârtie absorbantă. La final speli ca de obicei, cu apă caldă și detergent, insistând, dacă este cazul, pe ici-pe colo, pe unde a mai rămas o urmă de grăsime rebelă, cu o periuță de dinți veche.

Bicarbonatul de sodiu acționează la fel ca făina: absoarbe grăsimea ca o sugativă. Totul este să pudrezi friteuza din abundență și să lași bicarbonatul de sodiu să acționeze 30 de minute. La final este de ajuns să ștergi vasele cu buretele muiat în detergent lichid și să le clătești.

Oalele sau ibricele din alamă pot fi lustruite cu ketchup. Acoperă zonele pătate cu un strat gros de ketchup și lasă-l să acționeze cel puțin o jumătate de oră. Freacă apoi zona cu un burete, clătește și șterge imediat cu un prosop de hârtie, să nu rămână urme de apă.

Toarnă apă minerală în tigaia în care ai prăjit carne sau gogoși. Este indicat să adaugi apa minerală cât este caldă grăsimea, ca să se desprindă mai ușor când o cureți.

Sursa: suntgospodina.com


SIMPLU – Cum sa pui pilota in cearsaf in 90 sec

2 Pasi:

  1. Intoarceti cersaful pe dos. Puneti pilota deasupra. Rasuciti-le impreuna ca pe o clatita
  2. Intoarceti capetele cearsafului pe fata astfel incat pilota sa ramana in interior. Tineti de capete si scuturati astfel incat sa se intinda. Gata 🙂

Mai jos video:

https://www.youtube.com/watch?v=6Ln4ndIPyp8

Sursa video: YouTube.com


50 Life Hacks That Will Make Your Life Easier

Life hacks improve our efficiency and help us get things done. Life hacks also help us tackle the everyday problems that we face. Today, we have compiled some amazing life hacks that will make your life easier. We hope that these hacks, tips and tricks will optimize things in your life. Let us know your personal life hack in the comments below.

clever life hacks 1


clever life hacks 2


clever life hacks 3


clever life hacks 4


clever life hacks 5


clever life hacks 6


clever life hacks 7


clever life hacks 8


clever life hacks 9


clever life hacks 10


clever life hacks 21

clever life hacks


ideas to make life easy 1


ideas to make life easy 2


ideas to make life easy 3


ideas to make life easy 4


ideas to make life easy 5


ideas to make life easy 7


ideas to make life easy 8


ideas to make life easy 9


ideas to make life easy 10


ideas to make life easy 11


ideas to make life easy


Life Hacks 1


Life Hacks 2


Life Hacks 3


Life Hacks 4

Life Hacks 6


Life Hacks 7


Life Hacks 8


Life Hacks 9


Life Hacks 10


Life Hacks


life-hacks-to-simplify-your-life-4


life-hacks-to-simplify-your-life-9


life-hacks-to-simplify-your-life-10


life-hacks-to-simplify-your-life-11


life-hacks-to-simplify-your-life-12


life-hacks-to-simplify-your-life-14


life-hacks-to-simplify-your-life-15


life-hacks-to-simplify-your-life-16


life-hacks-to-simplify-your-life-17


life-hacks-to-simplify-your-life-19


life-hacks-to-simplify-your-life-20


life-hacks-to-simplify-your-life-21


when you do not have visa card

Sursa: wonderfulengineering.com


100 Clever Life Improving Ideas That You Can Use in Everyday Life

There is always an easy way to do a task. All you need are the right tips for every task. These 100 life improving ideas are meant to help you in carrying out everyday chores. Check out these tips and tell us your favourite tip in the comments section below.

Related: 50 Lifehacks That Will Make Your Life Easier

awesome life hacks


clever life hacks


improve my life 2


improve my life


ketchup-holder-cup-unroll-unfold-the-rim


life hacks 0


life hacks 1


life hacks 2


life hacks 3


life hacks 4


life hacks 5


life hacks 6


life hacks 8


life hacks 9


life hacks 10


life hacks 11


life hacks 12


life hacks


life improving ideas 0


life improving ideas 01


life improving ideas 1


life improving ideas 2


life improving ideas 3


life improving ideas 4


life improving ideas 5


life improving ideas 8


life improving ideas 9


life improving ideas 10


life improving ideas 012


life improving ideas 13


life improving ideas 23


life improving ideas 31


life improving ideas 91


life improving ideas s


life improving ideas


life improving ideas1


life improving ideas12


life-hacks-how-to-make-your-life-easier


life-hacks-how-to-make-your-life-easier-2


life-hacks-how-to-make-your-life-easier-3


life-hacks-how-to-make-your-life-easier-6


life-hacks-how-to-make-your-life-easier-7


life-hacks-how-to-make-your-life-easier-9


life-hacks-how-to-make-your-life-easier-11


life-hacks-how-to-make-your-life-easier-12


life-hacks-how-to-make-your-life-easier-14


life-hacks-how-to-make-your-life-easier-15


life-hacks-how-to-make-your-life-easier-16


life-hacks-how-to-make-your-life-easier-17


life-hacks-how-to-make-your-life-easier-18


life-hacks-how-to-make-your-life-easier-21


life-hacks-how-to-make-your-life-easier-23


life-hacks-how-to-make-your-life-easier-25


life-hacks-how-to-make-your-life-easier-27


life-hacks-how-to-make-your-life-easier-30


life-hacks-how-to-make-your-life-easier-34


life-hacks-how-to-make-your-life-easier-35


life-hacks-how-to-make-your-life-easier-38


life-hacks-how-to-make-your-life-easier-43


life-hacks-how-to-make-your-life-easier-46


Ten great housekeeping hacks for naturally cleaning your home

It’s true that a lot of cleaning products, detergents and other household supplies do more harm than good. It’s impossible to completely withdraw from using household chemicals, but you can try to reduce your use of them.

The Bright Side team has selected some awesome tips that will help you clean your house using products easily found in any kitchen.

Bathroom tiles

You will need:

  • 1/4 glass of hydrogen peroxide
  • 1 tablespoon of liquid soap
  • 1/2 glass of water

How to use it:

Mix all ingredients.

To clean superficial dirt, put the liquid on a sponge and give the tiles a wipe. Then wash the surface with water.

If the tiles are really filthy, put some liquid on them and on grout as well. Leave it for 10 minutes. During this time, dirt will dissolve and it would be easier to clean it off. Repeat the process one more time and wash the surface with water.

If you want your bathroom to stay clean for a long time, use the following technique: mix water and vinegar in the ration of 1 to 1 and spray tiles and grout with this liquid twice a week.

A gas stove

You will need:

  • Q-tips
  • Old tooth brush
  • Ammonia-anisic drops

How to use it:

Dip a Q-tip into ammonia-anisic drops and rub greasy spots. To clean ingrained grease, use a tooth brush and a regular sponge. Always put on gloves to protect your hands and skin.

Kitchen exhaust hood filters

You will need:

  • 1/2 cup regular baking soda
  • 1/2 glass ammonia

How to use it:

Boil water in a big pot.

Slowly pour out soda into water using a teaspoon.

Put filters into boiling water. Grease and dirt will immediately start dissolving. Remove the pot from fire in a couple of minutes. If filters are extremely dirty, repeat the process with a fresh supply of water.

If grease didn’t clean off completely, put the filters in hot water with ammonia (1/2 glass of ammonia for 118 fl oz (3.5 l) of water). It’s necessary to open windows and put on a filter mask to protect yourself from the strong smell of ammonia.

A mattress

You will need:

  • 8 fl oz (235 ml) 3% hydrogen peroxide
  • 3 tablespoons baking soda
  • A drop of liquid soap

How to use it:

Make the mixture right before you are going to clean a mattress as it’s more effective this way.

Mix baking soda and peroxide in a spray bottle. When baking soda dissolves, drip liquid soap in there. Shake the bottle and spray а dirty spot.

Leave it for 5-10 minutes. If you want it to dry faster, turn on a fan and point it to the spot.

Clean off the remnants of baking soda with a vacuum cleaner.

The oven

You will need:

  • Ammonia

How to use it:

Put some ammonia into a small bowl and leave it in a turned off oven for a night. Give your kitchen a good airing in the morning and wash the oven; grease will peel off easily. There should be no odor left. The only downside to this method is the smell, so please don’t forget to work with gloves and with the windows open.

The kettle

You will need:

  • Vinegar

How to use it:

To get rid of kettle furring, fill the kettle up to half or three quarters level with equal parts of water and vinegar. Cork the kettle nose (for example, you can make a «cork» out of paper) and boil water for as long as you need for furring to come off. Then wash the kettle well.

Dishes

You will need:

  • Dry mustard
  • Baking soda

How to use it:

The best possible safe dish-washing mixture is baking soda and dry mustard in the ration of 1 to 3. Mix both powders and put them into a bottle with holes in the lid. It’s easy to use.

The toilet

You will need:

  • Vinegar

How to use it:

To clean your toilet use pure vinegar. It’s also a great disinfectant!

A microfiber sofa cover

You will need:

  • A sponge
  • A bottle of isopropyl alcohol
  • A brush
  • Baking soda

How to use it:

Put some isopropyl alcohol on a sponge and rub dirty places. Use a brush to take care of microfibers. To eliminate funky odor, put some baking soda on as well.

The refrigerator

You will need:

  • Baking soda

How to use it:

Dissolve 2 tablespoons of baking soda in 34 fl oz (1 l) of water and scrub the inside of the refrigerator with it. Then wipe it with a soft cloth.

To eliminate unpleasant smells, you don’t have to buy special absorbents. You can just place some products that can be easily found in any kitchen in your fridge, and they’ll do an outstanding job. Here is a list of these products:

  • Pieces of dark bread
  • Glasses of baking soda
  • Slices of lemon
  • Аbsorbent coal

Sursa: brightside.me


40 Vintage Life Hacks from 100 Years Ago

Back in the 1900s, cigarette manufactures used to insert stiffening cards into their paper cigarette packs to add strength and help them last longer. Along the way, someone had the bright idea of printing trivia, artwork and even famous people and athletes (Honus Wagner anyone?) onto the stiffening cards.

In the early 20th Century, Gallaher’s Cigarettes printed a special series of 100 “How to do it” cards that included some truly useful and helpful tips for everyday situations and problems. The entire 100 card collection is part of the New York Public Library’s George Arents Collection and was recently digitized.

Below you will find 40 of the Sifter’s personal favorites. Visit the NYPL Digital Collections to see them all.


1. How to Extract a Splinter

vintage life hacks from the 1900s (29)

vintage life hacks from the 1900s (30)

George Arents Collection, The New York Public Library


2. How to Light a Match in the Wind

vintage life hacks from the 1900s (67)

vintage life hacks from the 1900s (68)

George Arents Collection, The New York Public Library


3. How to Tell the Points of the Compass with a Watch

vintage life hacks from the 1900s (71)

vintage life hacks from the 1900s (72)

George Arents Collection, The New York Public Library


4. How To Treat Sprains

vintage life hacks from the 1900s (11)

vintage life hacks from the 1900s (12)

George Arents Collection, The New York Public Library


5. How To Make a Fire Extinguisher

vintage life hacks from the 1900s (15)

vintage life hacks from the 1900s (16)

George Arents Collection, The New York Public Library


6. How To Carry a Heavy Jug

vintage life hacks from the 1900s (35)

vintage life hacks from the 1900s (36)

George Arents Collection, The New York Public Library


7. A Hint When Boiling Potatoes

vintage life hacks from the 1900s (13)

vintage life hacks from the 1900s (14)

George Arents Collection, The New York Public Library


8. How To Kill a Tree Stump

vintage life hacks from the 1900s (5)

vintage life hacks from the 1900s (6)

George Arents Collection, The New York Public Library


9. How To Make Corks Fit

vintage life hacks from the 1900s (9)

vintage life hacks from the 1900s (10)

George Arents Collection, The New York Public Library


10. How To Pull Out Long Nails

vintage life hacks from the 1900s (1)

vintage life hacks from the 1900s (2)

George Arents Collection, The New York Public Library


11. How To Measure With Coins

vintage life hacks from the 1900s (39)

vintage life hacks from the 1900s (40)

George Arents Collection, The New York Public Library


12. How To Detect Escaping Gas

vintage life hacks from the 1900s (45)

vintage life hacks from the 1900s (46)

George Arents Collection, The New York Public Library


13. How To Cool Wine with Ice

vintage life hacks from the 1900s (25)

vintage life hacks from the 1900s (26)

George Arents Collection, The New York Public Library


14. When Boiling Cracked Eggs

vintage life hacks from the 1900s (63)

vintage life hacks from the 1900s (64)

George Arents Collection, The New York Public Library


15. How To Preserve Valuable Vases

vintage life hacks from the 1900s (53)

vintage life hacks from the 1900s (54)

George Arents Collection, The New York Public Library


16. How To Remove Sea Stains from Brown Shoes

vintage life hacks from the 1900s (61)

vintage life hacks from the 1900s (62)

George Arents Collection, The New York Public Library


17. How To Make a Simple Gate Latch

vintage life hacks from the 1900s (7)

vintage life hacks from the 1900s (8)

George Arents Collection, The New York Public Library


18. How To Clean an Oil Painting

vintage life hacks from the 1900s (27)

vintage life hacks from the 1900s (28)

George Arents Collection, The New York Public Library


19. How To Test Butter

vintage life hacks from the 1900s (23)

vintage life hacks from the 1900s (24)

George Arents Collection, The New York Public Library


20. How To Draw a Circle Without a Compass

vintage life hacks from the 1900s (47)

vintage life hacks from the 1900s (48)

George Arents Collection, The New York Public Library


21. How To Clean Real Lace

vintage life hacks from the 1900s (17)

vintage life hacks from the 1900s (18)

George Arents Collection, The New York Public Library


22. How To Revive Cut Flowers

vintage life hacks from the 1900s (73)

vintage life hacks from the 1900s (74)

George Arents Collection, The New York Public Library


23. How To Judge the Freshness of a Lobster

vintage life hacks from the 1900s (75)

vintage life hacks from the 1900s (76)

George Arents Collection, The New York Public Library


24. How To Make a Water Fountain for Chicks

vintage life hacks from the 1900s (19)

vintage life hacks from the 1900s (20)

George Arents Collection, The New York Public Library


25. How To Treat Squeaky Boots

vintage life hacks from the 1900s (31)

vintage life hacks from the 1900s (32)

George Arents Collection, The New York Public Library


26. How To Adjust a Door

vintage life hacks from the 1900s (21)

vintage life hacks from the 1900s (22)

George Arents Collection, The New York Public Library


27. How To Cut New Bread Into Thin Slices

vintage life hacks from the 1900s (43)

vintage life hacks from the 1900s (44)

George Arents Collection, The New York Public Library


28. How To Remove a Stuck Glass Stopper

vintage life hacks from the 1900s (55)

vintage life hacks from the 1900s (56)

George Arents Collection, The New York Public Library


29. How To Detect Dampness in Beds

vintage life hacks from the 1900s (3)

vintage life hacks from the 1900s (4)

George Arents Collection, The New York Public Library


30. How To Draw an Ellipse with String

vintage life hacks from the 1900s (51)

vintage life hacks from the 1900s (52)

George Arents Collection, The New York Public Library


31. How To Pick Up Broken Glass

vintage life hacks from the 1900s (59)

vintage life hacks from the 1900s (60)

George Arents Collection, The New York Public Library


32. How To Stop a Runaway Horse

vintage life hacks from the 1900s (79)

vintage life hacks from the 1900s (80)

George Arents Collection, The New York Public Library


33. How To Clean New Boots

vintage life hacks from the 1900s (41)

vintage life hacks from the 1900s (42)

George Arents Collection, The New York Public Library


34. How To Remove a Tight Ring from the Finger

vintage life hacks from the 1900s (33)

vintage life hacks from the 1900s (34)

George Arents Collection, The New York Public Library


35. How To Keep a Paint Brush Handle Clean

vintage life hacks from the 1900s (49)

vintage life hacks from the 1900s (50)

George Arents Collection, The New York Public Library


36. How To Take Ink Stains Out a Handkerchief

vintage life hacks from the 1900s (57)

vintage life hacks from the 1900s (58)

George Arents Collection, The New York Public Library


37. How To Fit a Large Candle

vintage life hacks from the 1900s (69)

vintage life hacks from the 1900s (70)

George Arents Collection, The New York Public Library


38. How To Clean Bottles

vintage life hacks from the 1900s (37)

vintage life hacks from the 1900s (38)

George Arents Collection, The New York Public Library


39. Three Useful Knots

vintage life hacks from the 1900s (77)

vintage life hacks from the 1900s (78)

George Arents Collection, The New York Public Library


40. How To Separate Glass Tumblers

vintage life hacks from the 1900s (65)

vintage life hacks from the 1900s (66)

George Arents Collection, The New York Public Library
Sursa: twistedsifter.com


„Centrala verde” cu compost – cea mai ieftina sursa naturala de caldura si energie

Centrala verde cu compost inventata de francezul Jean Pain in anii ’70 este o sursa naturala independenta de energie termica si gaz natural, pe care si-o poate construi oricine, cu o minima investitie. Ingeniosul sistem este construit ca un generator pe baza fermentarii naturale a compostului si poate furniza unei ferme cu suprafata de 1500 mp intreaga caldura, gazul metan si electricitatea necesare pentru iarna pe o perioada de 12-16 luni.

O metoda vizionara

Compostul este un amestec de lemn verde tocat cu frunze cu tot pana la dimensiunea  aschiilor si inmuiat bine cu apa, care care are proprietatea de a genera caldura; pe baza acestei proprietati Jean Pain a construit, dupa multe incercari de variante, o movila din resturi de lemn tocat intr-o forma circulara, asemanatoare unei pile electrice, cu diametrul de 5 metri si inaltimea de 2,5 metri. Unele surse dau dimensiuni mult mai mari, de 10 x 6 metri. In orice caz, importante sunt forma cilindrica si un raport de ½ intre inaltime si diametru.

jp_digester          092423382265_jean_pain

Materialul folosit la compost este nepretentios, crengi de copaci si de tufisuri, adica exact ceea ce ramane de la curatarea padurilor si a perdelelor forestiere pentru intinerire! Conditia de baza este ca lemnul sa fie verde, nu uscat. Se pot folosi esente de foioase pentru ca genereaza o mai buna fermentare decat rasinoasele.

Construirea

Resturile de lemn si frunzele se toaca pana la dimensiunea unor aschii cu o grosime de pana la 5 mm. Atentie, o dimensiune mai mica a aschiilor produce intotdeauna o tasare mai puternica a stratului de compost, eliminarea unei mari parti de aer si, in consecinta, reducerea posibilitatii de fermentare!

Baza gramezii de compost trebuie sa fie plana si acoperita de o folie din plastic care se foloseste la amenajarea iazurilor, pentru a nu permite apei sa se scurga in sol. Materialele folosite la constructie sunt: circa 100 de metri de teava maleabila din plastic pentru conducerea apei in interiorul movilei, o pompa pentru circulatia apei, un rezervor metalic solid de 4 mc pentru biogaz cu conducta de metal pentru colectarea gazului si o plasa de sustinere a compostului (care poate fi un gard de otel obisnuit).

compostheatrecovery1

Constructia se poate ridica in circa sase ore de munca sustinuta, daca se utilizeaza mijloace mecanizate.

Peste folia asezata pe pamant se monteaza circular gardul de sustinere si apoi se trece la umplerea spatiului cu lemnul tocat, concomitent cu asezarea in spirala, de jos in sus,  in jurul rezervorului de biogaz, a conductei pentru apa calda. In centrul constructiei se aseaza rezervorul pentru biogaz, care trebuie sa fie situat cu capatul de sus la limita superioara a movilei si cu cel de jos la cel putin un metru deasupra bazei movilei, pentru a i se asigura incalzirea constanta. Pe timpul construirii si in urmatoarele patru zile se uda din belsug fiecare strat de lemn adaugat si tasat, astfel incat sa aiba o umiditate de cel putin 70%. Cea mai frecventa greseala care duce la esec este tocmai umiditatea prea mica a amestecului de lemn, care intarzie producerea compostului.

Compostul pentru rezervorul de biogaz trebuie prelucrat si inmuiat in apa cu cel putin doua luni inainte de construirea „centralei”. Rezervorul tebuie sa aiba un volum de aproximativ 4 mc din care trebuie asigurat un spatiu liber pentru acumularea gazului.

Odata terminata constructia, conducta de apa si teava de biogaz se racordeaza la instalatiile de incalzire si la terminalul de gaz dorit. Biogazul se poate utiliza, dupa o filtrare prealabila de impuritati, la bucatarie ori la alimentarea autovehiculelor cu motoare adaptate, prin stocare in butelii speciale. Noi recomandam consultarea si acreditarea acestei activitati de catre institutiile specializate.

Este bine ca intreaga constructie sa se acopere cu un strat din baloti de paie peste care se poate aseza, bine legata, o folie de plastic cu gauri de aerisire pe latura verticala, pentru a o feri de intemperiile sezonului rece – vant puternic, ploi, zapada, ger.

f9kc0kyhuht1tmn_large

De retinut!

– Trebuie avut in vedere faptul ca procesul de fermentatie are nevoie de o perioada cuprinsa intre 70 si 90 de zile, asa ca trebuie sa terminati lucrarea cu cel putin trei luni inainte de inceperea iernii!

-Unii specialisti recomanda adaugarea gunoiului de grajd, care accelereaza fermentatia si mareste concentratia biogazului.

-Ati remarcat, desigur, constructia „centralei” bio sub forma unei pile electrice; butelia de biogaz in centru, inconjurata de o manta de compost care ii asigura caldura necesara formarii biogazului. Ei bine, aceasta caldura se poate recupera prin apa circulata in interiorul movilei, care ajunge la o temperatura de 60-65 de grade Celsius si cu un debit de 4 litri/minut, suficienta pentru nevoile casnice ale unei gospodarii precum incalzirea pe timp de iarna a unei suprafete de 1500 mp si utilizarea la bucatarie si la baie.

-Cantitatea de biogaz produsa in rezervor poate ajunge la 300-400 mc pe toata durata de functionare.

-La sfarsitul duratei de viata a instalatiei, compostul se poate utiliza ca cel mai bun ingrasamant natural pentru gradina. De aceea, aceasta instalatie este recomandata fermelor si mai ales agricultorilor care isi strang toamna gunoiul de grajd in gradini pentru a fermenta fara folos pana in primavara; folosind aceasta inovatie ei pot exploata la maximum posibilitatile pe care le ofera aceasta resursa naturala gratuita in loc sa o lase sa-si piarda degeaba una dintre cele mai importante calitati pe care o ofera natura – aceea de a produce caldura!

img_1331-640x480

Sursa: 100construct.ro


Kitchen Hacks You Should Know!

1.Perfect hard boiled eggs every time:
Place eggs in pot of cold water and bring the water to a boil. Immediately turn off the heat. Let the eggs sit in the water for the allotted time then move them to a bowl with cold water for 2 minutes.

14100460_699562330201224_4688378214741135776_n

2. How to get more juice from citrus fruit?
Steps:
1. Place the citrus fruits in the microwave.
2. Heat on high for 20-30 seconds.
3. Remove from the microwave.
4. Leave to sit for about half a minute.
5. Cut the citrus fruit in half and squeeze. The juice will flow easily.

14045867_699562326867891_1520558981971842017_n

3. The Finger Test to Check the Doneness of Meat.

14034816_699562333534557_4360090794925046891_n

4. A perfect slice:
Before you end up with a plate full of big cake crumbs, run a knife under hot water before cutting into the cake.

14117892_699562370201220_5303242277083097155_n

5. Give bananas a longer life.
Keep bananas fresher, longer by wrapping the end of the bunch with plastic wrap. Better yet, separate each banana.
The plastic wrap blocks ethylene gases from releasing out of the stem, consequently ripening the fruit too fast

14068296_699562373534553_5741582664962007399_n

6. Use baking soda for easy-to-peel hard-boiled eggs.

14054252_699562363534554_7814343545031696152_n

7. How to prevent dough stick on hand without flour your hands?

14022262_699562400201217_5683816906074986228_n

8. Feel hungry during bedtime? 10 healthy bedtime snacks for you.

14141539_699562406867883_1231996920039082897_n-1

9. How to Clean and Season a Cast Iron Pan?

Materials:
Cast iron pan
1 raw potato, sliced in half
2 tbsp salt
1-2 tbsp cooking oil with a high smoke point (flax, grapeseed and peanut oils work well)
paper towels
Wooden or metal flat-edged spatula

Methods:
1. Sprinkle the salt into the pan.
2. Using the flat side of the potato, scrub the salt into the surface of the pan.
3. Use a slightly damp paper towel to wipe the salt from the pan.
4. Once the salt has been removed and the pan is dry, pour in the oil.
5. The surface should be lightly coated in oil, with no excess oil pooling anywhere.
6. Wipe out all of the excess oil before placing in the oven.
7. Preheat oven to 400 degrees F.
8. Place it in the oven at 400 degrees F for one hour.
9. Allow the pan to cool and wipe out any excess oil that may be left behind.

Ps: Re-season the pan once every 15-20 uses, or whenever you start to notice foods sticking more and/or the seasoning wearing away.

14102749_699562413534549_101192071444183141_n

10.The Correct Way to Cut a Mango

14045807_699562436867880_3674962965112641168_n


11.Heating your pizza with a cup of water prevents the crust from getting chewy. However, you can also apply this hack to any leftovers to prevent food from drying out.

14141561_699562456867878_5252894293664975126_n

12. Add marshmallows to your brown sugar to keep it soft:

The molasses in brown sugar can evaporate over time, but a couple of marshmallows will keep it moist.

14040100_699562466867877_5598284691908225133_n

13. Best Way To Shuck Corn On The Cob.

14039904_699562470201210_7535879844972328590_n

14. How to determine if an egg is fresh?

14102135_699562506867873_835759038135181579_n

15. How to clean a blender fast?

Step 1: Add soap into blender.
Step 2: Add water
Step 3: Turn on the blender and whirl the mixture
Step 4: Rinse the blender with running water.
Step 5: DONE!

14055085_699562600201197_1632540672186138733_n

16. How to cut watermelon for little fingers?

Step 1:Cut the watermelon in half.

Step 2:Take one half and place it cut side down. Cut it into sections approximately 1 to 1.5 inches thick.

Step 3:Rotate the melon 90° and repeat, creating 1 inch squares in the skin.

Step 4:Toss the end pieces that are mostly or all skin and rind. Then pick up the pieces and eat.

Step 5:Enjoy!

14095877_699562610201196_7138493899671719048_n

17. How to cook vegetables correctly.

14063710_699562726867851_5792492526387066602_n

18. Another trick to impress anyone.

14088446_699562736867850_6676498940246632054_n

19.Don’t Have Any Eggs?
Replace It With These In Baking Cakes!

14021530_699562743534516_3254268677007450570_n

20. How to Keep Water From Boiling Over?

When you put a pot of water on, put a wooden spoon over the top of the pot. If it starts to boil up too high, the spoon will pop the bubbles and keep it from boiling over as quickly, meaning you have more time to get back and turn the heat down.

You could use something metal, but you’d have to remove it with an oven mitt because it will become very hot (unlike wood, which won’t transfer as much heat).

14040014_699562763534514_2127423057753034129_n
21.Recycled Bottle Caps to Seal Plastic Bags
14046072_699562866867837_3671933791140072345_n
22. How to heat 2 bowls in 1 microwave?
 14045944_699562876867836_7605260953495556174_n
23. How to cut many cherry tomatoes in seconds?

1. Place all cherry tomatoes on a plate.
2. Place another plate on top of the cherry tomatoes.
3. Slice it with sharp knife at the gap between 2 plates.
4. DONE!

 14063851_699562903534500_7923954887993200526_n
24. How to measure ingredients with your hand?
14102614_699562910201166_276589044316336207_n
25. Reuse the hanger, pant clips become chip clips.
14089142_699562930201164_4670270862950169414_n
26. How to peel lemons in style.
14063842_699563110201146_4448610275919651659_n
27. Table manners you should know.
14067672_699563113534479_8310180732913965100_n
28. How to set a table?
14088456_699563143534476_6994027489124116293_n
29. Use a clothes pin to make chopsticks foolproof.
14117727_699563163534474_6054040874744484939_n
30. How to cook pasta quickly?
14054928_699563166867807_4596247521339585833_n
31. How to Tweak Chocolate Chip Cookies to Your Favourite
14051719_699563183534472_7281080036001442395_n
32. This tip will help you pick the correct Avocado!
14088549_699563206867803_5323568291103921176_n
33. To refrigerate or not.
14051667_699563203534470_8744189095762688135_n
34. You can use it as your checklist of drinks you have yet to try.
14067723_699563220201135_8612332716397475366_n-1
35. How to test the freshness of the eggs.
14022250_699563253534465_5842225046398019805_n
36. 
14141714_699563263534464_6644742370269894685_n
37. 
14051794_699563296867794_8659723703540197480_n
38. 
14034879_699563293534461_3205449867699909410_n
39. 
14064182_699563310201126_8986010360508355969_n
40. 
14067723_699563363534454_4472812693987048499_n
41. 
14095946_699563360201121_8122062004632913509_n
42.
14117761_699563396867784_3794672502195741037_n
43. 
14067445_699563410201116_7964738954837098483_n
44. 
14079866_699563413534449_8654288859107344276_n
45.
14079622_699563430201114_29311402561759125_n
46.
14045772_699563460201111_4079747714965989820_n
47.
14102146_699563463534444_5965856590520539893_n
48. 
14088514_699563493534441_7522210070611102303_n
49.
14045944_699563503534440_3673925558924800458_n
50.
14089061_699563510201106_5992142230841972690_n
51.
14100488_699563530201104_1941685191919761679_n
Sursa: facebook.com